Panasonic SADP1 SADP1 User Guide - Page 33
USING OTHER EQUIPMENT, Press [TUNER/AUX] to select AUX., Start play.
 |
View all Panasonic SADP1 manuals
Add to My Manuals
Save this manual to your list of manuals |
Page 33 highlights
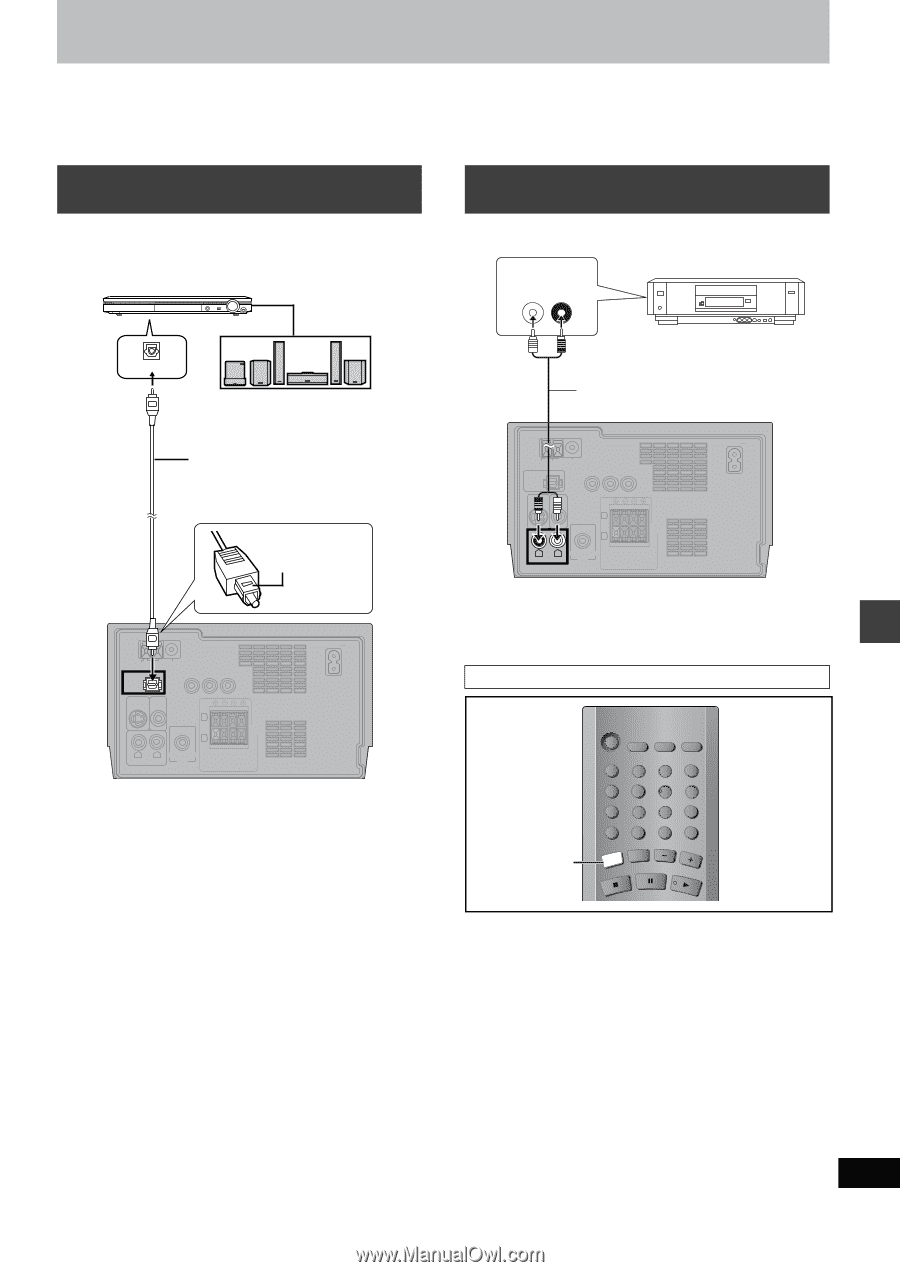
Using other equipment Before connection ≥Disconnect the AC power supply cord. ≥Turn off all equipment and read the appropriate operating instructions. ≥The equipment connections described are examples. ≥Peripheral equipment and optional cables sold separately unless otherwise indicated. Home Theater-Enjoying more powerful sound Listening to an external source through this unit's speaker Enjoy the powerful movie theater and hall-like sound available with multiple channel audio found on DVDs by connecting an amplifier and speakers. Amplifier VOLUME You can playback the sound from a video cassette recorder, tape deck, laser disc player, etc., through this unit's speaker. AUDIO OUT LR Video cassette recorder (DVD) IN Speakers (example) Connect three or more speakers for surround sound. Optical digital audio cable Do not bend sharply when connecting. Insert fully, with this side facing up. AM ANT FM ANT EXT LOOP OPTICAL OUT 75≠ COMPONENT VIDEO OUT PR PB Y S-VIDEO VIDEO OUT OUT L R R L AUX SUBWOOFER OUT HIGH(6≠) LOW(6≠) SPEAKERS (SB-DP1) AC IN To enjoy multi-channel surround sound Connect an amplifier with a built-in decoder or a decoder-amplifier combination. Change the settings in "Digital output" (➡ page 31). ≥You can only use DTS Digital Surround decoders that are compatible with DVD. Recording Output ≥With DVD, the following conditions must be met: a the disc doesn't have protection preventing digital recording, and b the recording equipment can handle signals with a sampling frequency of 48 kHz. ≥You cannot record WMA/MP3. When recording DVDs, make the following settings. -Advanced surround: OFF (➡ page 19) -PCM Digital Output: Up to 48 kHz (➡ page 31) -Dolby Digital/DTS Digital Surround: PCM (➡ page 31) Audio cable AM ANT FM ANT EXT LOOP OPTICAL OUT 75≠ COMPONENT VIDEO OUT PR PB Y S-VIDEO VIDEO OUT OUT L R R L AUX SUBWOOFER OUT HIGH(6≠) LOW(6≠) SPEAKERS (SB-DP1) AC IN When connecting a record player We recommend using a record player with a built-in phono equalizer. If your player doesn't have a built-in equalizer, connect it first to a separate equalizer and then connect that to this unit. To playback TVÍ Í TV/VIDEO CLOCK/ SLEEP SETUP TIMER FPLAY TUNER/AUX PROGRAM 1 PLAY MODE 4 REPEAT 7 AUDIO SUBTITLE TUNER/AUX MUTING 23 56 89 0 S10 VOLUME CANCEL P.MEMORY DVD/CD RECT NAVIGATOUR TV VOLr PLAY LIST 1 Press [TUNER/AUX] to select "AUX". Each time you press the button: FM )AM )AUX ^_____b 2 Start play. Other functions RQT6815 33
-
 1
1 -
2
-
3
-
4
-
5
-
6
-
7
-
8
-
9
-
10
-
11
-
12
-
13
-
14
-
15
-
16
-
17
-
18
-
19
-
20
-
21
-
22
-
23
-
24
-
25
-
26
-
27
-
 28
28 -
 29
29 -
 30
30 -
 31
31 -
 32
32 -
 33
33 -
 34
34 -
 35
35 -
 36
36 -
 37
37 -
 38
38 -
39
-
40
 |
 |