Panasonic SCHTB550 SCHTB550 User Guide - Page 10
Step 2 Assembling the speakers
 |
View all Panasonic SCHTB550 manuals
Add to My Manuals
Save this manual to your list of manuals |
Page 10 highlights
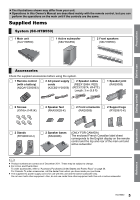
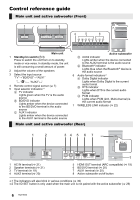
Step 2 Assembling the speakers When attaching the speakers to a wall Place the speakers horizontally ∏ 2 Speakers ∏ 4 Screws ∏ 2 Speaker cables (L): WHITE (R): RED ∏ 1 Speaker joint ≥For a safety measure to prevent the speakers from falling, refer to page 17. ≥To prevent damage or scratches, lay down a soft cloth and perform the assembly on it. Assemble the speakers. ≥ The two speakers are interchangeable. 1 3 4 2 A " " shaped slit ≥ Insert the speaker joint fully into the slit. B Screw (supplied) ≥ Be sure to insert the screws following the order as indicated in the illustration. ≥ Keep the screws out of reach of children to prevent swallowing. 10 RQT9660
-
 1
1 -
2
-
3
-
4
-
 5
5 -
 6
6 -
 7
7 -
 8
8 -
 9
9 -
 10
10 -
 11
11 -
 12
12 -
 13
13 -
 14
14 -
 15
15 -
16
-
17
-
18
-
19
-
20
-
21
-
22
-
23
-
24
-
25
-
26
-
27
-
28
-
29
-
30
-
31
-
32
-
33
-
34
-
35
-
36
 |
 |

10
RQT9660
Step 2 Assembling the speakers
≥
For a safety measure to prevent the speakers from falling, refer to page 17.
≥
To prevent damage or scratches, lay down a soft cloth and perform the assembly on it.
Assemble the speakers.
≥
The two speakers are interchangeable.
When attaching the speakers to a wall
Place the speakers horizontally
∏
2 Speakers
∏
2 Speaker cables
(L): WHITE
(R): RED
∏
1 Speaker joint
∏
4 Screws
A
“
”
shaped slit
≥
Insert the speaker joint fully into the slit.
B
Screw (supplied)
≥
Be sure to insert the screws following the order as indicated in the illustration.
≥
Keep the screws out of reach of children to prevent swallowing.
2
4
1
3