Pfaff coverstyle 4850 Owner's Manual
Pfaff coverstyle 4850 Manual
 |
View all Pfaff coverstyle 4850 manuals
Add to My Manuals
Save this manual to your list of manuals |
Pfaff coverstyle 4850 manual content summary:
- Pfaff coverstyle 4850 | Owner's Manual - Page 1
Owner´s manual - Pfaff coverstyle 4850 | Owner's Manual - Page 2
3 2 1 17 16 15 14 13 12 11 10 9 45 6 7 8 - Pfaff coverstyle 4850 | Owner's Manual - Page 3
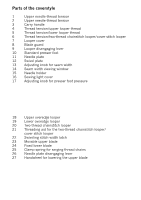
Parts of the coverstyle 1 Upper needle-thread tension 2 Upper needle-thread tension 3 Carry handle 4 Thread tension/upper looper thread 5 Thread tension/lower looper thread 6 Thread tension/two-thread chainstitch looper/cover stitch looper 7 Looper cover 8 Blade guard 9 Looper - Pfaff coverstyle 4850 | Owner's Manual - Page 4
bottom of the box inwards. The following accessories can be found in the box: 1 Overlock needle system EL X 705, cat. no. 2002 2 Thread unreeling discs (5) 3 Transparent presser foot (F) for cover stitch and two-thread chainstitch 4 Clip-on thread guide 5 Cleaning brush 6 Screw driver 7 Machine oil - Pfaff coverstyle 4850 | Owner's Manual - Page 5
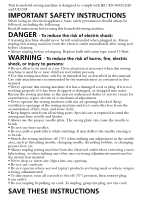
• Do not use bent needles. • Do not pull or push fabric while stitching. It may deflect the needle causing it to break. • Switch the sewing machine covers, lubricating, or when making any other user servicing adjustments mentioned in the instruction manual. • Never drop or insert any object into any - Pfaff coverstyle 4850 | Owner's Manual - Page 6
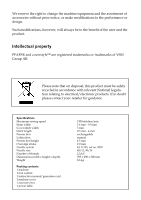
threads Dimensions (width x height x depth) Weight Packing contents 1 machine 1 foot control 1 instruction manual/guarantee card 1 machine cover 1 accessory box 1 power table 1300 stitches/min. 1.4 mm - 9.0 mm 5 mm 0.5 mm - 4 mm exchangeable manual 4.5 mm 2.0 mm EL X 705, cat no. 2002 80/12, 90/14 - Pfaff coverstyle 4850 | Owner's Manual - Page 7
in its stride and will sew through thick and thin. To learn about your new coverstyle follow the instruction in this manual. Some pictures of the machine may be slightly different from your coverstyle. Your PFAFF® coverstyle features the very latest in design and technology, and it is just as simple - Pfaff coverstyle 4850 | Owner's Manual - Page 8
Converter, attaching ...32 Cover stitch, important notes on sewing 44, 45 Differential feed...36, 37 Edge guide ...45 Electrical connection ...7 ...11 Program overview ...40 - 43 Rubber feet, cleaning ...58 Safety instructions...1, 2 Seam width adjusting knob ...33 Seam width viewing window ...33 - Pfaff coverstyle 4850 | Owner's Manual - Page 9
Contents Page Sewing problems and their solutions ...61 Spool disc ...10 Spool holder ...9 Stitch formation correction measures 46 - 56 Stitch length adjustment knob ...38 Stitch length, adjusting ...38 Stitch width latch, swivelling ...31 Telescoping thread guide ...9 Thread chain cutter ...29 - Pfaff coverstyle 4850 | Owner's Manual - Page 10
Machine cover The machine cover protects the machine from dust and dirt. When the sewing process is finished, push the telescopic thread guide 32 together. The spool stand 34 must be pushed to its full extent in to the machine, regardless of whether a spool is attached. Place the - Pfaff coverstyle 4850 | Owner's Manual - Page 11
Connecting the foot control Connect the plug of the foot control to the connection socket 39 of the machine. The sewing speed is regulated by activating the foot control. Electrical connection Connect the foot control cord with the wall outlet. Master switch When you turn on the master switch 38 - Pfaff coverstyle 4850 | Owner's Manual - Page 12
Looper cover Push the looper cover 7 fully to the right and then swivel it down. Five types of stitches and their threading paths are portrayed in color on the inside of the looper cover. Note: The electricity supply of the machine is cut off - Pfaff coverstyle 4850 | Owner's Manual - Page 13
Pull the telescopic thread guide 32 upwards to its highest position. To ensure optimum thread feed, turn the telescopic parts slowly until you hear the locking balls flick into place. Thread unreeling disc The thread unreeling disc (in the accessory box) is used for small spools/spools with notched - Pfaff coverstyle 4850 | Owner's Manual - Page 14
vibration of the cones/spools aiding in smoother feeding of the threads. Clip on thread guide Use the clip on thread guide accessory when sewing with decorative thread. Clip this onto the telescoping thread guide 32 and thread the machine as shown in the illustration. Use the thread net and - Pfaff coverstyle 4850 | Owner's Manual - Page 15
Prog. 02), the 2 thread chainstitch (Prog. 01), the 5 thread safety stitch seam (Prog. 09) and the 4 thread safety stitch seam (Prog. 08). Transparent presser foot F from the accessories can also be used for the cover stitch (Prog. 02). For all other programs use standard presser foot 10 and setting - Pfaff coverstyle 4850 | Owner's Manual - Page 16
and R2. The fastening screw is located directly above the corresponding needle. The different needle positions are depicted in a schematic drawing in the instruction manual. Also refer to the examples above and below. Insert the needle(s) as shown on the program overview (see pages 40-43). Note: If - Pfaff coverstyle 4850 | Owner's Manual - Page 17
: Lower the presser foot and move the needle(s) to the highest position by turning the handwheel towards you. Push the needle inserting tool (from the accessory box 47) from below upward fully over the needle. Loosen the fastening screw of the needle (without removing it) with the Allen key (behind - Pfaff coverstyle 4850 | Owner's Manual - Page 18
You will find information on the thread net, thread unreeling disc, spool disc and cone thread adapter on pages 9 and 10. Thread through the thread guides 31 from the back to the front following the colored threading paths. Lift the carry handle 3 upwards. Thread through the underside of the carrying - Pfaff coverstyle 4850 | Owner's Manual - Page 19
the handwheel towards you until the upper overedge looper 18 is in its highest position. Thread in a sequence of 1 to 8. Thread through the thread guides 1 to 7, which are marked with a pink dot. Thread from the front through the eye of the upper overedge looper 8. Pull approximately 4" (10 cm) of - Pfaff coverstyle 4850 | Owner's Manual - Page 20
Threading the lower overedge looper (yellow) Turn the handwheel towards you until the lower overedge looper 19 is on the extreme right. Thread in a sequence of 1 to 10. 16 - Pfaff coverstyle 4850 | Owner's Manual - Page 21
1 to 8, marked yellow. Press lever A downwards and hook the thread into guide B. Please also refer to the drawing below. Note: The lever returns automatically to its position as soon as you start sewing. Thread from the front - Pfaff coverstyle 4850 | Owner's Manual - Page 22
Threading the two-thread chainstitch looper and cover stitch looper (violet) for the chainstitch Turn the handwheel towards you until the two-thread chainstitch looper 20 is on the extreme right. Thread in a sequence of 1 to 11. 18 - Pfaff coverstyle 4850 | Owner's Manual - Page 23
Thread the thread guides which are marked with a violet square in a sequence of 1 to 9. start sewing. Thread from the front through eye C of the two thread chainstitch looper and the cover stitch looper (= threading point 11). Pull approximately 4" (10 cm) of thread through the looper and place - Pfaff coverstyle 4850 | Owner's Manual - Page 24
Exception: Threading the two-thread chainstitch looper and cover stitch looper for the cover stitch (violet) (prog. 02) Turn the handwheel towards you until the two thread chainstitch looper 20 is on the extreme right. Thread in a sequence of 1 to 10. 20 - Pfaff coverstyle 4850 | Owner's Manual - Page 25
diagram, in a sequence of 1 to 8. Some of the threads guides are marked with a violet square. Press lever A upward and Thread from the front through eye C of the two-thread chainstitch looper and the cover stitch looper (= threading point 10). Pull approximately 4" (10 cm) of thread through the - Pfaff coverstyle 4850 | Owner's Manual - Page 26
needles Thread in a sequence of 1 to 8. The thread must be guided through the lower slot of thread guide 4. Pull approximately 4" (10 cm) of thread through the looper and place it to the left under the presser foot. Note: For the cover stitch the thread must also be guided through the lower thread - Pfaff coverstyle 4850 | Owner's Manual - Page 27
: Threading needle L2 when sewing a 5thread safety-stitch seam (Prog. 09), a 4-thread safety-stitch seam (Prog. 08) and a 2-thread chainstitch (Prog. 01) Thread in a sequence of 1 to 9. The thread must be guided through the upper slot of thread guide 5. Pull approximately 4" (10 cm) of thread - Pfaff coverstyle 4850 | Owner's Manual - Page 28
in drawing 2. Should this sequence not be followed, thread breakage or missed stitches can occur. If the looper threads break, you must pull the needle threads until the knots are about 6 inches (15 cm) past the last thread guide in front of the needles. Cut the knots off and pull the threads - Pfaff coverstyle 4850 | Owner's Manual - Page 29
highest position and lower the presser foot. Place the thread from right to left in notch A of the needle threader (to be found in the accessory box). One of the two triangles must point upwards. Place the needle threader onto the front groove of the needle. Slide the needle threader down - Pfaff coverstyle 4850 | Owner's Manual - Page 30
Overview of the threading paths and threading sequences Program 01: 2-thread chainstitch Program 02: cover stitch Program 03: 2-thread flatlock, narrow Program 11: 2-thread serging, narrow Program 12: 2-thread rolled hem Program 13: folded 2-thread rolled hem 26 Program 04 2-thread flatlock, wide - Pfaff coverstyle 4850 | Owner's Manual - Page 31
Overview of the threading paths and threading sequences Program 05: 3-thread overedge. narrow Program 14: 3-thread rolled hem Program 15: folded 3-thread rolled hem Program 16 3-thread flatlock, narrow Program 06: 3-thread overedge, wide Program 17: 3-thread serging, wide Program 18: 3-thread fl - Pfaff coverstyle 4850 | Owner's Manual - Page 32
Overview of the threading paths and threading sequences Program 09: 5-thread safety-stitch seam Program 10: 2-needle 3-thread assembly seam Presser foot pressure The pre-set presser foot pressure on the machine is suitable for medium heavy fabrics. - Pfaff coverstyle 4850 | Owner's Manual - Page 33
at the start of the fabric by pulling it into the seam. Stitch off a minimum 4" (10 cm) long thread chain and raise the presser foot. Remove the cannot be used for either the 2-thread safety-stitch seam, the 4-thread safetystitch seam, the 2-thread chainstitch or for the rolled hem. 29 - Pfaff coverstyle 4850 | Owner's Manual - Page 34
Disengaging the upper bladet Turn off the electrical power Move the movable upper blade 23 into its highest position by turning the handwheel towards you. Remove the waste container and open the looper cover and the swivel plate. Push the knob for lowering the upper blade 27 fully to the right. To - Pfaff coverstyle 4850 | Owner's Manual - Page 35
latch For standard overlock seams: The swiveling stitch width latch 22 remains in the basic position when sewing all types of standard overlock seams (exception: Program 01, 02). For rolled hems: Pull knob (A) to the right and swivel the swiveling stitch width latch 22 downwards. This setting allows - Pfaff coverstyle 4850 | Owner's Manual - Page 36
Attaching the converter Turn off the electrical power Position the upper overedge looper 18 right next to the needle by turning the handwheel towards you. Push the tip of the converter into the back side of the upper overedge looper until it clicks into place and push the converter onto the - Pfaff coverstyle 4850 | Owner's Manual - Page 37
have a seam width that is completely adjustable from 1.5 mm to 4.0 mm. The bottom row of numbers refers to the seam of the 4 or 5 thread safety stitch seam. The width settings 6.5 mm through 9 mm are measured from needle L2 to the outer fabric edge. Measurements are shown in metric and fractions. 33 - Pfaff coverstyle 4850 | Owner's Manual - Page 38
paths and threading sequences (see page 26). Open the looper cover and remove the blade guard 8 by pulling it towards you. Lower the swiveling stitch width latch (see page 31) and disengage the upper blade (see page 30). Ensure that the upper blade is disengaged by turning the handwheel towards - Pfaff coverstyle 4850 | Owner's Manual - Page 39
looper cover and remove the power table. Move the looper disengaging lever to the right, thus re-engaging the upper overedge looper. Bring the swiveling stitch width latch into the basic position (see page 31) and engage the upper blade (see page 30). Push the blade guard into the looper cover - Pfaff coverstyle 4850 | Owner's Manual - Page 40
feed dog feeds the same amount of fabric as the rear feed dog. Note: The function of the differential feed also depends on the set stitch length and the type of fabric being used. Set the regulator wheel for the differential feed 41 to 0.5. At this setting the front feed dog - Pfaff coverstyle 4850 | Owner's Manual - Page 41
contains information on the differential feed settings. However, you should always test your setting first on a piece of scrap fabric. Type of knitwear, jerseys, knitwear, ruffled sleeve and collar edges, skirt hems, dense stitch lengths. Gathering: ruffling light materials and lace, seam allowances - Pfaff coverstyle 4850 | Owner's Manual - Page 42
length between 0.5 mm to 4.0 mm by turning the stitch length adjustment knob (42). Note: For the two thread chainstitch, the setting should be plate. Inserting the needle plate Place the needle plate to the rear on the guide pin (A) and press down at the front until you hear it click into place. 38 - Pfaff coverstyle 4850 | Owner's Manual - Page 43
settings for adjusting thread tension are recommendations. Fabric type, thread quality and needle gauge will influence seam results. Always sew off a test seam onto a piece of scrap fabric and check the thread loops. Adjust the thread tension if necessary. Adjusting the tension settings is described - Pfaff coverstyle 4850 | Owner's Manual - Page 44
fabric layers where a traditional pressed open seam is required. Also works well as a basting stitch for test fitting garments. Stitch length Stitch width 3-4 3.5 Sewing hems and fancy stitches. 3-4 3.5 Program 03 2-thread flatlock, narrow Serging light fabrics. Joining stretch fabrics with - Pfaff coverstyle 4850 | Owner's Manual - Page 45
Stitch width latch 22 ■ = top ® = bottom Looper disengaging level 9 Power table 50 Converter 28 ● = with ■ = with ° = without ® = without Thread tension The value refer to medium-heavy - Pfaff coverstyle 4850 | Owner's Manual - Page 46
of 2-needle, 3-thread assambly seam light, very stretchy fabrics. Needle Stitch position length 2 Stitch width 5.5 Program 11 2-thread serging, narrow Serging light fabrics. 1.5 5.5 Program 12 2-thread rolled hem Serging very light fabrics. Decorative edges. 1-2 5.5 Program 13 Folded - Pfaff coverstyle 4850 | Owner's Manual - Page 47
Stitch width latch 22 ■ = top ® = bottom Looper disengaging level 9 Power table 50 Converter 28 ● = with ■ = with ° = without ® = without Thread tension The value refer to medium-heavy - Pfaff coverstyle 4850 | Owner's Manual - Page 48
hemmer guide H2 is available as an optional accessory. With this optional accessory you can hem your fabric effortlessly without having to press under the hem edge prior to sewing the cover stitch. Preparing your fabric to lie perfectly smooth. Test your settings first on a piece of scrap fabric. 44 - Pfaff coverstyle 4850 | Owner's Manual - Page 49
, i.e. pant or sleeve hem: Sew around tubular item, oversewing 4-5 stitches at the beginning of your seam ' After the last stitch, turn the hand wheel and knot them. Edge guide Push the edge guide (included in your accessory box) into the guide holder A from the left. The edge guide can be set as - Pfaff coverstyle 4850 | Owner's Manual - Page 50
formation correction measures cover stitch Program 02 When all tensions are correctly set, the needle threads (green and blue) are just slightly visible on the underside of the fabric. The - Pfaff coverstyle 4850 | Owner's Manual - Page 51
to the correction possibilities of these seam below and on page 51. Note: Attach the converter (see page 32), when sewing a 4-thread safety stitch seam. 2-thread chainstitch Program 01 When all tensions are correctly set, the needle thread (blue) is just slightly visible on the tunderside of the - Pfaff coverstyle 4850 | Owner's Manual - Page 52
4-thread overedge seam Program 07 When all tensions are correctly set, the loops of both looper threads (pink and yellow) are directly on the edge of the fabric. The needle threads (blue and green) are too loose, causing larger loops of needle thread on the underside of the fabric. Set the blue and - Pfaff coverstyle 4850 | Owner's Manual - Page 53
3-thread overedge seam narrow and wide Program 05 and 06 When all tensions are correctly set, the loops of both looper threads (pink and yellow) are directly on the edge of the fabric. The needle thread is too loose, causing loops on the underside of the fabric. Set the relevant needle thread - Pfaff coverstyle 4850 | Owner's Manual - Page 54
3-thread flatlock narrow and wide Program 16 and 18 The needle thread is too tight. Set the needle thread tension (blue) to a lower value. The upper looper thread (pink) appears on the underside of the fabric. Set the pink thread tension to a higher value. The lower looper thread (yellow) is too - Pfaff coverstyle 4850 | Owner's Manual - Page 55
2-thread flatlock narrow and wide Program 03 and 04 When all tensions are correctly set, the loops of both threads are directly on the underside of the fabric. Note: The converter (see page 32) must be attached to sew the 2-thread flatlock seam. The needle thread is too loose or the lower looper - Pfaff coverstyle 4850 | Owner's Manual - Page 56
3-thread rolled hem Program 14 The upper needle thread (green) is too loose. Set the green thread tension to a higher value. The upper looper thread (pink) appears on - Pfaff coverstyle 4850 | Owner's Manual - Page 57
3-thread rolled hem (folded) Program 15 The upper needle thread (green) is too loose. Set the green thread tension to a higher value. The upper looper thread (pink) only - Pfaff coverstyle 4850 | Owner's Manual - Page 58
12 Note: The converter (see page 32) must be attached to sew the 2 thread rolled hem. The upper needle thread (green) is too tight. Set the green thread tension to a lower value and/or the yellow thread tension to a higher value. - Pfaff coverstyle 4850 | Owner's Manual - Page 59
(folded) Program 13 Note: The converter (see page 32) must be attached to sew the 2 thread rolled hem. The upper needle thread (green) is too loose. Set the green thread tension to a higher value and/or the yellow thread tension to a lower value. - Pfaff coverstyle 4850 | Owner's Manual - Page 60
2-needle 3-thread assembly seam Program 10 Note: The converter (see page 32) must be attached to sew the 2-needle 3-thread assembly seam. The lower needle thread (blue) is too loose. Set the blue thread tension to a higher value. The upper needle thread (green) is too loose. Set the green thread - Pfaff coverstyle 4850 | Owner's Manual - Page 61
Thread chart for 2- , 3- and 4-thread overedge seams Thread Stitch length Light fabrics: organdy, fine knitwear, taffeta, silk, lining - 60 Synthetic thread no. 70 - 140 2.0 - 4.0 mm 2- or 3-thread rolled hems Polyester thread no. 120 - 140 Mercerized thread (bulk thread) 1.0 - 2.0 mm 57 - Pfaff coverstyle 4850 | Owner's Manual - Page 62
open the looper cover and swivel plate. Disengage the upper blade (see page 30) and remove the presser foot and the needle plate. Use the accessory brush provided to remove any waste thread from the upper and lower blades, the differential feed and the looper area. Lubricating the machine Turn off - Pfaff coverstyle 4850 | Owner's Manual - Page 63
knob for seam width to 3.5 mm. Fasten the upper blade (see page 39) before loosening the fastening screw (A) with the wrench provided in the accessory box. Then remove the upper blade. To insert: Attach the new upper blade and gently tighten the fastening screw. Then turn the handwheel until the - Pfaff coverstyle 4850 | Owner's Manual - Page 64
the electrical power Using the screw driver in the accessory box loosen the fastening screw to the sewing light cover 16 until the cover can be removed. Push the light bulb fully into its socket. Rotate counter clockwise through half a turn and remove. Guide the new light bulb (max. 15 W) into the - Pfaff coverstyle 4850 | Owner's Manual - Page 65
. No difficult or tricky set tings need to be made. Sewing problems of the kind described below may occur as a result of minor adjustment Use needle system EL X 705. Thread properly (see page 14 - 23). Stitch formation faulty Incorrect setting of thread tension. Re-set thread tensions (see page 46 - Pfaff coverstyle 4850 | Owner's Manual - Page 66
Parts of the coverstyle 31 Thread guides with color coding 32 Telescoping thread guide 33 Thread chain cutter 34 Thread spool 41 Regulator wheel for differential feed 42 Stitch length adjustment knob 43 Presser foot lifter 44 Rear thread guides 45 Power table 46 Foot control 47 Accessory box 62 - Pfaff coverstyle 4850 | Owner's Manual - Page 67
44 43 42 41 40 38 39 31 32 33 34 35 37 36 - Pfaff coverstyle 4850 | Owner's Manual - Page 68
VSM Group AB • SE-561 84 Huskvarna • SWEDEN www.pfaff.com 413 03 60-26B • English • Inhouse • © 2006 VSM Group AB • All rights reserved • Printed in Sweden on environmentally-friendly paper
-
 1
1 -
 2
2 -
 3
3 -
 4
4 -
 5
5 -
 6
6 -
 7
7 -
8
-
9
-
10
-
11
-
12
-
13
-
14
-
15
-
16
-
17
-
18
-
19
-
20
-
21
-
22
-
23
-
24
-
25
-
26
-
27
-
28
-
29
-
30
-
31
-
32
-
33
-
34
-
35
-
36
-
37
-
38
-
39
-
40
-
41
-
42
-
43
-
44
-
45
-
46
-
47
-
48
-
49
-
50
-
51
-
52
-
53
-
54
-
55
-
56
-
57
-
58
-
59
-
60
-
61
-
62
-
63
-
64
-
65
-
66
-
67
-
68
 |
 |

Owner´s manual