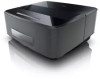
Philips HDP1690 User manual
Philips HDP1690 Manual
 |
View all Philips HDP1690 manuals
Add to My Manuals
Save this manual to your list of manuals |
Philips HDP1690 manual content summary:
- Philips HDP1690 | User manual - Page 1
Register your product and get support at www.philips.com/welcome Screeneo HDP1650TV HDP1690TV US User Manual - Philips HDP1690 | User manual - Page 2
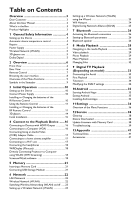
Table on Contents Overview 3 Dear Customer 3 About this User Manual 3 What's in the Box 3 Product Highlights 3 1 General Safety the Menu Functions 36 12 Service 38 Cleaning 38 Device Overheated 38 Update Firmware with Memory Card 38 Troubleshooting 39 13 Appendix 41 Technical - Philips HDP1690 | User manual - Page 3
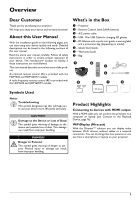
no liability if these instructions are not followed. This user manual describes several versions of the product. An infrared remote control (IR) is provided with the HDP1650 and HDP1650TV models. A radio frequency remote control (RF) is provided with the HDP1690 and HDP1690TV models. What's in the - Philips HDP1690 | User manual - Page 4
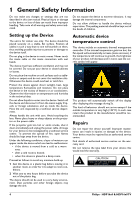
in this user manual. Physical injury or Have the unit inspected by a technical service department. Always handle the unit with care device to be investigated by a technical service centre. To prevent the spread of fire by an authorised service centre. Find details of authorised service centres on the - Philips HDP1690 | User manual - Page 5
consumer is the bearer of lenses (eyeglasses or contact lenses); • You should stop watching 3D in the event of the occurrence of eye problems or discomfort, and in the event of a persistence of the same, consult a doctor. Dolby Digital Manufactured under license from Dolby Laboratories. Dolby and - Philips HDP1690 | User manual - Page 6
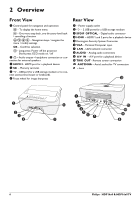
7 LAN - LAN network connector 8 AUDIO - Analog audio connectors 9 A/V IN - A/V port for a playback device ‹ TRIG OUT- Remote screen connection ANTENNA - Aerial socket for TV connection - Lens a b c d PHILIPS f e a b c d e f PHILIPS S/PDIF 1 OPTICAL 2 VGA g L R AUDIO OUT AV TRIG IN OUT - Philips HDP1690 | User manual - Page 7
(music only) - To stop playback - Skip forward (music only) - To rewind - To start / pause playback - To fast-forward 3 EPG -To display the electronic program guide. 3D - To display the 3D menu. Favorite - To display the favourite list in DVB-T mode. 4 To display the home menu. 5 TAB key or Toggle - Philips HDP1690 | User manual - Page 8
. • Fn to use blue characters Navigation by (air) mouse: (like standard mouse operation within Android) CAUTION! Air mouse The air mouse is not provided with Screeneo HDP1650TV. Select an icon by pointing with the mouse pointer and clicking with the left mouse key - Philips HDP1690 | User manual - Page 9
Overview of the Menu Functions 1 After switching on the device the main menu appears. 2 Select the desired menu using the navigation keys 3 Confirm with OK. 4 By pressing the u key you will return to the main menu. Symbols in the Statusbar HDMI 1, 2, & 3 - Switch to the external video input HDMI - Philips HDP1690 | User manual - Page 10
of danger. 1 Connect the power cord into the socket on the rear side of your device (1). 2 Plug the power cord to outlet on the wall (2). PHILIPS S/PDIF 1 OPTICAL 2 VGA L R AUDIO OUT AV TRIG IN OUT b a To change the size of the screen, just move the projector towards or away from the - Philips HDP1690 | User manual - Page 11
is used. 1 To access the battery, take an appropriate tool and place it in the orifice as shown below, open the battery compartment. 1 PHILIPS 22,5° 22,5° EPG 3D FAVORITE SOURCE SMART SETTINGS FORMAT TAB MENU INFO OK EXIT PAGE/CH - RECALL OPTIONS PAGE/CH + 1 .@ 2 ABC DEF 3 4 GHI - Philips HDP1690 | User manual - Page 12
until you hear "CLICK" it tells you that the closure is correct. CLICK 5 6 Replace the battery cover in place and press down to close. 12 Philips · HDP16x0 & HDP16x0TV - Philips HDP1690 | User manual - Page 13
control has to be paired with the USB receiver again. For renewing the pairing please connect the USB receiver to a rear USB port of the Screeneo. Then pressing the red and blue key on the remote control together for 5 s to 10 s at the same time. 2 Now do move your remote control - Philips HDP1690 | User manual - Page 14
for one second and a half on the 3D glasses . 3x 1.5 SEC The LED flashes green three times and becomes fixed. Your glasses are ready. 14 Philips · HDP16x0 & HDP16x0TV - Philips HDP1690 | User manual - Page 15
with ¡/¢. 8 Confirm with OK. 9 Exit with u. 12 A message is displayed «Open User Manual?», use the keys À/Á for select Yes or No. Press OK to continue. The manual is displayed or the address web site where the user manual can be downloaded. Turning off the projector Press the B button on the panel - Philips HDP1690 | User manual - Page 16
connect a second display such as a projector. Check your laptop's manual to find out how to activate the external video output. Use PDAs. The projector supports the following resolutions: VGA/SVGA/ XGA. For best results, please check the best resolution. PHILIPS HDMI 3 PHILIPS S/PDIF 1 OPTICAL - Philips HDP1690 | User manual - Page 17
AV TRIG IN OUT AV IN Notice Switching to the Multimedia Device Signal Output See the multimedia device instruction manual to find out how to switch the signal output to this jack. PHILIPS S/PDIF 1 OPTICAL 2 VGA L R AUDIO OUT AV TRIG IN OUT AUDIO OUT Connect to the Playback Device 17 - Philips HDP1690 | User manual - Page 18
up the message Invitation to connect, Decline or Accept, select Accept. PHILIPS 3 After connecting the headphones, increase the volume to a comfortable to use the Screeneo as computer screen. For this, both devices must be connected to the same wireless or wired network. Screeneo firmware version - Philips HDP1690 | User manual - Page 19
support in order to update your Screeneo. Get yourself a suitable digital media and insert it into your computer. 1 Launch an Internet browser, in the address bar, type the address: www.philips.com/screeneo and double click the executable. 3 Follow the instructions that appear on the screen. 4 Agree - Philips HDP1690 | User manual - Page 20
a precaution, note the name and the key to protection of your access point. On the Screeneo, 1 Use ¡/¢ to select Settings. 2 Confirm with OK. 3 Using ¡/¢ select Wireless Click Search. 5 Select and click on the Screeneo where you want to connect. 6 If necessary, enter password of acces point selected. - Philips HDP1690 | User manual - Page 21
5 Memory Inserting a Memory Card Connecting USB Storage Medium PHILIPS PHILIPS 1 Insert a memory card with the contacts facing downwards into the SD/MMC slot at the back of the device. Your device supports the following memory cards: SD/SDHC/SDXC/MMC. 2 Insert the memory card into the slot until - Philips HDP1690 | User manual - Page 22
end of a LAN cable (not supplied) to the ETHERNET port of your projector. PHILIPS S/PDIF 1 OPTICAL 2 VGA L R AUDIO OUT AV TRIG IN OUT 2 Connect to the network. 3 Configure the LAN network settings in manual or automatic configuration. Automatic configuration The automatic configuration of - Philips HDP1690 | User manual - Page 23
very quickly and easily. You can activate the login with a pin code or using Push Button Configuration (PBC), if your access point (Access Point, Router) supports this method. Network 23 - Philips HDP1690 | User manual - Page 24
Portable WiFi Hotspot. 10 Confirm with OK. 11 Using ¡/¢ select On. 12 Confirm with OK. The projector is now visible by other Wifi devices. 24 Philips · HDP16x0 & HDP16x0TV - Philips HDP1690 | User manual - Page 25
the navigation keys to select Settings. Digital Living Network Alliance (DLNA) This device supports Digital Living Network Alliance (DLNA). Using this standard you can quickly interconnect your a smartphone) using DLNA. To do this, see the instruction manual for the device in question. Network 25 - Philips HDP1690 | User manual - Page 26
select BT Speaker or press OPTIONS key then select SOURCE and BT Speaker. 4 Confirm with OK. 5 Press the Red key to power on the speaker. Philips · HDP16x0 & HDP16x0TV - Philips HDP1690 | User manual - Page 27
6 Press the Green key to make the speaker discoverable during 60 seconds. 7 On your external device, activate the Bluetooth connection and select the speaker name from the list. When the device is connected, his name is displayed on the top of the screen. 8 Press the Green key to play music. During - Philips HDP1690 | User manual - Page 28
all files (photo, audio and video). • MOVIES to view videos files only. • PICTURES to view photo files only. • MUSIC to view audio files only. 28 Philips · HDP16x0 & HDP16x0TV - Philips HDP1690 | User manual - Page 29
adjust the volume using the keys / or À/Á on the remote control. Press or pletely. repeatedly to shut off the volume com- Photo Playback Supported file formats Supported file formats are JPEG, BMP, PNG and GIF. Photo Playback (USB/SD Card/ Internal Memory/DLNA) 1 Switch the device on using the - Philips HDP1690 | User manual - Page 30
a picture, use the navigation keys to select the symbol then press OK to rotate the picture 90° clockwise. Press ¿ return to the slide show. 30 Philips · HDP16x0 & HDP16x0TV - Philips HDP1690 | User manual - Page 31
off the Image Playback You can switch off the screen while playing music in order to save power by a long press on the key. Supported file formats Supported file formats are MP3 and WAV. Music Playback (USB/SD Card/ Internal Memory/DLNA) 1 Switch the device on using the on/off key. 2 The - Philips HDP1690 | User manual - Page 32
the file. 7 Confirm with OK. Notice Error If errors occur during the deletion process, make sure that the storage medium is not write-protected. 32 Philips · HDP16x0 & HDP16x0TV - Philips HDP1690 | User manual - Page 33
function is first started, the automatic channel search must be started. 1 Switch the device on using the on/off key. 2 The main menu appears. PHILIPS S/PDIF 1 OPTICAL 2 VGA L R AUDIO OUT AV TRIG IN OUT 3 Connect the aerial (see Connecting the Aerial, page 33). 4 Use the navigation keys to - Philips HDP1690 | User manual - Page 34
key on the remote control. Main menus are: Edit channels: To display and modify the channel and radio lists. Installation: To launch an automatic or a manual search for channels. System Setup: To modify the parental lock settings, the display settings and the favorite settings. 34 - Philips HDP1690 | User manual - Page 35
10 Android Your projector uses the Android operating system. Starting Android Apps 1 Switch the device on using the on/off key. 2 After the initial screen the main menu appears. 6 Confirm with OK. 7 Use the navigation keys to select ApkInstaller. 8 Confirm with OK. 9 Use the navigation keys to - Philips HDP1690 | User manual - Page 36
standard. Gamma - adjusts the gamma correction according to the type of the projected image. Manual colors RGB - manually adjust the hue, saturation and brightness of colors in RGB mode. Use to adjust the - set date and time Android Settings - set Android system 36 Philips · HDP16x0 & HDP16x0TV - Philips HDP1690 | User manual - Page 37
and information on the device (Capacity: / Free space: / Firmware version: / Device name: / Model:) Demo mode - switching demo mode on and off. In this mode, Screeneo is continuously displayed on the screen and video and/or audio files placed in internal memory are read directly. Settings 37 - Philips HDP1690 | User manual - Page 38
12 Service Cleaning DANGER! Instructions for Cleaning! Use a soft, lint-free cloth. Never use liquid or easily flammable cleansers (sprays, 7 Confirm with à. 8 Use ¡/¢ to select Firmware Update. 9 Confirm with à. 10 Use ¡/¢ to select Install. 11 Confirm with à. 38 Philips · HDP16x0 & HDP16x0TV - Philips HDP1690 | User manual - Page 39
Troubleshooting Power Cycling If a problem occurs that cannot be corrected with the instructions in this user manual (see also the on the panel control. 4 If the problem repeats, please contact our technical customer service or your retailer. Problems Solutions The projector cannot be switched on - Philips HDP1690 | User manual - Page 40
Problems Solutions The the chapter Appendix). The device cannot read the USB stick • The device does not support the exFAT file system. • Format the USB key in FAT format, then use it USB receiver to a rear USB port of the Screeneo. Then pressing the red and blue key on the remote control together for 5 s - Philips HDP1690 | User manual - Page 41
USB connection max. power 5V, 500mA Technology / optical Display technology WXGA 0.45" DLP Light source RGB LED Native resolution 1280 x 800 Pixel (16:9) Supported Resolutions VGA/SVGA/WVGA XGA/WXGA/FULL HD Projected image size (inch 50 up to 100 Screen distance (mm 108 up to 441 Display - Philips HDP1690 | User manual - Page 42
The declaration of compliance can be consulted on the site www.screeneo.philips.com. Preservation of the environment as part of a sustainable development and, if not installed and used in accordance with the instructions, may cause harmful interference to radio communications. However, there is - Philips HDP1690 | User manual - Page 43
instructions. Sagemcom Documents SAS shall not be liable for any damages or problems PHILIPS manual customer support service in your service à la clientèle de votre pays : 1 866 310 0788 Exclusivo para México. For Mexico only. Exclusivement pour le Mexique PROYECTOR (Screeneo HDP1690/F7) Appendix 43 - Philips HDP1690 | User manual - Page 44
N.V. and are used by Sagemcom Documents SAS under license from Koninklijke Philips N.V. È 2015 Sagemcom Documents SAS All rights reserved Sagemcom Documents SAS Documents Business Unit Headquarters : 250, route de l'Empereur 92848 Rueil-Malmaison Cedex · FRANCE Tel: +33 (0)1
-
 1
1 -
 2
2 -
 3
3 -
 4
4 -
 5
5 -
 6
6 -
 7
7 -
8
-
9
-
10
-
11
-
12
-
13
-
14
-
15
-
16
-
17
-
18
-
19
-
20
-
21
-
22
-
23
-
24
-
25
-
26
-
27
-
28
-
29
-
30
-
31
-
32
-
33
-
34
-
35
-
36
-
37
-
38
-
39
-
40
-
41
-
42
-
43
-
44
 |
 |
Register your product and get support at
www.philips.com/welcome
Screeneo
HDP1650TV
HDP1690TV
US
User Manual