Philips HDP1690 User manual - Page 10
Initial Operation
 |
View all Philips HDP1690 manuals
Add to My Manuals
Save this manual to your list of manuals |
Page 10 highlights
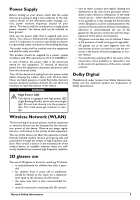
3 Initial Operation Setting up the Device Before installing your device, make sure that the projector is turned off and the power cord is unplugged from the power outlet. CAUTION! Remove protection foil before operation! Do not place any objects in front of the lens! You can position the device so that it lies flat on a table in front of the projection surface; it is not necessary to tilt it towards the projection surface. The device compensates for the distortion from the slanted projection (pincushion distortion). Check that the projection surface is appropriated to the projector. The distance between the projector and the screen determines the actual size of the image. Connect Power Supply CAUTION! The power cord is used as a power unit cut off. As a precaution, the outlet shall be located close to the device and be of easy access in case of danger. 1 Connect the power cord into the socket on the rear side of your device (1). 2 Plug the power cord to outlet on the wall (2). PHILIPS S/PDIF 1 OPTICAL 2 VGA L R AUDIO OUT AV TRIG IN OUT b a To change the size of the screen, just move the projector towards or away from the wall. The size of the screen (b) is comprised between 50 and 100 inches depending on the projection distance (a), as described in the following table. Diagonal size (b) (mm) [inch] Projection distance (a) (mm) 1270 108 [50] 2540 441 [100] Installing or Changing the batteries of the IR Remote Control DANGER! Risk of Explosion with Incorrect Type of Batteries Only use the AAA type battery. There is a risk of explosion if the incorrect battery type is used. 1 To access the battery, press to unlock the locking mechanism (1) and slide out the battery compartment (2). 10 Philips · HDP16x0 & HDP16x0TV
-
 1
1 -
2
-
3
-
4
-
 5
5 -
 6
6 -
 7
7 -
 8
8 -
 9
9 -
 10
10 -
 11
11 -
 12
12 -
 13
13 -
 14
14 -
 15
15 -
16
-
17
-
18
-
19
-
20
-
21
-
22
-
23
-
24
-
25
-
26
-
27
-
28
-
29
-
30
-
31
-
32
-
33
-
34
-
35
-
36
-
37
-
38
-
39
-
40
-
41
-
42
-
43
-
44
 |
 |
