Pioneer DEH-P8400BH Owner's Manual - Page 11
Audio adjustments, Operating this unit - install
 |
View all Pioneer DEH-P8400BH manuals
Add to My Manuals
Save this manual to your list of manuals |
Page 11 highlights
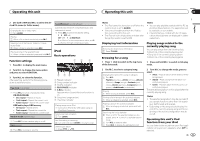
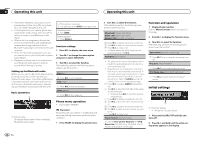
Operating this unit Operating this unit Section 02 English You can play the Pandora by connecting your iPod which was installed the Pandora application. Basic operations 12 3 45 6 1 Thumbs Up/Thumbs Down indicator 2 QuickMix indicator 3 PLAY/PAUSE indicator 4 S.Rtrv indicator Appears when Sound Retriever function is on. 5 Song time (progress bar) 6 Play time indicator Playing tracks 1 Connect an iPod to the USB cable using an iPod Dock Connector. 2 Start up the Pandora application installed on the iPod. Giving a Thumbs Up 1 Press to give a "Thumbs Up" for the track currently playing. Giving a Thumbs Down 1 Press to give a "Thumbs Down" for the track currently playing and to skip to the next track. Skipping tracks 1 Turn LEVER to the right. Displaying text information Selecting the desired text information 1 Press /DISP. Selecting and playing the QuickMix/station list 1 Press (list) to switch to the QuickMix/ station list mode. 2 Use M.C. to select the QuickMix or desired station. Changing the sort order 1 Press (list). ! ABC - You can sort the items in the list alpha- betically ! DATE - You can sort the items in the list in order of the dates on which the items were created Changing QuickMix or stations 1 Turn M.C. Playing 1 When QuickMix or the station is selected, press M.C. Function settings 1 Press M.C. to display the main menu. 2 Turn M.C. to change the menu option and press to select FUNCTION. 3 Turn M.C. to select the function. After selecting, perform the following procedures to set the function. Bookmark (bookmark) 1 Press M.C. to store track information. Pause (pause) 1 Press M.C. to pause or resume. Sound Retriever (sound retriever) 1 Press M.C. to select the desired setting. 1-2-OFF (off) OFF (off)-1-2 (MIXTRAX) 1 is effective for low compression rates, and 2 is effective for high compression rates. Audio adjustments 1 1 Audio display Shows the audio adjustment status. 1 Press M.C. to display the main menu. 2 Turn M.C. to change the menu option and press to select AUDIO. 3 Turn M.C. to select the audio function. After selecting, perform the following procedures to set the audio function. Fader/Balance (fader/balance adjustment) 1 Press M.C. to display the setting mode. 2 Press M.C. to cycle between fader (front/rear) and balance (left/right). 3 Turn M.C. to adjust the front/rear speaker bal- ance. ! The front/rear speaker balance cannot be adjusted when the rear output setting is Rear SP :S/W. Refer to S/W control (rear output and subwoofer setting) on page 15. 4 Turn M.C. to adjust the left/right speaker balance. Preset EQ (equalizer recall) 1 Press M.C. to display the setting mode. 2 Turn M.C. to select an equalizer curve. Powerful-Natural-Vocal-Custom1-Custom2-Flat-Super bass G.EQ (equalizer adjustment) You can adjust the currently selected equalizer curve setting as desired. Adjusted equalizer curve settings are stored in Custom1 or Custom2. ! A separate Custom1 curve can be created for each source. If you make adjustments when a curve other than Custom2 is selected, the equalizer curve settings will be stored in Custom1. ! A Custom2 curve that is common for all sources can be created. If you make adjustments when the Custom2 curve is selected, the Custom2 curve will be updated. 1 Recall the equalizer curve you want to adjust. 2 Press M.C. to display the setting mode. 3 Press M.C. to cycle between equalizer band and level. 4 Turn M.C. to select the equalizer band to adjust. 100Hz-315Hz-1.25kHz-3.15kHz-8kHz Turn M.C. to adjust the equalizer curve. +6 to -6 is displayed as the equalizer curve is increased or decreased. En 11
-
 1
1 -
2
-
3
-
4
-
5
-
 6
6 -
 7
7 -
 8
8 -
 9
9 -
 10
10 -
 11
11 -
 12
12 -
 13
13 -
 14
14 -
 15
15 -
 16
16 -
17
-
18
-
19
-
20
-
21
-
22
-
23
-
24
-
25
-
26
-
27
-
28
-
29
-
30
-
31
-
32
-
33
-
34
-
35
-
36
-
37
-
38
-
39
-
40
-
41
-
42
-
43
-
44
-
45
-
46
-
47
-
48
-
49
-
50
-
51
-
52
-
53
-
54
-
55
-
56
-
57
-
58
-
59
-
60
-
61
-
62
-
63
-
64
-
65
-
66
-
67
-
68
-
69
-
70
-
71
-
72
-
73
-
74
-
75
-
76
-
77
-
78
-
79
-
80
-
81
-
82
-
83
-
84
-
85
-
86
-
87
-
88
-
89
-
90
-
91
-
92
-
93
-
94
-
95
-
96
-
97
-
98
-
99
-
100
-
101
-
102
-
103
-
104
-
105
-
106
-
107
-
108
-
109
-
110
-
111
-
112
 |
 |
