Pioneer DEH-P8400BH Owner's Manual - Page 26
Installation - remote
 |
View all Pioneer DEH-P8400BH manuals
Add to My Manuals
Save this manual to your list of manuals |
Page 26 highlights
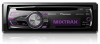
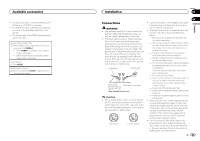
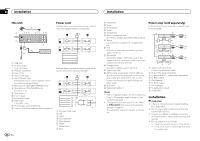
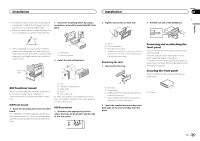
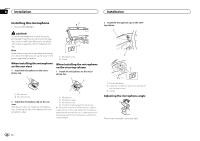
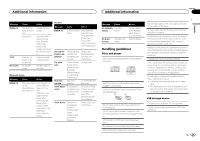
Section 04 Installation Installation This unit 8 2 3 45 67 9 a 1 b d e c 1 USB port 2 Antenna input 15 cm (5-7/8 in.) 3 IP-BUS input (blue) 4 Fuse (10 A) 5 Power cord input 6 Wired remote input Hard-wired remote control adaptor can be connected (sold separately). 7 Microphone input (DEH-P8400BH only) 8 Microphone (DEH-P8400BH only) 4 m (13 ft. 1 in.) 9 Rear output a Front output b Subwoofer output c USB cable 1.5 m (4 ft. 11 in.) d IP-BUS cable (sold separately) e Pioneer IP-BUS accessories (sold separately) Power cord Perform these connections when not connecting a rear speaker lead to a subwoofer. L 1 R 2 3 4 6 8 F 7 9 5 a c R b d e f g h i Perform these connections when using a subwoofer without the optional amplifier. L 2 4 6 F 7 j a SW b 1 R 3 8 9 c d ek f ac gl m h i bd 1 To power cord input 2 Left 3 Right 4 Front speaker 5 Rear speaker 6 White 7 White/black 8 Gray 26 En 9 Gray/black a Green b Green/black c Violet d Violet/black e Black (chassis ground) Connect to a clean, paint-free metal location. f Yellow Connect to the constant 12 V supply terminal. g Red Connect to terminal controlled by ignition switch (12 V DC). h Blue/white Connect to system control terminal of the power amp or auto-antenna relay control terminal (max. 300 mA 12 V DC). i Orange/white Connect to lighting switch terminal. j Subwoofer (4 W) k When using a subwoofer of 70 W (2 W), be sure to connect the subwoofer to the violet and violet/black leads of this unit. Do not connect anything to the green and green/ black leads. l Not used. m Subwoofer (4 W)× 2 Notes ! With a 2 speaker system, do not connect anything to the speaker leads that are not connected to speakers. ! Change the initial setting of this unit. Refer to S/W control (rear output and subwoofer setting) on page 15. The subwoofer output of this unit is monaural. Power amp (sold separately) Perform these connections when using the optional amplifier. 1 3 2 4 5 5 3 1 2 6 7 7 3 1 2 8 9 9 1 System remote control Connect to Blue/white cable. 2 Power amp (sold separately) 3 Connect with RCA cables (sold separately) 4 To Rear output 5 Rear speaker 6 To Front output 7 Front speaker 8 To subwoofer output 9 Subwoofer Installation Important ! Check all connections and systems before final installation. ! Do not use unauthorized parts as this may cause malfunctions. ! Consult your dealer if installation requires drilling of holes or other modifications to the vehicle. ! Do not install this unit where: - it may interfere with operation of the vehicle. - it may cause injury to a passenger as a result of a sudden stop.
-
 1
1 -
2
-
3
-
4
-
5
-
6
-
7
-
8
-
9
-
10
-
11
-
12
-
13
-
14
-
15
-
16
-
17
-
18
-
19
-
20
-
 21
21 -
 22
22 -
 23
23 -
 24
24 -
 25
25 -
 26
26 -
 27
27 -
 28
28 -
 29
29 -
 30
30 -
 31
31 -
32
-
33
-
34
-
35
-
36
-
37
-
38
-
39
-
40
-
41
-
42
-
43
-
44
-
45
-
46
-
47
-
48
-
49
-
50
-
51
-
52
-
53
-
54
-
55
-
56
-
57
-
58
-
59
-
60
-
61
-
62
-
63
-
64
-
65
-
66
-
67
-
68
-
69
-
70
-
71
-
72
-
73
-
74
-
75
-
76
-
77
-
78
-
79
-
80
-
81
-
82
-
83
-
84
-
85
-
86
-
87
-
88
-
89
-
90
-
91
-
92
-
93
-
94
-
95
-
96
-
97
-
98
-
99
-
100
-
101
-
102
-
103
-
104
-
105
-
106
-
107
-
108
-
109
-
110
-
111
-
112
 |
 |
