Poulan 1994-04 User Manual - Page 6
Assembly
 |
View all Poulan 1994-04 manuals
Add to My Manuals
Save this manual to your list of manuals |
Page 6 highlights
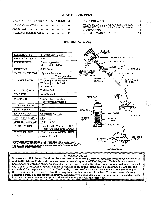
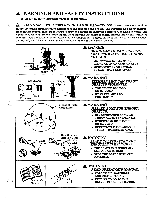
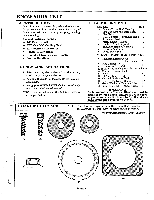
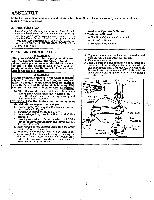
ASSEMBLY (If tool is received assembled, repeat all steps in this section to be sure assembly is correct and is adjusted for the operator.) A. PREPARATION This Operator's Manual has been developed to help you assemble the tool and to provide its safe operation. It is important that you read the entire manual to become familiar with the tool before you begin assembly. If you have any questions or need further assistance, call our CUSTOMER ASSISTANCE HOTLINE at 1-800-554-6723. 1. Read your Operator's Manual 2. Tools you will need: - Hex Wrench(s) provided with tool - Adjustable Wrench - Standard Screwdriver B. FOR LINE TRIMMER USE A WARNING The plastic shield must be properly installed for all line trimmer usage. The plastic shield provides partial protection from the risk of thrown objects to the operator and others and is equipped with a line limiter which cuts excess line to the proper length. A WARNING Failure to install shield in theposition shown in Figure 2 can result in serious injury to the operator. The length of the shield must be aligned with the length of the drive shaft housing. Direct the widest part of shield toward the engine. NOTE: Remove the metal shield and blade before installing the plastic shield and trimmer head. 1. Place the shield under the bearing housing and align screw holes. Figure 2 . CAPTION: I The line limiter (on the underside of the shield) is sharp and can cut you. 2. Insert screws "A." through the bearing housing into the shield. Figure 2 . 3. Tighten the screws evenly and securely 4. Remove the packing cover from the arbor shaft if so equipped. 5. Install grass washer "F." over the arbor shaft. Make sure the grass washer is against and curved over the dust cup. Figure 2 . 6. Start threading the trimmer head onto the arbor shaft as shown in Figure 2 . 7. Align the hole in the dust cup with the hole in the center front of the bearing housing by turning the dust cup. Then, insert the small hex wrench (provided) into the aligned holes to keep the arbor shaft from turning. Figure 2 (inset). 8. Tighten the trimmer head against the washer and dust cup while holding the hex wrench. 9. Remove the hex wrench. NOTE: To remove the trimmer head, insert the hex wrench into the aligned holes in the dust cup and bearing housing. Unthread the trimmer head. Be sure to store grass washer "F", plastic shield, 4 shield screws, and hardware with the trimmer head for future use. Hex 41) 14/,..:rew A. Wrench Bearing Housing Clamp Widest Part\ Line of Shield Limiter Toward Engine Direction to Install Figure 2 Dust Cup Arbor Shaft Grass Washer F. Trimmer Head
-
 1
1 -
 2
2 -
 3
3 -
 4
4 -
 5
5 -
 6
6 -
 7
7 -
 8
8 -
 9
9 -
 10
10 -
 11
11 -
 12
12 -
13
-
14
-
15
-
16
-
17
-
18
-
19
-
20
-
21
-
22
-
23
-
24
 |
 |
