RCA HDV5000 User Manual - HDV5000 - Page 14
Connecting to a TV with Component Y, Pb, Pr Jacks - remote code
 |
UPC - 747192000066
View all RCA HDV5000 manuals
Add to My Manuals
Save this manual to your list of manuals |
Page 14 highlights
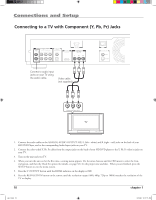
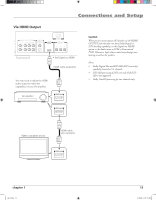
Connections and Setup Connecting to a TV with Component (Y, Pb, Pr) Jacks Connect to audio input jacks on your TV using the audio cable. Video cable (not supplied) Component video input TV 1. Connect the audio cables to the ANALOG AUDIO OUTPUT 2CH L (left - white) and R (right - red) jacks on the back of your HD DVD Player, and to the corresponding Audio Input jacks on your TV. 2. Connect the color-coded Y, Pb, Pr cables from the output jacks on the back of your HD DVD player to the Y, Pb, Pr video in jacks on your TV. 3. Turn on the unit and your TV. 4. When you turn the unit on for the first time, a setting menu appears. Use the arrow buttons and the OK button to select the General option, and then the Clock Set option (for details, see page 32). Set the proper time and date. When you are finished, press the SETUP button to exit the menu system. 5. Press the V. OUTPUT button until the HDMI indicator on the display is OFF. 6. Press the RESOLUTION button on the remote until the resolution output (480i, 480p, 720p or 1080i) matches the resolution of the TV or display. 10 chapter 1 s&c1.indd 10 3/15/06 10:17:21 AM
-
 1
1 -
2
-
3
-
4
-
5
-
6
-
7
-
8
-
 9
9 -
 10
10 -
 11
11 -
 12
12 -
 13
13 -
 14
14 -
 15
15 -
 16
16 -
 17
17 -
 18
18 -
 19
19 -
20
-
21
-
22
-
23
-
24
-
25
-
26
-
27
-
28
-
29
-
30
-
31
-
32
-
33
-
34
-
35
-
36
-
37
-
38
-
39
-
40
-
41
-
42
-
43
-
44
-
45
-
46
-
47
-
48
-
49
-
50
-
51
-
52
-
53
-
54
-
55
-
56
-
57
-
58
-
59
-
60
-
61
-
62
 |
 |
