Ricoh Aficio SP 1200SF User's Guide - Page 52
Setting the print density, Additional receiving operations, Printing a reduced incoming fax
 |
View all Ricoh Aficio SP 1200SF manuals
Add to My Manuals
Save this manual to your list of manuals |
Page 52 highlights
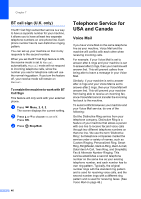
Chapter 6 Setting the print density 6 You can adjust the print density to make your printed pages darker or lighter. a Make sure you are in Fax mode . b (for EU and Asia/Oceania) Press Menu, 2, 1, 7. (for USA and Canada) Press Menu, 2, 1, 6. c Press a to make the print darker. Or, press b to make the print lighter. Press OK. d Press Stop/Exit. Additional receiving operations 6 Printing a reduced incoming fax 6 If you choose On, the machine automatically reduces each page of an incoming fax to fit on one page of A4 or Letter size paper. The machine calculates the reduction ratio by using the page size of the fax and your Paper Size setting ( Menu, 1, 3). a Make sure you are in Fax mode . b Press Menu, 2, 1, 5. c Press a or b to choose On or Off. Press OK. d Press Stop/Exit. Setting the fax receive stamp 6 You can set the machine to print the received date and time in the top centre of each received fax page. a Make sure you are in Fax mode . b (for EU and Asia/Oceania) Press Menu, 2, 1, 9. (for USA and Canada) Press Menu, 2, 1, 8. c Press a or b to choose On or Off. Press OK. d Press Stop/Exit. Note Make sure you have set the current date and time in the machine. 42
-
 1
1 -
2
-
3
-
4
-
5
-
6
-
7
-
8
-
9
-
10
-
11
-
12
-
13
-
14
-
15
-
16
-
17
-
18
-
19
-
20
-
21
-
22
-
23
-
24
-
25
-
26
-
27
-
28
-
29
-
30
-
31
-
32
-
33
-
34
-
35
-
36
-
37
-
38
-
39
-
40
-
41
-
42
-
43
-
44
-
45
-
46
-
 47
47 -
 48
48 -
 49
49 -
 50
50 -
 51
51 -
 52
52 -
 53
53 -
 54
54 -
 55
55 -
 56
56 -
 57
57 -
58
-
59
-
60
-
61
-
62
-
63
-
64
-
65
-
66
-
67
-
68
-
69
-
70
-
71
-
72
-
73
-
74
-
75
-
76
-
77
-
78
-
79
-
80
-
81
-
82
-
83
-
84
-
85
-
86
-
87
-
88
-
89
-
90
-
91
-
92
-
93
-
94
-
95
-
96
-
97
-
98
-
99
-
100
-
101
-
102
-
103
-
104
-
105
-
106
-
107
-
108
-
109
-
110
-
111
-
112
-
113
-
114
-
115
-
116
-
117
-
118
-
119
-
120
-
121
-
122
-
123
-
124
-
125
-
126
-
127
-
128
-
129
-
130
-
131
-
132
-
133
-
134
-
135
-
136
-
137
-
138
-
139
-
140
-
141
-
142
-
143
-
144
-
145
-
146
-
147
-
148
-
149
-
150
-
151
-
152
-
153
-
154
-
155
-
156
-
157
-
158
-
159
-
160
-
161
-
162
-
163
-
164
-
165
-
166
-
167
-
168
-
169
-
170
-
171
-
172
-
173
-
174
-
175
-
176
-
177
-
178
-
179
-
180
-
181
-
182
-
183
-
184
-
185
-
186
-
187
-
188
-
189
-
190
-
191
-
192
-
193
-
194
-
195
-
196
 |
 |
