Ryobi BT3KIT English Manual - Page 13
Clamping Scroll Saw To Workbench, Sawdust Blower, Drop Foot
 |
View all Ryobi BT3KIT manuals
Add to My Manuals
Save this manual to your list of manuals |
Page 13 highlights
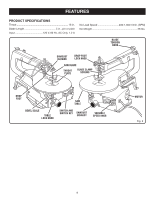
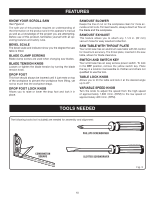
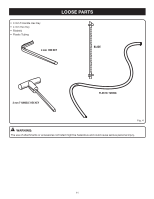
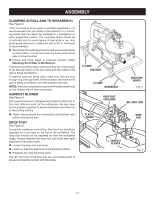
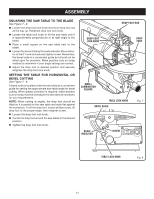
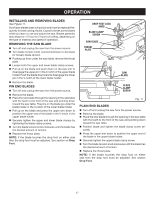
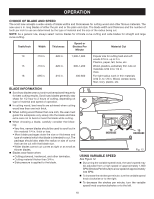
ASSEMBLY CLAMPING SCROLL SAW TO WORKBENCH See Figure 5. If the scroll saw is to be used in a portable application, it is recommended that you fasten it permanently to a mounting board that can easily be clamped to a workbench or other supporting surface. The mounting board should be of sufficient size to avoid tipping of saw while in use. Any good grade plywood or chipboard with a 3/4 in. thickness is recommended. Mount saw to board using holes in saw base as a template for hole pattern. Locate and mark the holes where scroll saw is to be mounted. Follow last three steps in previous section called Mounting Scroll Saw to Workbench. If lag bolts are being used, make sure they are long enough to go through holes in the saw base and the material the saw is being mounted to. If machine bolts are being used, make sure they are long enough to go through holes in the saw base, the material the saw is being mounted to, and the washers and nuts. NOTE: It may be necessary to countersink washers and nuts on the bottom side of mounting board. SAWDUST BLOWER See Figure 6. The sawdust blower is designed and preset to direct air to the most effective point on the cutting line. Be sure drop foot is properly adjusted to secure workpiece and direct air to the cutting surface. Plastic tubing should be connected to the bellows tube before starting the saw. DROP FOOT See Figure 6. To prevent workpiece from lifting, the drop foot should be adjusted so it just rests on the top of the workpiece. The drop foot should not be adjusted so that the workpiece drags. Always retighten the drop foot lock knob after each adjustment has been made. Loosen the drop foot lock knob. Lower or raise the drop foot to the desired position. Retighten the drop foot lock knob. The tall, front part of the drop foot acts as a blade guard to prevent accidental contact with the blade. 15 0 C-CLAMP SAW BASE C-CLAMP WORKBENCH DROP FOOT LOCK KNOB MOUNTING BOARD Fig. 5 BELLOWS TUBE PLASTIC TUBING DROP FOOT SAWDUST BLOWER 15 0 Fig. 6 30 30 13
-
 1
1 -
2
-
3
-
4
-
5
-
6
-
7
-
 8
8 -
 9
9 -
 10
10 -
 11
11 -
 12
12 -
 13
13 -
 14
14 -
 15
15 -
 16
16 -
 17
17 -
 18
18 -
19
-
20
-
21
-
22
 |
 |
