Ryobi BT3KIT English Manual - Page 20
Maintenance
 |
View all Ryobi BT3KIT manuals
Add to My Manuals
Save this manual to your list of manuals |
Page 20 highlights
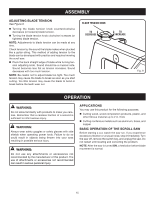
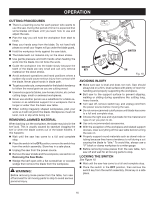
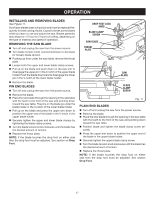
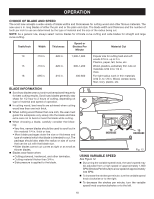
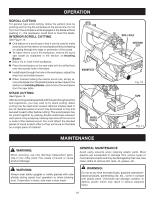
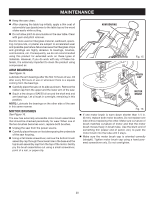
MAINTENANCE Keep the saw clean. After cleaning the table top initially, apply a thin coat of automobile type (paste) wax to the table top so the wood slides easily while cutting. Do not allow pitch to accumulate on the saw table. Clean with gum and pitch remover. Electric tools used on fiberglass material, wallboard, spackling compounds, or plaster are subject to accelerated wear and possible premature failure because the fiberglass chips and grindings are highly abrasive to bearings, brushes, commutators, etc. Consequently, we do not recommended using this product for extended work on these types of materials. However, if you do work with any of these materials, it is extremely important to clean the product using compressed air. ARM BEARINGS See Figure 15. Lubricate the arm bearings after the first 10 hours of use. Oil after every 50 hours of use or whenever there is a squeak coming from the bearings. Carefully place the saw on its side as shown. Remove the rubber cap from the upper and the lower arm of the saw. Squirt a few drops of SAE20 oil around the shaft end and arm bearings. Let oil soak in overnight, remaining in this position. NOTE: Lubricate the bearings on the other side of the saw in this same manner. MOTOR BRUSHES See Figure 16. The saw has externally accessible motor brush assemblies that should be checked periodically for wear. When one of the two brushes becomes worn, replace both brushes. Unplug the saw from the power source. Carefully place the saw on its side exposing the underside of the saw housing. Using a flat blade screwdriver, remove the bottom brush assembly cap through the access hole in the base and the top brush assembly cap from the top of the motor. Gently pry the brush assemblies out using a small screwdriver, point of a nail, or paper clip. 15 0 30 ARM BEARING Fig. 15 BRUSH CAP MOTOR BRUSH Fig. 16 If one motor brush is worn down shorter than 1/4 in. (6 mm), replace both motor brushes. Do not replace one side without replacing the other. Make sure curvature of brush matches curvature of motor and that the motor brush moves freely in brush tube. Use the blunt end of something thin (eraser end of pencil, etc.) to push the motor brush into the tube until it stays. Make sure the motor brush cap is oriented correctly (straight). Tighten motor brush cap using a hand powered screwdriver only. Do not overtighten. 20
-
 1
1 -
2
-
3
-
4
-
5
-
6
-
7
-
8
-
9
-
10
-
11
-
12
-
13
-
14
-
 15
15 -
 16
16 -
 17
17 -
 18
18 -
 19
19 -
 20
20 -
 21
21 -
 22
22
 |
 |
