Ryobi BT3KIT English Manual - Page 17
Installing And Removing Blades, Removing The Saw Blade, Pin End Blades, Plain End Blades
 |
View all Ryobi BT3KIT manuals
Add to My Manuals
Save this manual to your list of manuals |
Page 17 highlights
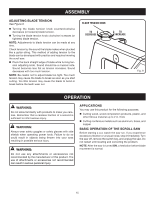
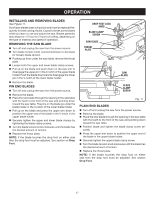
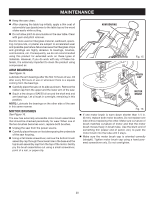
OPERATION INSTALLING AND REMOVING BLADES See Figure 11. Scroll saw blades wear out quickly and must be replaced frequently for best cutting results. Expect to break some blades while you learn to use and adjust the saw. Blades generally stay sharp for 1/2 hour to 2 hours of cutting, depending on the type of material and speed of operation. REMOVING THE SAW BLADE Turn off and unplug the saw from the power source. Turn blade tension knob counterclockwise to decrease (or loosen) blade tension. Pushing up from under the saw table, remove the throat plate. Loosen both the upper and lower blade clamp screws. Pull up on the blade and push down on the saw arm to disengage the upper pin in the V-notch of the upper blade holder. Push the blade downward to disengage the lower pin in the V-notch of the lower blade holder. Remove the blade. PIN END BLADES Turn off and unplug the saw from the power source. Remove the blade. Place the new blade through the opening in the saw table with the teeth to the front of the saw and pointing down toward the saw table. The pins on the blade go under the blade holder in the V-notch of the lower blade holder. Pull up on the blade and press the upper arm down to position the upper end of the blade in the V-notch in the upper blade holder. Securely tighten the upper and lower blade clamps by tightening the blade clamp screws. Turn the blade tension knob clockwise until the blade has the desired amount of tension. Replace the throat plate. NOTE: If the blade touches the drop foot on either side then the drop foot must be adjusted. See section on Drop Foot. DROP FOOT LOCK KNOB BLADE CLAMP SCREW SAW BLADE THROAT PLATE SAW BLADE BLADE CLAMP SCREW Fig. 11 PLAIN END BLADES Turn off and unplug the saw from the power source. Remove the blade. Place the new blade through the opening in the saw table with the teeth to the front of the saw and pointing down toward the saw table. Position blade and tighten the blade clamp screw securely. Press the upper arm down to position the upper end of the blade in the upper blade holder. Securely tighten the upper blade clamp screw. Turn the blade tension knob clockwise until the blade has the desired amount of tension. Replace the throat plate. NOTE: If the blade touches the drop foot on either side then the drop foot must be adjusted. See section Drop Foot. 17
-
 1
1 -
2
-
3
-
4
-
5
-
6
-
7
-
8
-
9
-
10
-
11
-
 12
12 -
 13
13 -
 14
14 -
 15
15 -
 16
16 -
 17
17 -
 18
18 -
 19
19 -
 20
20 -
 21
21 -
 22
22
 |
 |
