Ryobi P552 Manual 1 - Page 18
Aligning The Laser Guide Line
 |
View all Ryobi P552 manuals
Add to My Manuals
Save this manual to your list of manuals |
Page 18 highlights
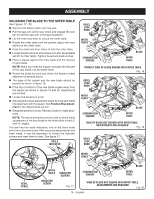
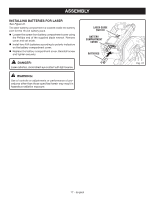
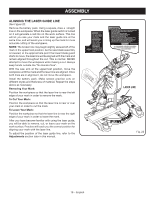
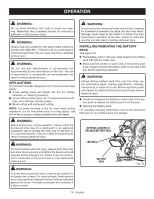
ASSEMBLY ALIGNING THE LASER GUIDE LINE See Figure 22. Remove the battery pack. Using a square, draw a straight line on the workpiece. When the laser guide switch is turned on it will generate a red line on the work surface. This line will let you see your mark and the laser guide line at the same time, and will assist you in lining up the mark for more accurate cutting of the workpiece. NOTE: The broken line may begin slightly skewed off of the mark in the uppermost position. As the saw blade assembly is lowered, at the approximate point the lower blade guard starts to move, the laser line will be aligned with the mark and remain aligned throughout the cut. This is normal. NEVER attempt to move the workpiece while making a cut. Always keep hands outside the "No Hands Zone". With the saw arm at the uppermost position, move the workpiece until the mark and the laser line are aligned. Once both lines are in alignment, do not move the workpiece. Install the battery pack. Make several practice cuts on different styles and thickness of material. Repeat the steps above as necessary. Removing Your Mark: Position the workpiece so that the laser line is near the left edge of your mark in order to remove the mark. To Cut Your Mark: Position the workpiece so that the laser line is near or over your mark in order to cut the mark. To Leave Your Mark: Position the workpiece so that the laser line is near the right edge of your mark in order to leave the mark. After you have become familiar with using the laser guide, you will be able to remove, cut, or leave your mark on the work surface. Practice will teach you the correct position for aligning your mark with the laser line. To adjust the position of the laser guide line, refer to the Adjustments section later in this manual. LASER LINE Fig. 22 18 - English
-
 1
1 -
2
-
3
-
4
-
5
-
6
-
7
-
8
-
9
-
10
-
11
-
12
-
 13
13 -
 14
14 -
 15
15 -
 16
16 -
 17
17 -
 18
18 -
 19
19 -
 20
20 -
 21
21 -
 22
22 -
 23
23 -
24
-
25
-
26
-
27
-
28
-
29
-
30
-
31
-
32
-
33
-
34
-
35
-
36
-
37
-
38
-
39
-
40
-
41
-
42
-
43
-
44
-
45
-
46
-
47
-
48
-
49
-
50
-
51
-
52
-
53
-
54
-
55
-
56
-
57
-
58
-
59
-
60
-
61
-
62
-
63
-
64
-
65
-
66
-
67
-
68
-
69
-
70
-
71
-
72
-
73
-
74
-
75
-
76
-
77
-
78
-
79
-
80
-
81
-
82
-
83
-
84
-
85
-
86
-
87
-
88
 |
 |
