Ryobi WS720 Operation Manual - Page 11
To Make An L-cut, To Make A Bevel Cut
 |
View all Ryobi WS720 manuals
Add to My Manuals
Save this manual to your list of manuals |
Page 11 highlights
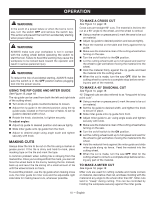
OPERATION Using a marker or grease pencil, mark the area to be cut on material. Set the rip guide to desired width, and tighten the knob to secure in place. Slide miter guide onto rip guide from front. Adjust miter guide to desired angle, using angle scale, and tighten securely with knob. Make sure the material is clear of the cutting wheel before turning on the saw. Turn the on/off switch to the on position. Let the cutting wheel build up to full speed and wait for the wheel to get wet before moving the material into the wheel. Hold the material firmly against the miter guide and slide miter guide along rip fence. Feed the material into the cutting wheel. When the cut is made, turn the saw OFF. Wait for the cutting wheel to come to a complete stop before removing any part of the material. To make an L-cut See Figure 17, page 19. L-cuts are cuts that remove a piece of tile to fit in a corner, around a cabinet, or a piece of molding and are made by two separate cuts. NOTE: Only overcut on the bottom or underneath side of the material being cut. Cut material to desired width using directions for cross cut Adjust rip guide to desired position and secure tightly. Place the material on the table and firmly against the rip guide. Make sure the material is clear of the cutting wheel before turning on the saw. Turn the on/off switch to the on position. Let the cutting wheel build up to full speed and wait for the wheel to get wet before moving the material into the wheel. Hold the material firmly against the rip guide and feed the material into the cutting wheel. Make the cut far enough into the material without overcutting. Turn the on/off switch to the OFF position. Turn the material over and make the cut along one of the marks. This time overcut the other line and the cut piece should separate from the rest of the material. Turn the on/off switch to the on position. Let the cutting wheel build up to full speed and wait for the wheel to get wet before moving the material into the wheel. When the cut is made, turn the saw OFF. Wait for the cutting wheel to come to a complete stop before removing any part of the material. To make a bevel cut See Figures 18 - 19, page 19. Beveled 22.5° and 45° cuts can be made using the bevel table. Using a marker or grease pencil, mark the area to be cut on material. Tip up the bevel table. On underside of bevel table, pull down the two table legs into right angles of the plate. Use first notches in legs to rest plate into 22.5° angle. Use second set of notches to angle bevel table into high- est 45° angle. NOTE: Make sure bevel table is locked firmly in place before beginning cut Fold legs up and lay bevel table flat for 0° angle. Turn the on/off switch to the on position. Let the cutting wheel build up to full speed and wait for the wheel to get wet before moving the material into the wheel. Hold the material firmly against the bevel table and feed the material into the cutting wheel. When the cut is made, turn the saw OFF. Wait for the cutting wheel to come to a complete stop before removing any part of the material. 11 - English
-
 1
1 -
2
-
3
-
4
-
5
-
 6
6 -
 7
7 -
 8
8 -
 9
9 -
 10
10 -
 11
11 -
 12
12 -
 13
13 -
 14
14 -
 15
15 -
 16
16 -
17
-
18
-
19
-
20
-
21
-
22
-
23
-
24
-
25
-
26
-
27
-
28
-
29
-
30
-
31
-
32
-
33
-
34
-
35
-
36
-
37
-
38
-
39
-
40
-
41
-
42
-
43
-
44
 |
 |