Samsung HMX-QF30BN User Manual Ver.1.0 (English) - Page 85
Using Auto Backup to send videos or photos, Installing the program for Auto backup on your PC,
 |
View all Samsung HMX-QF30BN manuals
Add to My Manuals
Save this manual to your list of manuals |
Page 85 highlights
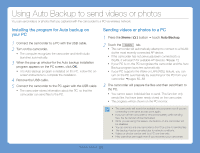
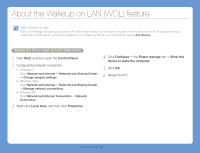
Using Auto Backup to send videos or photos You can send videos or photos that you captured with the camcorder to a PC via wireless network. Installing the program for Auto backup on your PC 1 Connect the camcorder to a PC with the USB cable. 2 Turn on the camcorder. • The computer recognizes the camcorder and Intelli-studio launches automatically. 3 When the pop-up window for the Auto backup installation program appears on the PC screen, click OK. • The Auto Backup program is installed on the PC. Follow the onscreen instructions to complete the installation. 4 Remove the USB cable. 5 Connect the camcorder to the PC again with the USB cable. • The camcorder stores information about the PC, so that the camcorder can send files to the PC. Sending videos or photos to a PC 1 Press the [Home ( )] button touch Auto Backup. 2 Touch the Confirm tab. • The camcorder will automatically attempt to connect to a WLAN via the most recently connected AP device. • If the camcorder has not previously been connected to a WLAN, it will search for available AP devices. page 72 • If your PC is on, the PC recognizes the camcorder and the Auto Backup program launches automatically. • If your PC supports the Wake on LAN (WOL) feature, you can turn on the PC automatically by searching for the PC from your camcorder. pages 82~83 3 The camcorder will prepare the files and then send them to the PC. • You cannot select individual files to send. This function only sends files that have been newly stored on the camcorder. • The progress will be shown on the PC monitor. • The camcorder will search for available access points even if you are connecting to the same access point again. • If you turn off the camcorder or remove the battery while sending files, the file transfer will be interrupted. • While you are using this feature, the buttons on the camcorder will be disabled. • You can connect only one camcorder to the PC at a time for sending files. • The backup may be canceled due to network conditions. • Videos or photos can be sent to a PC one time only. • Files cannot be sent again even if you reconnect your camcorder. Wireless network 81
-
 1
1 -
2
-
3
-
4
-
5
-
6
-
7
-
8
-
9
-
10
-
11
-
12
-
13
-
14
-
15
-
16
-
17
-
18
-
19
-
20
-
21
-
22
-
23
-
24
-
25
-
26
-
27
-
28
-
29
-
30
-
31
-
32
-
33
-
34
-
35
-
36
-
37
-
38
-
39
-
40
-
41
-
42
-
43
-
44
-
45
-
46
-
47
-
48
-
49
-
50
-
51
-
52
-
53
-
54
-
55
-
56
-
57
-
58
-
59
-
60
-
61
-
62
-
63
-
64
-
65
-
66
-
67
-
68
-
69
-
70
-
71
-
72
-
73
-
74
-
75
-
76
-
77
-
78
-
79
-
 80
80 -
 81
81 -
 82
82 -
 83
83 -
 84
84 -
 85
85 -
 86
86 -
 87
87 -
 88
88 -
 89
89 -
 90
90 -
91
-
92
-
93
-
94
-
95
-
96
-
97
-
98
-
99
-
100
-
101
-
102
-
103
-
104
-
105
-
106
-
107
-
108
-
109
-
110
-
111
-
112
-
113
-
114
-
115
-
116
-
117
-
118
-
119
-
120
-
121
-
122
-
123
-
124
-
125
-
126
-
127
-
128
-
129
-
130
-
131
-
132
-
133
 |
 |
