Samsung LNS4695DX User Manual (ENGLISH) - Page 49
Setting the Film Mode, English-47
 |
View all Samsung LNS4695DX manuals
Add to My Manuals
Save this manual to your list of manuals |
Page 49 highlights
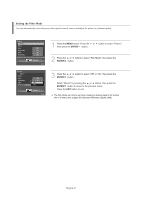
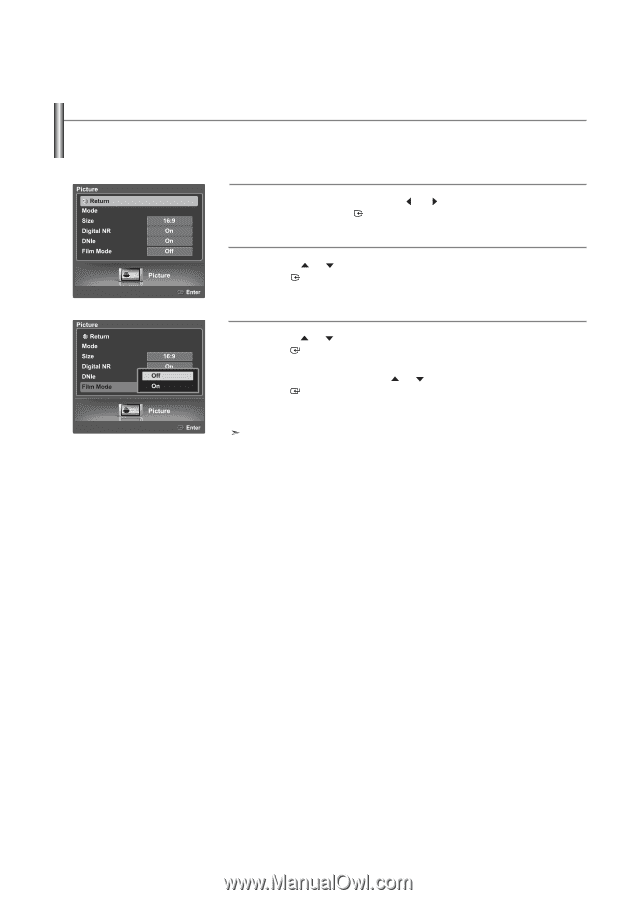
Setting the Film Mode You can automatically sense and process film signals from all sources and adjust the picture for optimum quality. 1 Press the MENU button. Press the then press the ENTER button. or button to select "Picture", 2 Press the or button to select "Film Mode", then press the ENTER button. 3 Press the or button to select "Off" or "On", then press the ENTER button. Select "Return" by pressing the or button, then press the ENTER button to return to the previous menu. Press the EXIT button to exit. The Film Mode can only be set when viewing an analog signal in AV modes (AV or S-Video) that support SD (Standard Definition) signals (480i). English-47
-
 1
1 -
2
-
3
-
4
-
5
-
6
-
7
-
8
-
9
-
10
-
11
-
12
-
13
-
14
-
15
-
16
-
17
-
18
-
19
-
20
-
21
-
22
-
23
-
24
-
25
-
26
-
27
-
28
-
29
-
30
-
31
-
32
-
33
-
34
-
35
-
36
-
37
-
38
-
39
-
40
-
41
-
42
-
43
-
 44
44 -
 45
45 -
 46
46 -
 47
47 -
 48
48 -
 49
49 -
 50
50 -
 51
51 -
 52
52 -
 53
53 -
 54
54 -
55
-
56
-
57
-
58
-
59
-
60
-
61
-
62
-
63
-
64
-
65
-
66
-
67
-
68
-
69
-
70
-
71
-
72
-
73
-
74
-
75
-
76
-
77
-
78
-
79
-
80
-
81
-
82
-
83
-
84
-
85
-
86
-
87
-
88
-
89
-
90
-
91
-
92
-
93
-
94
-
95
-
96
-
97
-
98
-
99
-
100
-
101
-
102
-
103
-
104
-
105
-
106
-
107
-
108
-
109
-
110
-
111
-
112
-
113
-
114
-
115
-
116
-
117
-
118
-
119
-
120
-
121
-
122
-
123
-
124
-
125
-
126
-
127
-
128
-
129
-
130
-
131
-
132
-
133
-
134
-
135
-
136
-
137
-
138
-
139
-
140
-
141
-
142
-
143
-
144
-
145
-
146
-
147
-
148
-
149
-
150
-
151
-
152
-
153
-
154
-
155
-
156
-
157
-
158
-
159
-
160
-
161
-
162
-
163
-
164
-
165
-
166
-
167
-
168
-
169
-
170
-
171
-
172
-
173
-
174
-
175
-
176
-
177
-
178
-
179
-
180
-
181
-
182
-
183
-
184
-
185
-
186
-
187
-
188
-
189
-
190
-
191
-
192
-
193
-
194
-
195
-
196
-
197
-
198
-
199
-
200
-
201
-
202
-
203
-
204
-
205
-
206
-
207
-
208
-
209
-
210
-
211
-
212
-
213
-
214
-
215
-
216
-
217
-
218
-
219
-
220
-
221
-
222
-
223
-
224
-
225
-
226
-
227
-
228
-
229
-
230
-
231
-
232
-
233
-
234
-
235
-
236
-
237
-
238
-
239
-
240
-
241
-
242
-
243
-
244
-
245
-
246
-
247
-
248
-
249
-
250
-
251
-
252
-
253
-
254
-
255
-
256
-
257
-
258
-
259
-
260
-
261
-
262
-
263
-
264
-
265
-
266
-
267
-
268
-
269
-
270
-
271
-
272
-
273
-
274
-
275
 |
 |
English-47
Setting the Film Mode
You can automatically sense and process film signals from all sources and adjust the picture for optimum quality.
1
Press the
MENU
button. Press the
or
button to select “Picture”,
then press the
ENTER
button.
2
Press the
or
button to select “Film Mode”, then press the
ENTER
button.
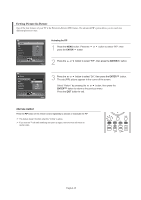
3
Press the
or
button to select “Off” or “On”, then press the
ENTER
button.
Select “Return” by pressing the
or
button, then press the
ENTER
button to return to the previous menu.
Press the
EXIT
button to exit.
The Film Mode can only be set when viewing an analog signal in AV modes
(AV or S-Video) that support SD (Standard Definition) signals (480i).