Samsung SCH R500 User Manual (ENGLISH) - Page 63
Camera
 |
View all Samsung SCH R500 manuals
Add to My Manuals
Save this manual to your list of manuals |
Page 63 highlights
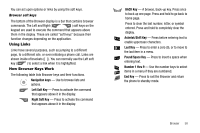
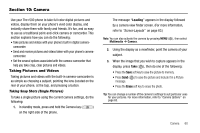
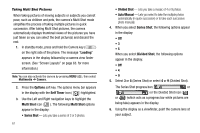
Section 10: Camera Use your The r500 phone to take full color digital pictures and videos, display them on your phone's vivid color display, and instantly share them with family and friends. It's fun, and as easy to use as a traditional point-and-click camera or camcorder. This section explains how you can do the following: • Take pictures and videos with your phone's built-in digital camera- camcorder. • Send and receive pictures and videos taken with your phone's camera- camcorder. • Set the several options associated with the camera-camcorder that help you take crisp, clear pictures and videos. Taking Pictures and Videos Taking pictures and videos with the built-in camera-camcorder is as simple as choosing a subject, pointing the lens (located on the rear of your phone, at the top), and pressing a button. Taking Snap Shots (Single Pictures) To take a single picture using the current camera settings, do the following: 1. In standby mode, press and hold the Camera key ( ) on the right side of the phone. The message "Loading" appears in the display followed by a camera view finder screen. (For more information, refer to "Screen Layouts" on page 63.) Note: You can also activate the camera by pressing MENU ( ), then select Multimedia ➔ Camera. 2. Using the display as a viewfinder, point the camera at your subject. 3. When the image that you wish to capture appears in the display, press Take ( ), then do one of the following: • Press the Save soft key to save the picture to memory. • Press Send ( ) to save the picture and include it in a Picture message. • Press the Erase soft key to erase the photo. Tip: You can change a number of the camera's settings to suit particular uses for your pictures. For more information, refer to "Camera Options" on page 65. Camera 60
-
 1
1 -
2
-
3
-
4
-
5
-
6
-
7
-
8
-
9
-
10
-
11
-
12
-
13
-
14
-
15
-
16
-
17
-
18
-
19
-
20
-
21
-
22
-
23
-
24
-
25
-
26
-
27
-
28
-
29
-
30
-
31
-
32
-
33
-
34
-
35
-
36
-
37
-
38
-
39
-
40
-
41
-
42
-
43
-
44
-
45
-
46
-
47
-
48
-
49
-
50
-
51
-
52
-
53
-
54
-
55
-
56
-
57
-
 58
58 -
 59
59 -
 60
60 -
 61
61 -
 62
62 -
 63
63 -
 64
64 -
 65
65 -
 66
66 -
 67
67 -
 68
68 -
69
-
70
-
71
-
72
-
73
-
74
-
75
-
76
-
77
-
78
-
79
-
80
-
81
-
82
-
83
-
84
-
85
-
86
-
87
-
88
-
89
-
90
-
91
-
92
-
93
-
94
-
95
-
96
-
97
-
98
-
99
-
100
-
101
-
102
-
103
-
104
-
105
-
106
-
107
-
108
-
109
-
110
-
111
-
112
-
113
-
114
-
115
-
116
-
117
-
118
-
119
-
120
-
121
-
122
-
123
-
124
-
125
-
126
-
127
-
128
-
129
-
130
-
131
-
132
-
133
-
134
-
135
-
136
-
137
-
138
-
139
-
140
-
141
-
142
-
143
-
144
-
145
-
146
-
147
-
148
-
149
-
150
-
151
-
152
-
153
-
154
-
155
-
156
 |
 |