Sanyo DP26746 Owners Manual - Page 9
Side And Back Panels - no video
 |
UPC - 086483058660
View all Sanyo DP26746 manuals
Add to My Manuals
Save this manual to your list of manuals |
Page 9 highlights
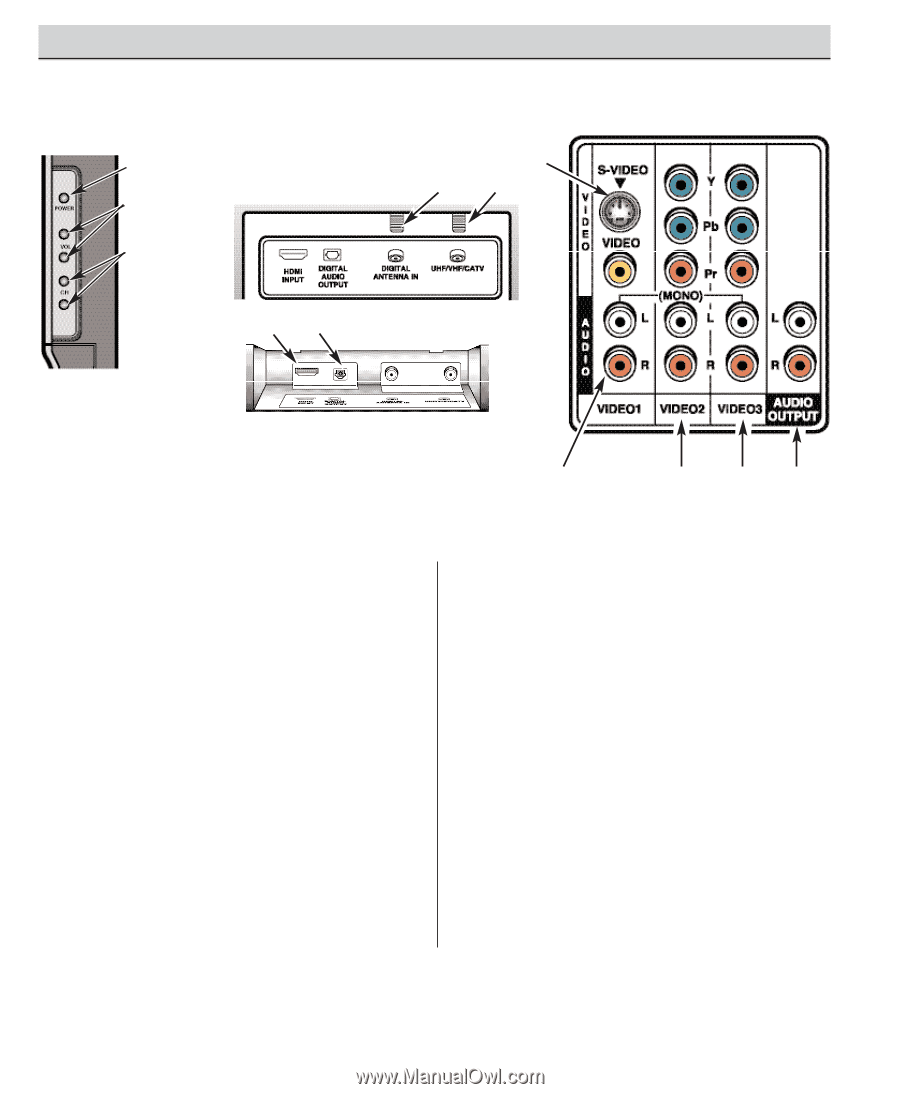
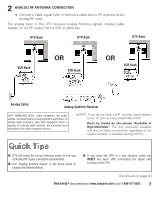
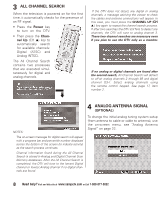
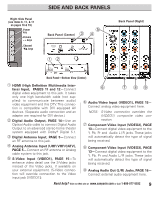
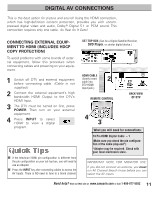
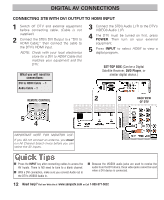
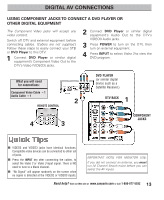
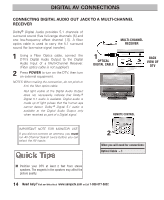
Right Side Panel (see items 8, 11, & 17 on pages 18 & 19) Power key Volume - + keys Channel ML keys SIDE AND BACK PANELS Ž Back Panel (Center) Back Panel (Right) È Œ Back Panel-Bottom View (Center) Œ HDMI (High Definition Multimedia Inter- face) Input, PAGES 11 and 12-Connect digital video equipment to this jack. It takes only one high bandwidth cable (not supplied) to communicate between audio / video equipment and this DTV. This connection is compatible with DVI equipped AV devices. (Separate audio connection and an adapter are required for DVI device.) Digital Audio Output, PAGE 14-Use an Optical Audio cable to connect Digital Audio Output to an advanced stereo home theater system equipped with Dolby® Digital 5.1. Ž Digital Antenna Input, PAGE 5-Connect an RF antenna to this jack. Analog Antenna Input (UHF/VHF/CATV), PAGE 5-Connect an RF antenna or Analog cable system to this jack. S-Video Input (VIDEO1), PAGE 15-To enhance video detail use the S-Video jacks instead of the Video jacks, if available on your external equipment. (S-Video connection will override connection to the Video input jack [VIDEO1]). ‘ ’ “” ‘ Audio/Video Input (VIDEO1), PAGE 15- Connect analog video equipment here. NOTE: S-Video connection overrides the (VIDEO1) composite video connection. ’ Component Video Input (VIDEO2), PAGE 13-Connect digital video equipment to the Y, Pb, Pr and Audio L / R jacks. These jacks will automatically detect the type of signal being received. “ Component Video Input (VIDEO3), PAGE 13-Connect digital video equipment to the Y, Pb, Pr and Audio L / R jacks. These jacks will automatically detect the type of signal being received. ” Analog Audio Out (L/R) Jacks, PAGE 16- Connect external audio equipment here. Need help? Visit our Web site at www.sanyoctv.com or Call 1-800-877-5032 9
-
 1
1 -
2
-
3
-
 4
4 -
 5
5 -
 6
6 -
 7
7 -
 8
8 -
 9
9 -
 10
10 -
 11
11 -
 12
12 -
 13
13 -
 14
14 -
15
-
16
-
17
-
18
-
19
-
20
-
21
-
22
-
23
-
24
-
25
-
26
-
27
-
28
-
29
-
30
-
31
-
32
-
33
-
34
-
35
-
36
-
37
-
38
-
39
-
40
-
41
-
42
-
43
-
44
-
45
-
46
-
47
-
48
-
49
-
50
-
51
-
52
-
53
-
54
-
55
-
56
-
57
-
58
-
59
-
60
-
61
-
62
-
63
-
64
-
65
-
66
-
67
-
68
 |
 |