Sanyo PLC XU73 Owners Manual - Page 54
Appendix, Troubleshooting - problem
 |
View all Sanyo PLC XU73 manuals
Add to My Manuals
Save this manual to your list of manuals |
Page 54 highlights
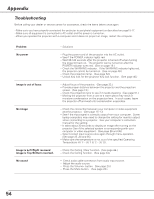
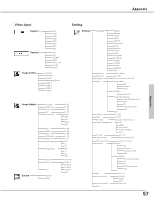
Appendix Troubleshooting Before calling your dealer or service center for assistance, check the items below once again. -Make sure you have properly connected the projector to peripheral equipment as described on page15-17. -Make sure all equipment is connected to AC outlet and the power is turned on. -When you operate the projector with a computer and it does not project an image, restart the computer. Problem: No power Image is out of focus. No image Image is Left/Right reversed. Image is Top/Bottom reversed. No sound - Solutions - Plug the power cord of the projector into the AC outlet. - See if the POWER indicator lights red. - Wait 90-120 seconds after the projector is turned off when turning the projector back on. The projector can be turned on after the POWER indicator turns red. (See on page 19.) - Check the WARNING indicator. If the WARNING indicator lights red, the projector cannot be turned on. (See on page 49.) - Check the projection lamp. (See page 52.) - Unlock Key lock for the projector Key lock function. (See page 46.) - Adjust focus of the projector. (See page 22.) - Provide proper distance between the projector and the projection screen. (See page 13.) - Check the projection lens to see if it needs cleaning. (See page 51.) - Moving the projector from a cool to a warm place may result in moisture condensation on the projection lens. In such cases, leave the projector off and wait until condensation evaporates. - Check the connection between your computer or video equipment and the projector. (See page 15-17) - See if the input signal is correctly output from your computer. Some laptop computers may need to change the setting for monitor output when connecting to a projector. See your computer's instruction manual for the setting. - It takes about 30 seconds to display an image after turning on the projector.See if the selected system is corresponding with your computer or video equipment. (See page 26 and 36) - Select correct input source once again through menu operation. (See page 25 ,34 and 35) - Make sure the temperature is not out of the specified Operating Temperature (41 ˚F ~ 95 ˚F (5 ˚C ~ 35 ˚C)) . - Check the Ceiling / Rear function. (See page 44.) - Check the Ceiling function. (See page 44.) - Check audio cable connection from audio input source. - Adjust the audio source. - Press the Volume+ button. (See page 23.) - Press the Mute button. (See page 23.) 54
-
 1
1 -
2
-
3
-
4
-
5
-
6
-
7
-
8
-
9
-
10
-
11
-
12
-
13
-
14
-
15
-
16
-
17
-
18
-
19
-
20
-
21
-
22
-
23
-
24
-
25
-
26
-
27
-
28
-
29
-
30
-
31
-
32
-
33
-
34
-
35
-
36
-
37
-
38
-
39
-
40
-
41
-
42
-
43
-
44
-
45
-
46
-
47
-
48
-
 49
49 -
 50
50 -
 51
51 -
 52
52 -
 53
53 -
 54
54 -
 55
55 -
 56
56 -
 57
57 -
 58
58 -
 59
59 -
60
-
61
-
62
-
63
-
64
 |
 |