Sanyo VCC-XZ600N Installation Manual
Sanyo VCC-XZ600N - Network Camera - Weatherproof Manual
 |
View all Sanyo VCC-XZ600N manuals
Add to My Manuals
Save this manual to your list of manuals |
Sanyo VCC-XZ600N manual content summary:
- Sanyo VCC-XZ600N | Installation Manual - Page 1
INSTALLATION MANUAL Color CCD Camera THIS INSTALLATION SHOULD BE MADE BY A QUALIFIED SERVICE PERSON AND SHOULD CONFORM TO ALL LOCAL CODES. VCC-XZ600N Español Français English Please read this installation manual carefully in order to ensure correct installation. In addition, be sure to read - Sanyo VCC-XZ600N | Installation Manual - Page 2
support the full weight of the camera problem Do not use the unit if smoke or a strange odor comes from the unit, or if it seems not to function correctly. Turn off the power immediately and disconnect the power cord, and then consult your dealer or an Authorized Sanyo Service instructions. - Sanyo VCC-XZ600N | Installation Manual - Page 3
and, if not installed and used in accordance with the instructions, may cause harmful interference to radio communications. However, there is ." This installation manual and the electronic manual are copyrighted by SANYO Electric Co., Ltd. No materials contained in these manuals may be reproduced - Sanyo VCC-XZ600N | Installation Manual - Page 4
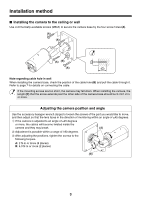
the lens faces in the direction of monitoring within an angle of ±45 degrees. 1 If the camera is adjusted to an angle of ±45 degrees or more, the cables will become twisted inside the camera and they may break. (A) 2 Adjustment is possible within a range of 180 degrees. 3 After adjusting the - Sanyo VCC-XZ600N | Installation Manual - Page 5
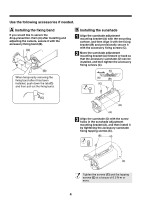
needed. A Installing the fixing band If you would like to secure the drop-prevention chain (A) after installing and adjusting the camera, secure it with the accessory fixing band (B). (A) (B) B Installing the sunshade 1 Align the sunshade adjustment mounting bracket (A) with the mounting surface - Sanyo VCC-XZ600N | Installation Manual - Page 6
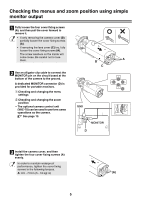
not to lose them. A B C 2 Use an alligator clip cable to connect the MONITOR pin on the circuit board at the bottom of the camera to the ground. A dedicated MONITOR connector (D) is provided for portable monitors. 1Checking and changing the menu settings 2Checking and changing the zoom position - Sanyo VCC-XZ600N | Installation Manual - Page 7
simple monitor output". (P5) 2 Use the accessory hexagonal wrench (small) to loosen the camera fixing screw (A), and then remove the camera unit (B) from the camera fixing bracket (C). (B) (A) (C) (A) (D) • Tighten the camera fixing screw so that the screw head (E) do not protrude by any more than - Sanyo VCC-XZ600N | Installation Manual - Page 8
colors or higher • Web browser: Internet Explorer Ver.6.0 or higher Connect the camera to the LAN through a switching hub using shielded LAN cables. PC LAN cable distance by using multiple switching hubs with PoE support. For details on the extendable distance, please refer to the hub - Sanyo VCC-XZ600N | Installation Manual - Page 9
● About the internet connection Port forwarding must be set on two of the router ports (camera side). For details on how to set port forwarding, please refer to your router's instruction manual. • Video port number Conduct the following port forwarding settings with respect to the router: IP - Sanyo VCC-XZ600N | Installation Manual - Page 10
Connections Note: All connection cables should be 24 AWG or higher with a maximum length of no more than 600 m (656 yds). BNC type Coaxial cable Digital video recorder etc. Shielded LAN cable (CAT5 or higher, straight type) See "Connection when Using PoE Power Supply" or "Connection when Not - Sanyo VCC-XZ600N | Installation Manual - Page 11
Alarm Signal Input For details, see "Setting the Alarm Input (ALARM IN)" in the electronic manual contained in the CD-ROM. SYNC CAMERA LENS ALARM PRIVACY MASK PASSWORD LANGUAGE OPTION INT 1 y SET y SET y SET y SET y SET y SET y ALARM ALARM IN ALARM OUT ALARM DISPLAY 1 y SET y OFF b - Sanyo VCC-XZ600N | Installation Manual - Page 12
You can switch the viewing mode manually between the color mode and the black/white mode. & [CAMERA] ⇒ [COLOR] ⇒ [EXT ALARM] Camera Title You can set and display the camera title. This helps you confirm from which camera the image is sent when multiple cameras are connected. (Maximum 16 characters - Sanyo VCC-XZ600N | Installation Manual - Page 13
mode and the black/white mode. You can adjust the luminance threshold for switching the viewing mode. LOW MID HIGH B/W Color Switchover point & [CAMERA] ⇒ [DAY/NIGHT] ⇒ [AUTO] ⇒ [LEVEL] White Balance Adjustment In addition to the white balance adjustment, you can use the mask patterns to cover - Sanyo VCC-XZ600N | Installation Manual - Page 14
control unit (VAC-70) can be used to perform same operations as the camera. For details, refer to the instruction manual for the camera control unit. A Using the buttons on the camera 1 Displays the main menu. Press and hold down the SET button for 3 seconds or longer to display the main menu - Sanyo VCC-XZ600N | Installation Manual - Page 15
next screen. When you select the menu item with y mark and press the SET button, the submenu screen for advanced options appears. SYNC CAMERA LENS ALARM PRIVACY MASK PASSWORD LANGUAGE OPTION INT 1 y SET y SET y SET y SET y SET y SET y Pressing the jl button moves the cursor. SET After - Sanyo VCC-XZ600N | Installation Manual - Page 16
[POSITION] is reset from "ON" to the default "OFF". When the [POSITION] setting is switched to "OFF", the zoom and focus settings stored in the camera will be overwritten by those settings of the current position. In the same way, performing zoom or focus operation with [POSITION] set to "OFF" also - Sanyo VCC-XZ600N | Installation Manual - Page 17
troubleshooting procedure Click "Troubleshooting" on the menu located on the left of the screen. & You can also refer to "How to use this manual" to better understand the structure of the electronic manual and the description of individual screens. MEMO: To open and view the instruction manual - Sanyo VCC-XZ600N | Installation Manual - Page 18
Main specifications ■ Camera Television system Image sensor Effective pixels Scanning system Synchronization method Video output Horizontal Maximum 16 users (admin: 1 user) Maximum 12 users (admin: 1 user, SSL ON) BASIC authentication (ID/password), SSL supported -10°C - +50°C/14°F - 122°F 17 - Sanyo VCC-XZ600N | Installation Manual - Page 19
to the license agreement. • For information on the other products or services provided by third parties which are introduced in the CD-ROM, please contact The official name for "Windows" used in this manual is Microsoft® Windows® Operating System. In this manual, note that the word "Windows" is used - Sanyo VCC-XZ600N | Installation Manual - Page 20
MEMO ... - Sanyo VCC-XZ600N | Installation Manual - Page 21
MANUEL D'INSTALLATION Caméra CCD couleurs CETTE INSTALLATION DOIT ETRE EFFECTUEE PAR UNE PERSONNE QUALIFIEE DU SERVICE TECHNIQUE ET DOIT ETRE CONFORME A TOUS LES CODES LOCAUX. VCC-XZ600N Español Français English Veuillez lire ce manuel d'installation très attentivement afin d'effectuer une - Sanyo VCC-XZ600N | Installation Manual - Page 22
courbée, ronde ou autre, utilisez alors un support de montage en vente dans le commerce. • -vous à votre revendeur ou à un Centre de service Sanyo autorisé. ■ Ne l'ouvrez pas et ne le modifiez é chimiquement, assurez-vous de lire toutes les instructions qui l'accompagnent. Assurez-vous qu'aucune piè - Sanyo VCC-XZ600N | Installation Manual - Page 23
radio et, s'il n'est pas installé et utilisé conformément aux instructions, peut provoquer des interférences nuisibles aux communications radio. Il n'est et le manuel électronique sont protégés par les droits d'auteur de SANYO Electric Co., Ltd. Aucun des éléments contenus dans ces manuels ne - Sanyo VCC-XZ600N | Installation Manual - Page 24
Méthode d'installation ■ Installation de la caméra au plafond ou au mur À l'aide de vis (M8x4) en vente dans le commerce, fixez l'embase de la caméra au niveau des quatre trous de vis (A). (A) (A) (A) (B) (A) (C) Remarque concernant le trou de passage du câble au mur Lorsque vous montez l'embase - Sanyo VCC-XZ600N | Installation Manual - Page 25
monter ce dernier (D), puis serrez les vis de fixation fournies (C). (C) (A) (B) (C) (C) (B) (A) 3 Alignez le pare-soleil (D) aux trous de vis de son support de montage et de réglage (A), puis fixez-le en serrant les vis autotaraudeuses de fixation du pare-soleil (E). (E) (D) Serrez les vis - Sanyo VCC-XZ600N | Installation Manual - Page 26
Vérification des menus et de la position de zoom avec une sortie d'écran simple 1 Desserrez entièrement les quatre vis de fixation du couvercle (A), puis tirez le couvercle vers l'avant pour l'extraire. • Si vous ne désirez enlever que le couvercle de la caméra (B), ne desserrez les vis de fixation - Sanyo VCC-XZ600N | Installation Manual - Page 27
. (B) (C) ■ Remplacement du dessiccatif Assurez-vous de bien respecter les instructions qui suivent pour ne pas endommager la caméra. • Assurez-vous fixation de la caméra (A), puis enlevez l'unité de caméra (B) de son support de fixation (C). (B) (A) (C) (A) (D) • Serrez la vis de fixation de la - Sanyo VCC-XZ600N | Installation Manual - Page 28
Branchements ■ Branchement avec la fonction PoE (Power over Ethernet) alimentation électrique Cette caméra permet la communication simultanée de vidéos aux formats JPEG et H.264 et également de vidéos bidirectionnelles entre la caméra et le PC. ● N'utilisez pas l'alimentation de la caméra. ● N' - Sanyo VCC-XZ600N | Installation Manual - Page 29
un câble LAN de type droit (CAT5 ou supérieur). Pour la connexion à un modem ADSL ou à d'autres dispositifs, reportez-vous au manuel d'instructions du dispositif concerné. Routeur ou modem ADSL Internet ● A propos de la connexion internet La transmission par port doit être réglée sur deux des ports - Sanyo VCC-XZ600N | Installation Manual - Page 30
Branchements Remarque: Tous les câbles de branchement doivent être au moins 24 AWG et d'une longueur maximale de 600 m (656 yd). Type BNC Câble coaxial Enregistreur vidéo numérique, etc. Branchement du moniteur • L'utilisation de câbles autres que ceux spécifiés peut atténuer les signaux vidéo et - Sanyo VCC-XZ600N | Installation Manual - Page 31
est relié à ce câble, il s'allume lorsqu'un signal d'alarme est reçu ou lorsque le capteur intégré détecte un mouvement. SYNC CAMERA LENTILLE ALARME MASQUE M/PASSE LANGUE OPTION INT 1 y REG y REG y REG y REG y REG y REG y ALARME ENT ALARME SORTIE ALARME 1 y REG y AFFICHER ALARME ARR - Sanyo VCC-XZ600N | Installation Manual - Page 32
réglages de zoom et de mise au point des positions de surveillance via le numéro de configuration caméra. & [CAMERA] ⇒ [POSITION] CAMERA 1 CAMERA 2 POSITION POSITION x 1.0 SET y x 3.0 SET y b La fonction de zoom électronique permet de zoomer un objet avec une puissance d'agrandissement plus - Sanyo VCC-XZ600N | Installation Manual - Page 33
couvrir toute source intense d'ombre ou de lumière dans l'image de surveillance pour que l'équilibrage des blancs puisse être configuré correctement. & [CAMERA] ⇒ [EQUIL BLANC] ⇒ [ATW] ⇒ [MASQUAGE] Compensation de contre-jour b La caméra utilise des zones de mesure divisées en 48 pour compenser - Sanyo VCC-XZ600N | Installation Manual - Page 34
rations que la caméra. Pour plus de détails, consultez le manuel d'instructions de la télécommande en question. A Avec les boutons de la caméra ) pour effectuer les réglages à distance VAC-70 Entree video VIDEO OUT 2 CAMERA 4 1 3 Type BNC • Veillez à bien débrancher la télécommande pour cam - Sanyo VCC-XZ600N | Installation Manual - Page 35
un article de menu avec la marque y et que vous pressez le bouton SET, un écran de sous-menu pour options avancées s'affiche. SYNC CAMERA LENTILLE ALARME MASQUE M/PASSE LANGUE OPTION INT 1 y REG y REG y REG y REG y REG y REG y Pressez le bouton jl pour déplacer le curseur. SET Après un - Sanyo VCC-XZ600N | Installation Manual - Page 36
le menu principal • [AFFICHER (TITRE)] et [RESEAU] dans le menu OPTION • Réglage du zoom ou de la mise au point dans [POSITION] dans le menu CAMERA Notez que la valeur de l'article [POSITION] passe de « MAR » à la valeur par défaut « ARR ». Quand le réglage [POSITION] est commuté sur « ARR », les - Sanyo VCC-XZ600N | Installation Manual - Page 37
finition menu pour chaque utilisation Cliquez sur « Guide au menu de réglage » sur le menu & Vous pouvez également consulter « How to use this manual (Comment utiliser ce manuel) » pour mieux comprendre la pouvoir ouvrir et visualiser le manuel d'instructions (VA-SW3050Lite). Si le logiciel en - Sanyo VCC-XZ600N | Installation Manual - Page 38
point Norme d'étanchéité Réseau Humidité/température ambiantes de service Source d'alimentation Consommation d'énergie Poids Standards couleur NTSC CCD transfert SSL MAR) Securité Authentification DE BASE (ID / mot de passe), support SSL Température de service -10 - +50°C/14°F - 122°F 17 - Sanyo VCC-XZ600N | Installation Manual - Page 39
accord de licence, vous devez accepter tous les termes et conditions qui y sont contenus. • Pour obtenir des informations sur les autres produits ou services fournis par des tiers et présentés dans le CD-ROM, veuillez contacter chaque fournisseur ou fabricant. Microsoft, Windows, ActiveX et Internet - Sanyo VCC-XZ600N | Installation Manual - Page 40
N.B... - Sanyo VCC-XZ600N | Installation Manual - Page 41
LA INSTALACIÓN TIENE QUE SER REALIZADA POR UNA PERSONA DE SERVICIO Y TIENE QUE ESTAR DE ACUERDO CON LOS CÓDIGOS LOCALES. VCC-XZ600N Español Français English Leer atentamente este manual de instalación para garantizar que se realiza una instalación correcta. Además, es preciso leer atentamente el - Sanyo VCC-XZ600N | Installation Manual - Page 42
la carcasa, pues podría ser peligroso y dañar la unidad. Para reparaciones, consulte en el lugar donde la compró o a un centro de servicio autorizado Sanyo. ■ No ponga objetos dentro de la unidad Asegúrese que ningún objeto metálico ni sustancias inflamables ingresan dentro de la unidad. Si se usa - Sanyo VCC-XZ600N | Installation Manual - Page 43
DE ESTE PRODUCTO RELACIONADAS CON LA SEGURIDAD O LA SEÑALIZACIÓN. Este manual de instalación y el manual electrónico están sujetos a derechos de autor de SANYO Electric Co., Ltd. Los materiales contenidos en estos manuales no pueden reproducirse con ningún medio sin la previa y expresa autorizaci - Sanyo VCC-XZ600N | Installation Manual - Page 44
Método de instalación ■ Instalación de la cámara en el techo o pared Use tornillos disponibles a la venta (M8x4) para asegurar la base de la cámara por los cuatro agujeros de tornillos (A). (A) (A) (A) (B) (A) (C) Nota respecto al agujero del cable en la pared Al instalar la base de la cámara, - Sanyo VCC-XZ600N | Installation Manual - Page 45
Si fuera necesario use los siguientes accesorios. A Instalación de la banda de fijación Si quisiera asegurar el cable de prevención de caída (A) después de instalar y ajustar la cámara, asegúrela con la banda de fijación accesoria (B). (A) B Instalación de la visera 1 Alinee la ménsula de montaje - Sanyo VCC-XZ600N | Installation Manual - Page 46
Verificación de los menús y la posición de zoom usando una sencilla salida de monitoreo. 1 Afloje totalmente los cuatro tornillos de fijación de cubierta (A), y luego tire de la cubierta hacia delante para desmontarla. • Si sólo desmonta la cubierta de la cámara (B), afloje parcialmente los - Sanyo VCC-XZ600N | Installation Manual - Page 47
el desecante por desecante nuevo antes de instalar la cubierta de la cámara (consulte en el lugar donde la compró o a un centro de servicio autorizado Sanyo). Si se usa la cámara sin cambiar el desecante, puede ocurrir condensación dentro de la cámara y hacer que la lente se empañe. 3 Cambie el - Sanyo VCC-XZ600N | Installation Manual - Page 48
Conexiones ■ Conexión cuando se usa la fuente de alimentación PoE (Power over Ethernet) Esta cámara suministra vídeo simultáneamente en los formatos JPEG y H.264 y también comunicación de vídeo bidireccional entre la cámara y el PC. ● No utilizar la fuente de alimentación de la cámara. ● No - Sanyo VCC-XZ600N | Installation Manual - Page 49
en dos de los puertos del enrutador (en la cámara). Para mayor información sobre cómo configurar el redireccionamiento de puertos, consultar el manual de instrucciones del enrutador. • Número del puerto para vídeo Configurar el redireccionamiento de puertos de la siguiente forma con respecto al - Sanyo VCC-XZ600N | Installation Manual - Page 50
Conexiones Nota: Todos los cables de conexión deben ser 24 AWG o mayores con un largo máximo de no más de 600 m (656 yardas). Tipo BNC Cable coaxial Grabador de vídeo digital, etc. Cable LAN apantallado (CAT5 o superior, de tipo recto) Ver "Conexión cuando se usa la fuente de alimentación PoE " o - Sanyo VCC-XZ600N | Installation Manual - Page 51
entrada de alarmas (ENTRADA ALARMA)" en el manual electrónico contenido en el CD-ROM. SYNC CAMERA LENS ALARM PRIVACY MASK PASSWORD LANGUAGE OPTION alarma o cuando el sensor de movimiento incorporado detecta movimiento. SYNC CAMERA LENS ALARM PRIVACY MASK PASSWORD LANGUAGE OPTION INT 1 y SET - Sanyo VCC-XZ600N | Installation Manual - Page 52
de zoom b Es posible almacenar los ajustes de zoom y enfoque de lugares de vigilancia por número de ajuste de cámara. & [CAMERA] ⇒ [POSICION] CAMERA 1 CAMERA 2 POSITION POSITION Ajustes de alarma b La cámara está provista de un sensor de movimiento incorporado. & [CAMARA] ⇒ [MOVIMIENTO] ⇒ [ON - Sanyo VCC-XZ600N | Installation Manual - Page 53
para la medición. & [CAMARA] ⇒ [BLC] ⇒ [MULT] o [CENT] b Es posible aplicar una máscara al área de medición que no se desea medir. & [CAMERA] ⇒ [BLC] ⇒ [MASCARA] Máscaras de privacidad Las máscaras de privacidad puede usarse para proteger la privacidad ocultando determinadas partes de la imagen que - Sanyo VCC-XZ600N | Installation Manual - Page 54
las mismas operaciones que la cámara. Para mayores detalles, consultar el manual de instrucciones de la unidad de control de la cámara. A Usando realizar los ajustes a distancia Entrada de vídeo VIDEO OUT VAC-70 2 CAMERA 4 1 3 BNC type • Asegurarse de desconectar la unidad de control - Sanyo VCC-XZ600N | Installation Manual - Page 55
Aprendizaje de las operaciones de ajuste del menú 1 Visualización del menú principal. SET Pulsar y mantener pulsado el botón durante unos 3 segundos. SINC CAMARA LENTE ALARMA MASCARA PRIV CONTRASENA IDIOMA OPCION PREAJUSTES MENU INT 1 y AJU y AJU y AJU y AJU y AJU y AJU - Sanyo VCC-XZ600N | Installation Manual - Page 56
Aprendizaje de las operaciones de ajuste del menú 5 Volver a la pantalla anterior. Seleccionar [MENU] - "ATRAS" en la parte inferior de la pantalla, y pulsar el botón SET. IRIS BALANCE BLANCO BLC OBTURADOR APERTURA AGC GAMMA MOVIMIENTO POSICION DIA/NOCHE PREAJUSTES MENU AUTO y ATW y OFF OFF ON y - Sanyo VCC-XZ600N | Installation Manual - Page 57
clic en el icono " ". 2 Seleccionar el modelo de la cámara (Pantalla 1). 3 Seleccionar el idioma deseado (Pantalla 2). El manual electrónico se abre. 4 Hacer clic en "Open this manual (Abrir este manual)". En el menú situado a la izquierda de la pantalla, hacer clic en el elemento sobre el que se - Sanyo VCC-XZ600N | Installation Manual - Page 58
Especificaciones principales ■ Cámara Sistemas de televisión Sensor de imágenes Píxeles efectivos Sistema de exploración Método de sincronización Salida de vídeo Resolución horizontal Iluminación de la imagen inferior Relación S/N de las imágenes Lente Zoom electrónico Entrada de alarma Salida de - Sanyo VCC-XZ600N | Installation Manual - Page 59
Corporation en los Estados Unidos y en otros países. El nombre oficial para "Windows" usado en este manual es Microsoft® Windows® Operating System. Notar que en este manual la palabra "Windows" se refiere al sistema operativo "Microsoft® Windows® XP". Intel y Pentium son marcas registradas o marcas - Sanyo VCC-XZ600N | Installation Manual - Page 60
NOTA ... - Sanyo VCC-XZ600N | Installation Manual - Page 61
- Sanyo VCC-XZ600N | Installation Manual - Page 62
Pattern sheet (Scale 1/1) Unit: mm (inch) 4- 8.5 (0.3) 141 (5.7) 110 (4.4) 150 (5.9) 172 (6.8) - Sanyo VCC-XZ600N | Installation Manual - Page 63
other cables as required. F CD-ROM (VA-SW3050Lite, Plug-in, Electronic Manual 1 F Accessoires 1 Pare-soleil 1 2 Vis autotaraudeuses de fixation du pare- Ne pas sortir le sac avant de l'utiliser. 6 Support de fixation et de réglage du pare-soleil 1 7 Support de fixation 1 8 Vis de fixation 2 9 - Sanyo VCC-XZ600N | Installation Manual - Page 64
113 (4.5) 87 (3.4) 29 (1.2) 172 (6.8) 87 (3.4) 182 (7.2) Dimensions 123 (4.9) 75 (3.0) 29 (1.2) 141 (5.7) 224 (8.9) 211 (8.3) 400 (16) 381 (15) 21 (0.9) Unit: mm (inch) 1AC6P1P3285-L5CE2/US (1207KP-HS) SANYO Electric Co., Ltd. Printed in China
-
 1
1 -
 2
2 -
 3
3 -
 4
4 -
 5
5 -
 6
6 -
 7
7 -
8
-
9
-
10
-
11
-
12
-
13
-
14
-
15
-
16
-
17
-
18
-
19
-
20
-
21
-
22
-
23
-
24
-
25
-
26
-
27
-
28
-
29
-
30
-
31
-
32
-
33
-
34
-
35
-
36
-
37
-
38
-
39
-
40
-
41
-
42
-
43
-
44
-
45
-
46
-
47
-
48
-
49
-
50
-
51
-
52
-
53
-
54
-
55
-
56
-
57
-
58
-
59
-
60
-
61
-
62
-
63
-
64
 |
 |
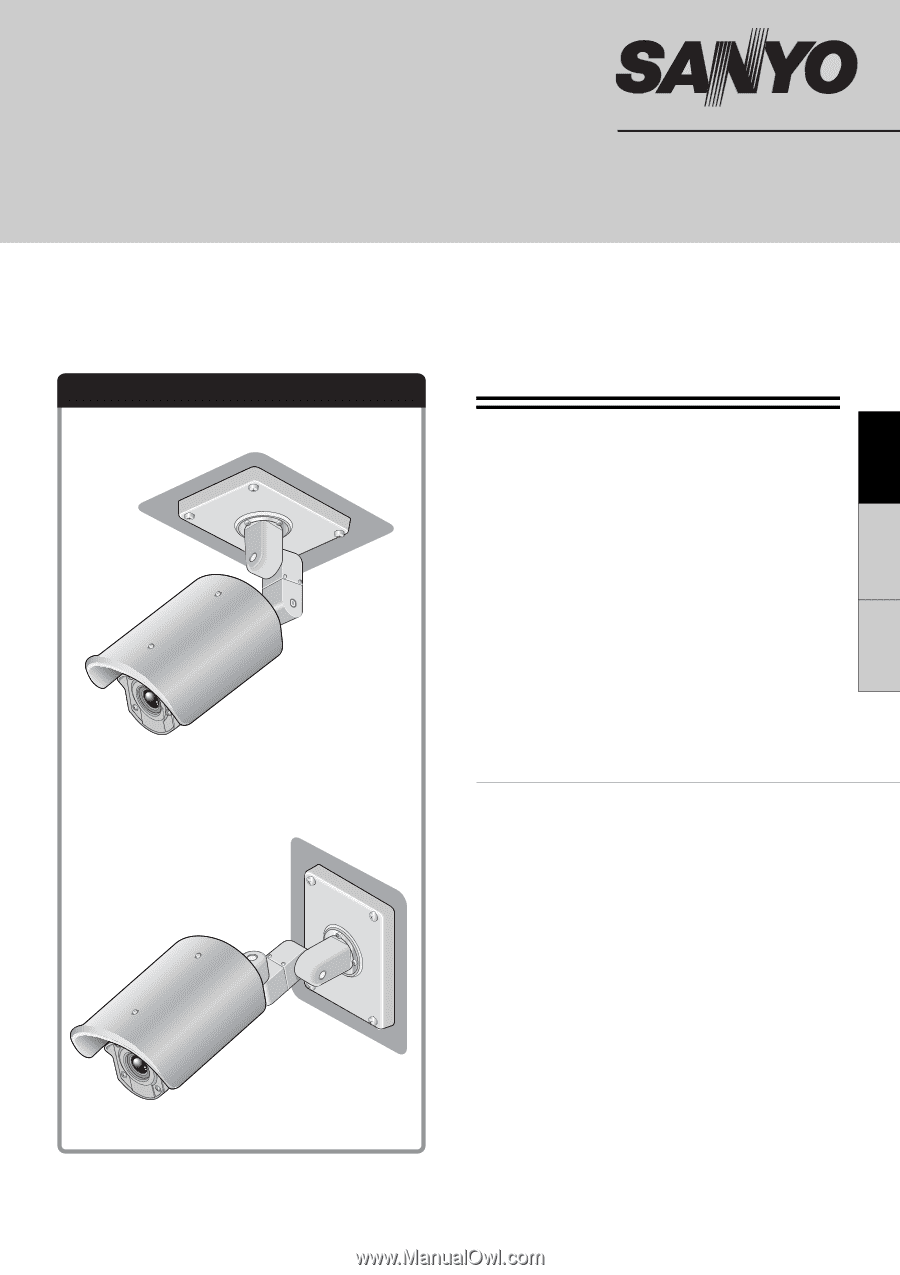
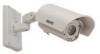
INSTALLATION MANUAL
Color CCD Camera
THIS INSTALLATION SHOULD BE MADE BY A QUALIFIED
SERVICE PERSON AND SHOULD CONFORM TO ALL LOCAL
CODES.
Please read this installation manual carefully in order to ensure correct installation. In addition,
be sure to read carefully the electronic manual contained in the CD-ROM to ensure correct
operation of the camera.
Contents
Information To User. . . . . . . . . . . . . . . . . . . . 1
Installation method . . . . . . . . . . . . . . . . . . . . 3
Checking the menus and zoom position
using simple monitor output . . . . . . . . . . . . 5
Desiccant for preventing humidity . . . . . . . 6
Connections. . . . . . . . . . . . . . . . . . . . . . . . . . 7
Features . . . . . . . . . . . . . . . . . . . . . . . . . . . . 11
How to Perform the Settings in the Menu
Screens . . . . . . . . . . . . . . . . . . . . . . . . . . . . 13
Learning the Menu Setting Operations . . . 14
Using the Electronic Manual (CD-ROM) . . 16
Main specifications . . . . . . . . . . . . . . . . . . . 17
&
Inserted at the end of this manual
•
Pattern Sheet
• Accessories
Dimensions . . . . . . . . . . . . . . . . . . Back page
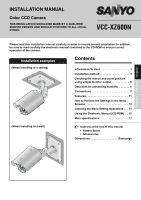
Installation examples
(When installing to a ceiling)
(When installing to a wall)
VCC-XZ600N
English
Français
Español