Sanyo VCC-XZ600N Installation Manual - Page 5
Use the following accessories if needed., Installing the fixing band, Installing the sunshade
 |
View all Sanyo VCC-XZ600N manuals
Add to My Manuals
Save this manual to your list of manuals |
Page 5 highlights
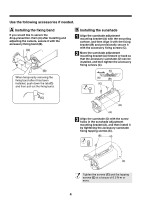
Use the following accessories if needed. A Installing the fixing band If you would like to secure the drop-prevention chain (A) after installing and adjusting the camera, secure it with the accessory fixing band (B). (A) (B) B Installing the sunshade 1 Align the sunshade adjustment mounting bracket (A) with the mounting surface, and then align it with the fixing bracket (B) and provisionally secure it with the accessory fixing screws (C). 2 Move the sunshade adjustment mounting bracket (A) forward or back so that the accessory sunshade (D) can be installed, and then tighten the accessory fixing screws (C). (C) When temporarily removing the fixing band after it has been installed, push down the tab (C) and then pull out the fixing band. (A) (B) (C) (C) (B) (A) 3 Align the sunshade (D) with the screw holes in the sunshade adjustment mounting bracket (A), and then install it by tightening the accessory sunshade fixing tapping screws (E). (E) (D) Tighten the screws (C) and the tapping screws (E) at a torque of 0.5 N·m or more. 4
-
 1
1 -
 2
2 -
 3
3 -
 4
4 -
 5
5 -
 6
6 -
 7
7 -
 8
8 -
 9
9 -
 10
10 -
 11
11 -
12
-
13
-
14
-
15
-
16
-
17
-
18
-
19
-
20
-
21
-
22
-
23
-
24
-
25
-
26
-
27
-
28
-
29
-
30
-
31
-
32
-
33
-
34
-
35
-
36
-
37
-
38
-
39
-
40
-
41
-
42
-
43
-
44
-
45
-
46
-
47
-
48
-
49
-
50
-
51
-
52
-
53
-
54
-
55
-
56
-
57
-
58
-
59
-
60
-
61
-
62
-
63
-
64
 |
 |
