Sanyo VCC-XZ600N Installation Manual - Page 7
Desiccant for preventing humidity, Replacing the desiccant
 |
View all Sanyo VCC-XZ600N manuals
Add to My Manuals
Save this manual to your list of manuals |
Page 7 highlights
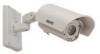
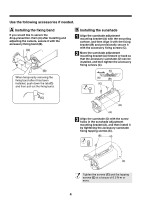
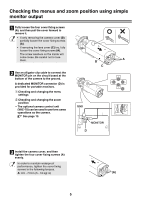
Desiccant for preventing humidity Desiccant (blue: normal) has been placed inside the camera to prevent humidity. If the desiccant has changed to a reddish-purple color, replace the desiccant with new desiccant before installing the camera cover. If the camera is used without replacing the desiccant, condensation may occur inside the camera and cause the lens to become foggy. 3 Replace the desiccant with the accessory desiccant. 4 Install the camera unit (B) as shown in the illustration, and then align the camera fixing screw (A) with the screw hole (D) in the camera unit and tighten them. (B) (C) ■ Replacing the desiccant Be sure to observe the following, otherwise the camera may become damaged. • Be sure to turn off the power. • Do not allow the camera to get wet from rain water or other liquids. 1 Loosen the four cover fixing screws. Refer to step 1 in "Checking the menus and zoom position using simple monitor output". (P5) 2 Use the accessory hexagonal wrench (small) to loosen the camera fixing screw (A), and then remove the camera unit (B) from the camera fixing bracket (C). (B) (A) (C) (A) (D) • Tighten the camera fixing screw so that the screw head (E) do not protrude by any more than 0.5 mm/ 0.02 in. (E) (F) • When tightening the screws, the camera fixing bracket (F) should be horizontal. 5 Install the camera cover. Refer to step 3 in "Checking the menus and zoom position using simple monitor output". (P5) 6
-
 1
1 -
 2
2 -
 3
3 -
 4
4 -
 5
5 -
 6
6 -
 7
7 -
 8
8 -
 9
9 -
 10
10 -
 11
11 -
 12
12 -
13
-
14
-
15
-
16
-
17
-
18
-
19
-
20
-
21
-
22
-
23
-
24
-
25
-
26
-
27
-
28
-
29
-
30
-
31
-
32
-
33
-
34
-
35
-
36
-
37
-
38
-
39
-
40
-
41
-
42
-
43
-
44
-
45
-
46
-
47
-
48
-
49
-
50
-
51
-
52
-
53
-
54
-
55
-
56
-
57
-
58
-
59
-
60
-
61
-
62
-
63
-
64
 |
 |
