Sanyo VCC-XZ600N Installation Manual - Page 4
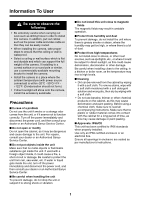
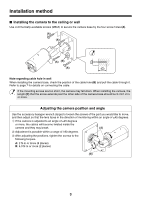
Installation method, Installing the camera to the ceiling or wall
 |
View all Sanyo VCC-XZ600N manuals
Add to My Manuals
Save this manual to your list of manuals |
Page 4 highlights
Installation method ■ Installing the camera to the ceiling or wall Use commercially-available screws (M8x4) to secure the camera base by the four screw holes (A). (A) (A) (A) (B) (A) (C) Note regarding cable hole in wall When installing the camera base, check the position of the cable hole (B) and pull the cable through it. Refer to page 7 for details on connecting the cable. If the mounting screws are too short, the camera may fall down. When installing the camera, the length (C) that the screw extends past the other side of the camera base should be 3 cm/1.2 in. or more. Adjusting the camera position and angle Use the accessory hexagon wrench (large) to loosen the screws of the part you would like to move, and then adjust so that the lens faces in the direction of monitoring within an angle of ±45 degrees. 1 If the camera is adjusted to an angle of ±45 degrees or more, the cables will become twisted inside the camera and they may break. (A) 2 Adjustment is possible within a range of 180 degrees. 3 After adjusting the positions, tighten the screws to the following torques. 1 1 A: 2 N·m or more (8 places) B: 4.3 N·m or more (2 places) 2 (B) 3
-
 1
1 -
 2
2 -
 3
3 -
 4
4 -
 5
5 -
 6
6 -
 7
7 -
 8
8 -
 9
9 -
 10
10 -
11
-
12
-
13
-
14
-
15
-
16
-
17
-
18
-
19
-
20
-
21
-
22
-
23
-
24
-
25
-
26
-
27
-
28
-
29
-
30
-
31
-
32
-
33
-
34
-
35
-
36
-
37
-
38
-
39
-
40
-
41
-
42
-
43
-
44
-
45
-
46
-
47
-
48
-
49
-
50
-
51
-
52
-
53
-
54
-
55
-
56
-
57
-
58
-
59
-
60
-
61
-
62
-
63
-
64
 |
 |
