Sanyo VCC-ZM600N Installation Manual - Page 1
Sanyo VCC-ZM600N - Network Camera Manual
 |
View all Sanyo VCC-ZM600N manuals
Add to My Manuals
Save this manual to your list of manuals |
Page 1 highlights
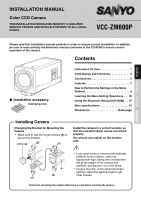
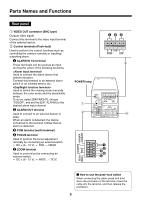
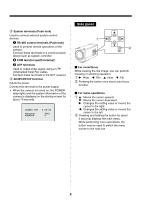
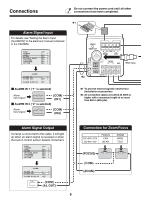
INSTALLATION MANUAL Color CCD Camera THIS INSTALLATION SHOULD BE MADE BY A QUALIFIED SERVICE PERSON AND SHOULD CONFORM TO ALL LOCAL CODES. VCC-ZM600P Deutsch Français English Please read this installation manual carefully in order to ensure correct installation. In addition, be sure to read carefully the electronic manual contained in the CD-ROM to ensure correct operation of the camera. Contents ● Installation accessory Clamping core Information To User 1 Parts Names and Functions 3 Connections 5 Features 7 How to Perform the Settings in the Menu Screens 9 Learning the Menu Setting Operations . . . 10 Using the Electronic Manual (CD-ROM) . . 12 Main specifications 13 Dimensions Back page Installing Camera Changing the Bracket for Mounting the Camera • Make sure to use the longer screws (A) to secure the bracket. Lens cap (B) (A) Install the camera in a correct location so that the intended object can be monitored properly. You should also adjust on the monitor side. • If you want to use a commercially available platform for the camera, select an appropriate type, taking into consideration the gross weight of the camera and platform, and secure it on a firm place. ✱ • Images may blur under extremely bright lighting; adjust the lighting angle to get (B) clear images. (A) ✱ Hole for mounting the camera (Remove the screw before mounting the camera.)
-
 1
1 -
 2
2 -
 3
3 -
 4
4 -
 5
5 -
 6
6 -
 7
7 -
8
-
9
-
10
-
11
-
12
-
13
-
14
-
15
-
16
-
17
-
18
-
19
-
20
-
21
-
22
-
23
-
24
-
25
-
26
-
27
-
28
-
29
-
30
-
31
-
32
-
33
-
34
-
35
-
36
-
37
-
38
-
39
-
40
-
41
-
42
-
43
-
44
-
45
-
46
-
47
-
48
-
49
-
50
-
51
-
52
-
53
-
54
-
55
-
56
 |
 |
