Sanyo VPC CG6 Owners Manual - Page 165
PRINT 1 IMAGE, Print this image
 |
UPC - 683728123048
View all Sanyo VPC CG6 manuals
Add to My Manuals
Save this manual to your list of manuals |
Page 165 highlights
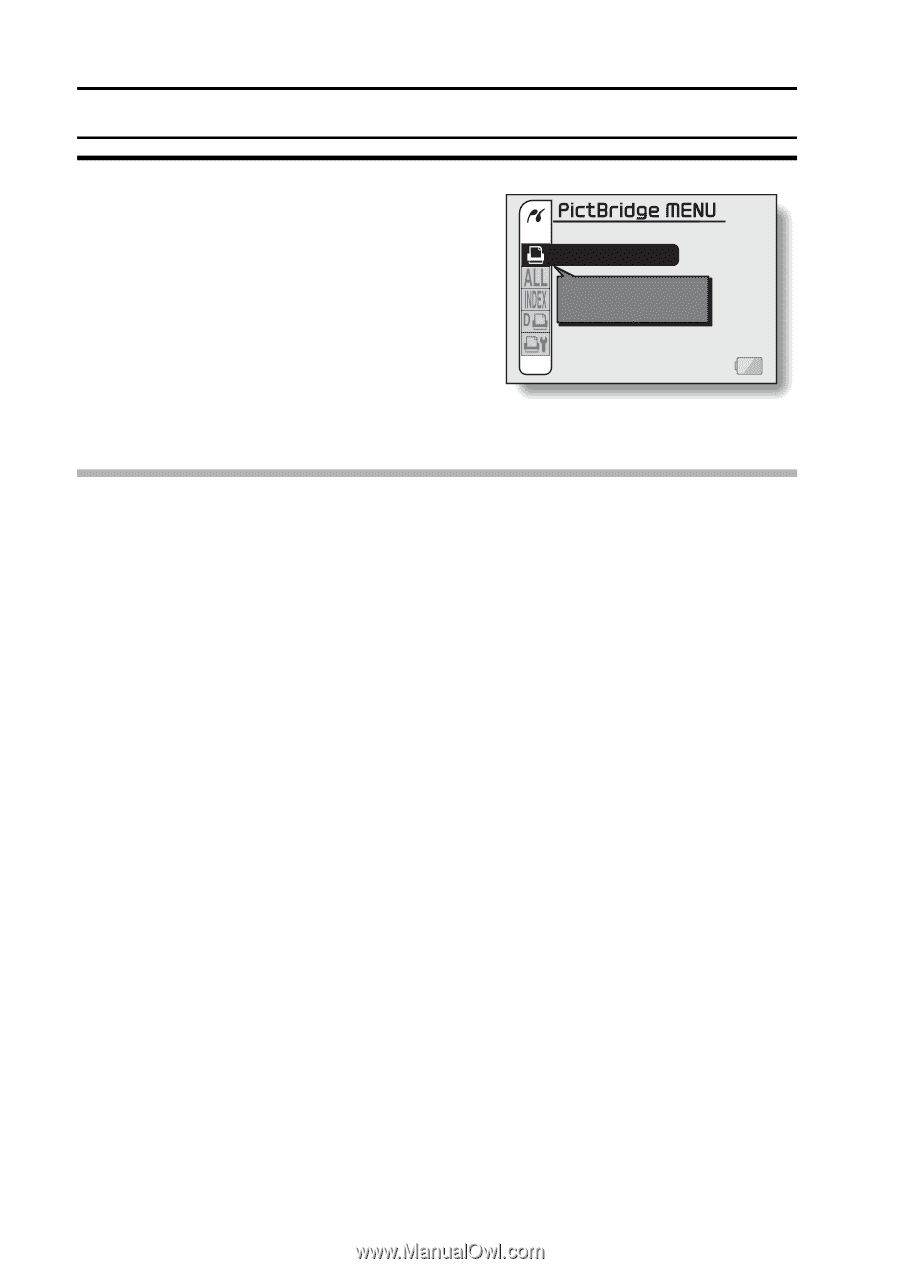
DIRECT PRINTING 3 Select "PictBridge", and press the SET button. h The camera changes to the PictBridge mode, and the PictBridge MENU appears. PRINT 1 IMAGE Print this image CAUTION Insert and pull out the cable carefully i When connecting the cables, make sure that the cable plugs are correctly oriented and that they match the shapes of the terminal sockets on the devices. Push the plugs in straight when connecting them. If undue force is used to connect a cable, it may permanently damage the connector pins in the terminal socket. i Do not use excessive force when connecting and disconnecting cables. Caution when connecting a printer i If the power to the printer is turned off while it is connected, the camera may not operate correctly. If the camera does not operate correctly, disconnect the USB interface cable, turn off the camera, and then reconnect the cable. i During PictBridge printing, the camera's button operation response is slower. i If the camera is powered by the battery pack for printing, make sure that the remaining battery charge is sufficient. 151 English
-
 1
1 -
2
-
3
-
4
-
5
-
6
-
7
-
8
-
9
-
10
-
11
-
12
-
13
-
14
-
15
-
16
-
17
-
18
-
19
-
20
-
21
-
22
-
23
-
24
-
25
-
26
-
27
-
28
-
29
-
30
-
31
-
32
-
33
-
34
-
35
-
36
-
37
-
38
-
39
-
40
-
41
-
42
-
43
-
44
-
45
-
46
-
47
-
48
-
49
-
50
-
51
-
52
-
53
-
54
-
55
-
56
-
57
-
58
-
59
-
60
-
61
-
62
-
63
-
64
-
65
-
66
-
67
-
68
-
69
-
70
-
71
-
72
-
73
-
74
-
75
-
76
-
77
-
78
-
79
-
80
-
81
-
82
-
83
-
84
-
85
-
86
-
87
-
88
-
89
-
90
-
91
-
92
-
93
-
94
-
95
-
96
-
97
-
98
-
99
-
100
-
101
-
102
-
103
-
104
-
105
-
106
-
107
-
108
-
109
-
110
-
111
-
112
-
113
-
114
-
115
-
116
-
117
-
118
-
119
-
120
-
121
-
122
-
123
-
124
-
125
-
126
-
127
-
128
-
129
-
130
-
131
-
132
-
133
-
134
-
135
-
136
-
137
-
138
-
139
-
140
-
141
-
142
-
143
-
144
-
145
-
146
-
147
-
148
-
149
-
150
-
151
-
152
-
153
-
154
-
155
-
156
-
157
-
158
-
159
-
 160
160 -
 161
161 -
 162
162 -
 163
163 -
 164
164 -
 165
165 -
 166
166 -
 167
167 -
 168
168 -
 169
169 -
 170
170 -
171
-
172
-
173
-
174
-
175
-
176
-
177
-
178
-
179
-
180
-
181
-
182
-
183
-
184
-
185
-
186
-
187
-
188
-
189
-
190
-
191
-
192
-
193
-
194
-
195
-
196
-
197
-
198
-
199
-
200
-
201
-
202
 |
 |