Sanyo VPC CG6 Owners Manual - Page 73
Displaying The Recording
 |
UPC - 683728123048
View all Sanyo VPC CG6 manuals
Add to My Manuals
Save this manual to your list of manuals |
Page 73 highlights
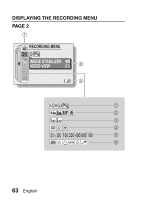
SHOOTING PAGE 1 (BASIC SETTINGS) DISPLAYING THE RECORDING MENU The RECORDING MENU is used to adjust your camera's shooting settings. The RECORDING MENU is organized into two displays: PAGE 1 and PAGE 2. You can also access the RECORDING MENU from the camera settings screen (OPTION MENU [page 120]). 1 Turn on the camera (page 26). h Turn the camera on in the shooting mode. MENU button 2 Press the MENU button. h The RECORDING MENU appears. h Pressing the MENU button again will cancel the RECORDING MENU. About the HELP display When the RECORDING MENU icon is selected, the HELP display appears, showing the function of the selected icon and the shooting mode(s) for which it is effective. PHOTO RESOLUTION 2816×2112 (6M-S) HELP display RECORDING MENU VIDEO CLIP MPEG4 640×480 30fps SHQ 59 English
-
 1
1 -
2
-
3
-
4
-
5
-
6
-
7
-
8
-
9
-
10
-
11
-
12
-
13
-
14
-
15
-
16
-
17
-
18
-
19
-
20
-
21
-
22
-
23
-
24
-
25
-
26
-
27
-
28
-
29
-
30
-
31
-
32
-
33
-
34
-
35
-
36
-
37
-
38
-
39
-
40
-
41
-
42
-
43
-
44
-
45
-
46
-
47
-
48
-
49
-
50
-
51
-
52
-
53
-
54
-
55
-
56
-
57
-
58
-
59
-
60
-
61
-
62
-
63
-
64
-
65
-
66
-
67
-
 68
68 -
 69
69 -
 70
70 -
 71
71 -
 72
72 -
 73
73 -
 74
74 -
 75
75 -
 76
76 -
 77
77 -
 78
78 -
79
-
80
-
81
-
82
-
83
-
84
-
85
-
86
-
87
-
88
-
89
-
90
-
91
-
92
-
93
-
94
-
95
-
96
-
97
-
98
-
99
-
100
-
101
-
102
-
103
-
104
-
105
-
106
-
107
-
108
-
109
-
110
-
111
-
112
-
113
-
114
-
115
-
116
-
117
-
118
-
119
-
120
-
121
-
122
-
123
-
124
-
125
-
126
-
127
-
128
-
129
-
130
-
131
-
132
-
133
-
134
-
135
-
136
-
137
-
138
-
139
-
140
-
141
-
142
-
143
-
144
-
145
-
146
-
147
-
148
-
149
-
150
-
151
-
152
-
153
-
154
-
155
-
156
-
157
-
158
-
159
-
160
-
161
-
162
-
163
-
164
-
165
-
166
-
167
-
168
-
169
-
170
-
171
-
172
-
173
-
174
-
175
-
176
-
177
-
178
-
179
-
180
-
181
-
182
-
183
-
184
-
185
-
186
-
187
-
188
-
189
-
190
-
191
-
192
-
193
-
194
-
195
-
196
-
197
-
198
-
199
-
200
-
201
-
202
 |
 |
