Sanyo VPC HD1 Instruction Manual, VPC-HD1010EX QSG
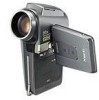
Sanyo VPC HD1 - Xacti Camcorder - 720p Manual
 |
UPC - 086483059766
View all Sanyo VPC HD1 manuals
Add to My Manuals
Save this manual to your list of manuals |
Sanyo VPC HD1 manual content summary:
- Sanyo VPC HD1 | Instruction Manual, VPC-HD1010EX QSG - Page 1
English QUICK GUIDE Digital Movie Camera Important note This manual explains how to safely operate the VPC-HD1010EX, VPC-HD1010 and VPC-HD1010GX. Any information regarding only one of these products will be labeled as such. Please read these instructions carefully before using the camera. Make sure - Sanyo VPC HD1 | Instruction Manual, VPC-HD1010EX QSG - Page 2
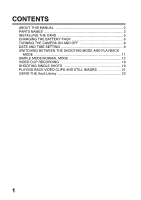
CONTENTS ABOUT THIS MANUAL 2 PARTS NAMES 3 INSTALLING THE CARD 5 CHARGING THE BATTERY PACK 6 TURNING THE CAMERA ON AND OFF 8 DATE AND TIME SETTING 9 SWITCHING BETWEEN THE SHOOTING MODE AND PLAYBACK MODE 11 SIMPLE MODE/NORMAL MODE 12 VIDEO CLIP RECORDING 18 SHOOTING SINGLE SHOTS 19 PLAYING - Sanyo VPC HD1 | Instruction Manual, VPC-HD1010EX QSG - Page 3
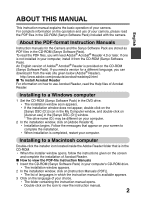
. For complete information on the operation and use of your camera, please read the PDF files in the CD-ROM (Sanyo Software Pack) included with the camera. About the PDF-format Instruction Manuals Instruction manuals for the Camera and the Sanyo Software Pack are stored as PDF files in the CD-ROM - Sanyo VPC HD1 | Instruction Manual, VPC-HD1010EX QSG - Page 4
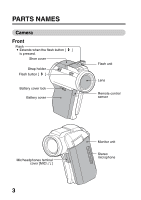
SETUP SETUP PARTS NAMES Camera Front Flash i Extends when the flash button [?] is pressed. Shoe cover Strap holder Flash button [?] Battery cover lock Battery cover Flash unit Lens Remote control sensor Mic/headphones teminal cover [MIC/ ] 3 Monitor unit Stereo microphone - Sanyo VPC HD1 | Instruction Manual, VPC-HD1010EX QSG - Page 5
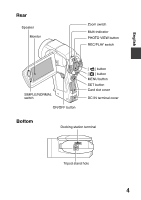
English Rear Speaker Monitor Zoom switch Multi-indicator PHOTO VIEW button REC/PLAY switch SIMPLE/NORMAL switch ON/OFF button [ ] button [ ] button MENU button SET button Card slot cover DC IN terminal cover Bottom Docking station terminal Tripod stand hole 4 - Sanyo VPC HD1 | Instruction Manual, VPC-HD1010EX QSG - Page 6
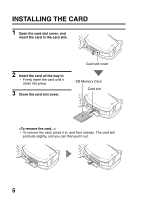
INSTALLING THE CARD 1 Open the card slot cover, and insert the card in the card slot. 2 Insert the card all the way in. h Firmly insert the card until it clicks into place. 3 Close the card slot cover. Card slot cover SD Memory Card Card slot h To remove the card, press it - Sanyo VPC HD1 | Instruction Manual, VPC-HD1010EX QSG - Page 7
THE BATTERY PACK 1 While pressing the battery cover lock, slide it (1), and pull out the battery cover toward the bottom of the camera (2). h The battery cover comes off. 1 Battery cover lock 2 2 Insert the battery pack. h Take care that it is positioned correctly. Battery cover Battery pack - Sanyo VPC HD1 | Instruction Manual, VPC-HD1010EX QSG - Page 8
the indicator turns off. h If the multi-indicator flashes red, it indicates that the battery pack is defective or the camera is not correctly set in the docking station. Reset the camera correctly in the docking station. h The charging time is approx. 200 minutes. Multi-indicator To power outlet DC - Sanyo VPC HD1 | Instruction Manual, VPC-HD1010EX QSG - Page 9
pictures: Set to REC. To play back images: Set to PLAY. 2 Open the monitor unit. 3 Press the ON/OFF button for at least 1 second. h The camera turns on. h If the date and time have not been set, the screen to set the date and time is shown on the monitor. REC - Sanyo VPC HD1 | Instruction Manual, VPC-HD1010EX QSG - Page 10
capturing images, make sure the correct date and time are set. Example: To set the clock to 7:30 p.m. on December 24, 2008 1 Turn on the camera (page 8), and press the SET button. h The Clock Set Screen appears. h Follow the procedures below to enable or disable the date display during playback - Sanyo VPC HD1 | Instruction Manual, VPC-HD1010EX QSG - Page 11
English 3 Set the clock. 1 Select "TIME". 2 Press the SET button. h The Set Time Screen appears. 3 Set the time to "19:30". h The time is set in the following order: Set the hour → Set the minute. h A 24-hour clock is used for the time display. 4 Press the SET button. 4 Set the order in which the - Sanyo VPC HD1 | Instruction Manual, VPC-HD1010EX QSG - Page 12
THE SHOOTING MODE AND PLAYBACK MODE Switch between the shooting mode (for recording) and the playback mode (for viewing your recorded images). 1 Turn on the camera (page 8). 2 Set the REC/PLAY switch to the desired mode. For recording: Set it to REC. For playback: Set it to PLAY. REC/PLAY button - Sanyo VPC HD1 | Instruction Manual, VPC-HD1010EX QSG - Page 13
English SIMPLE MODE/NORMAL MODE Switching between the SIMPLE and NORMAL modes Use the SIMPLE/NORMAL switch, located next to the monitor, to switch between the SIMPLE and NORMAL modes. 1 Set the SIMPLE/NORMAL switch to the desired mode. SIMPLE mode: Set it to SIMPLE. NORMAL mode: Set it to NORMAL. - Sanyo VPC HD1 | Instruction Manual, VPC-HD1010EX QSG - Page 14
Accessing/exiting the SIMPLE/NORMAL Mode Menu Screen 1 Set the camera to the shooting or playback mode. h Use the REC/PLAY the switch to REC. To access the Playback Menu: Set the switch to PLAY. 2 Set the camera to the SIMPLE mode or NORMAL mode. h Use the SIMPLE/NORMAL switch to select the desired - Sanyo VPC HD1 | Instruction Manual, VPC-HD1010EX QSG - Page 15
page 15, step 4. Display the NORMAL Mode Setting Menu → go to page 16, step 4. h To cancel the Menu Screen, press the MENU button. 1 RECORDING MENU 1 2 3 MOVIE PHOTO SCENE SELECT 8M 1 FILTER 2 FLASH 3 SELF-TIMER EXIT OK Select - Sanyo VPC HD1 | Instruction Manual, VPC-HD1010EX QSG - Page 16
to change, and press the SET button. h The Setting Screen for the selected item appears. Select an item to change Description of selected item Select movie and photo size EXIT OK To keep in HDTV size HDTV size 3.5M [16:9] EXIT OK 15 - Sanyo VPC HD1 | Instruction Manual, VPC-HD1010EX QSG - Page 17
a NORMAL Mode Setting Menu 4 Toggle the SET button up or down to select a tab. h The Menu Screen for the selected tab appears. Tab 1 RECORDING MENU1 2 MOVIE PHOTO 3 SCENE SELECT 8M 1 FILTER 2 FLASH 3 SELF-TIMER EXIT OK 5 Toggle the SET button to the right. 1 RECORDING MENU - Sanyo VPC HD1 | Instruction Manual, VPC-HD1010EX QSG - Page 18
Menu Screen, press the MENU button. Select an item to change 1 RECORDING MENU 1 2 MOVIE PHOTO 3 SCENE SELECT 8M 1 FILTER 2 FLASH 3 SELF-TIMER EXIT OK Applicable mode PHOTO : This setting is effective during video clip recording. : This setting is effective during still image shooting and - Sanyo VPC HD1 | Instruction Manual, VPC-HD1010EX QSG - Page 19
English VIDEO CLIP RECORDING 1 Turn on the camera (page 8), and set it to the shooting mode (page 11). 2 Press the [ ] button. h Recording 3 End the recording. h Press the [ ] button again to stop recording. [ ] button Recording time Full-HD REC 00:00:09 5 Available recording time remaining 18 - Sanyo VPC HD1 | Instruction Manual, VPC-HD1010EX QSG - Page 20
SHOOTING SINGLE SHOTS Capture a still image (single-shot). 1 Turn on the camera (page 8), [ and set it to the shooting mode (page 11). 2 Press the [ ] button. 1 Press the [ ] button halfway. h The autofocus operates, and the image is focused ( - Sanyo VPC HD1 | Instruction Manual, VPC-HD1010EX QSG - Page 21
when necessary. :: The flash operates with every image captured regardless of the conditions. ;: The flash does not operate even in dark situations. - Sanyo VPC HD1 | Instruction Manual, VPC-HD1010EX QSG - Page 22
AND STILL IMAGES 1 Set the camera to the playback mode (page 11). 2 Toggle the SET button to the left or right to display the image you wish to play back. h Video clips are indicated by a video clip pattern along the left and right sides of the screen. SAVE 2008.12.24 PLAY - Sanyo VPC HD1 | Instruction Manual, VPC-HD1010EX QSG - Page 23
English To do this... Do this Normal forward playback Press the SET button. Stop playback During playback, toggle the SET button down. Pause During playback, press the SET button or toggle the SET button up. During accelerated playback, toggle the SET button up. To play back During forward - Sanyo VPC HD1 | Instruction Manual, VPC-HD1010EX QSG - Page 24
USING THE Xacti Library 1 Connect a TV and a hard disk to the docking station, and set the camera in the docking station. * Please make sure that the camera and all devices are turned OFF before proceeding. Use the cable included with your camera to connect a TV to the docking station. To power - Sanyo VPC HD1 | Instruction Manual, VPC-HD1010EX QSG - Page 25
3 Select "BEGIN TRANSFER", and press the SET button. i File copying from the camera to the hard disk begins. i When copying is complete, press the SET button. disk is being used for the first time with the Xacti Library, a screen confirming that you wish to create a library appears. Select "YES" and - Sanyo VPC HD1 | Instruction Manual, VPC-HD1010EX QSG - Page 26
USING THE Xacti Library 3 Play back the files you copied to the hard disk. MAIN MENU DATA TRANSFER PLAYBACK . SELECT OK i The rest of the playback procedure is the same as for normal camera operation. i When you have finished using the camera, turn it off and remove it from the docking station. 25
-
 1
1 -
 2
2 -
 3
3 -
 4
4 -
 5
5 -
 6
6 -
 7
7 -
8
-
9
-
10
-
11
-
12
-
13
-
14
-
15
-
16
-
17
-
18
-
19
-
20
-
21
-
22
-
23
-
24
-
25
-
26
 |
 |

English
QUICK GUIDE
Digital Movie Camera
Please read these instructions carefully before using the camera.
Make sure to read and understand the separate booklet “SAFETY MANUAL”.
Keep this manual in a safe place for later reference.
Important note
This manual explains how to safely operate the VPC-HD1010EX,
VPC-HD1010 and VPC-HD1010GX.
Any information regarding only one of these products will be labeled as
such.