Sanyo VPC HD1 Instruction Manual, VPC-HD1A - Page 79
Displaying The Shooting Setting Screens
 |
UPC - 086483059766
View all Sanyo VPC HD1 manuals
Add to My Manuals
Save this manual to your list of manuals |
Page 79 highlights
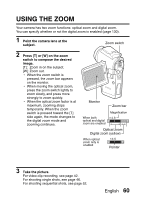
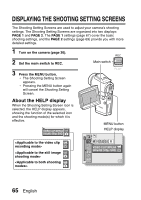
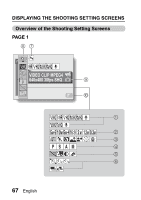
SHOOTING PAGE 1 (BASIC SETTINGS) DISPLAYING THE SHOOTING SETTING SCREENS The Shooting Setting Screens are used to adjust your camera's shooting settings. The Shooting Setting Screens are organized into two displays: PAGE 1 and PAGE 2. The PAGE 1 settings (page 67) cover the basic shooting settings, and the PAGE 2 settings (page 69) provide you with more detailed settings. 1 Turn on the camera (page 30). 2 Set the main switch to REC. Main switch 3 Press the MENU button. h The Shooting Setting Screen appears. h Pressing the MENU button again will cancel the Shooting Setting Screen. About the HELP display When the Shooting Setting Screen icon is selected, the HELP display appears, showing the function of the selected icon and the shooting mode(s) for which it is effective. VIDEO CLIP MPEG4 640x480 30fps SHQ MENU button HELP display VIDEO CLIP MPEG4 640x480 30fps SHQ 65 English
-
 1
1 -
2
-
3
-
4
-
5
-
6
-
7
-
8
-
9
-
10
-
11
-
12
-
13
-
14
-
15
-
16
-
17
-
18
-
19
-
20
-
21
-
22
-
23
-
24
-
25
-
26
-
27
-
28
-
29
-
30
-
31
-
32
-
33
-
34
-
35
-
36
-
37
-
38
-
39
-
40
-
41
-
42
-
43
-
44
-
45
-
46
-
47
-
48
-
49
-
50
-
51
-
52
-
53
-
54
-
55
-
56
-
57
-
58
-
59
-
60
-
61
-
62
-
63
-
64
-
65
-
66
-
67
-
68
-
69
-
70
-
71
-
72
-
73
-
 74
74 -
 75
75 -
 76
76 -
 77
77 -
 78
78 -
 79
79 -
 80
80 -
 81
81 -
 82
82 -
 83
83 -
 84
84 -
85
-
86
-
87
-
88
-
89
-
90
-
91
-
92
-
93
-
94
-
95
-
96
-
97
-
98
-
99
-
100
-
101
-
102
-
103
-
104
-
105
-
106
-
107
-
108
-
109
-
110
-
111
-
112
-
113
-
114
-
115
-
116
-
117
-
118
-
119
-
120
-
121
-
122
-
123
-
124
-
125
-
126
-
127
-
128
-
129
-
130
-
131
-
132
-
133
-
134
-
135
-
136
-
137
-
138
-
139
-
140
-
141
-
142
-
143
-
144
-
145
-
146
-
147
-
148
-
149
-
150
-
151
-
152
-
153
-
154
-
155
-
156
-
157
-
158
-
159
-
160
-
161
-
162
-
163
-
164
-
165
-
166
-
167
-
168
-
169
-
170
-
171
-
172
-
173
-
174
-
175
-
176
-
177
-
178
-
179
-
180
-
181
-
182
-
183
-
184
-
185
-
186
-
187
-
188
-
189
-
190
-
191
-
192
-
193
-
194
-
195
-
196
-
197
-
198
-
199
-
200
-
201
-
202
-
203
-
204
-
205
-
206
-
207
-
208
-
209
-
210
-
211
-
212
 |
 |
