Sharp CV10NH CV-10NH Operation Manual - Page 16
Installation And Removal Of Exhaust Hose
 |
UPC - 074000662377
View all Sharp CV10NH manuals
Add to My Manuals
Save this manual to your list of manuals |
Page 16 highlights
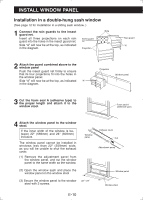
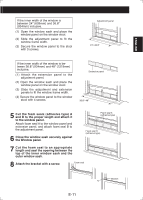
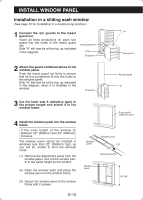
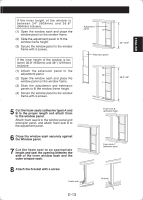
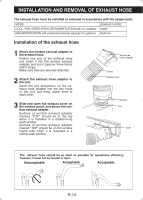
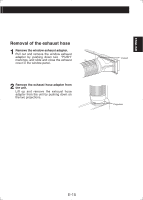
INSTALLATION AND REMOVAL OF EXHAUST HOSE The exhaust hose must be installed or removed in accordance with the usage mode. MODE EXHAUST HOSE COOL, FAN, VENTILATION, DEHUMIDIFICATION with no container Install DEHUMIDIFICATION with container(minimum capacity 31/2 gallons) Remove Installation of the exhaust hose 1 Attach the window exhaust adapter to the exhaust hose. Extend one end of the exhaust hose and insert it into the window exhaust adapter, and turn it (approx. three times) until it stops. Make sure they are securely attached. 2 Attach the exhaust hose adapter to the unit. Insert the two projections on the exhaust hose adapter into the two holes on the unit, and firmly attach them to each other. 3 Slide and open the exhaust cover on the window panel, and attach the window exhaust adapter. Surface of window exhaust adapter marked "TOP" should be at the top when it is installed in a double-hung sash window. Surface of window exhaust adapter marked "TOP" should be on the window frame side when it is installed in a sliding sash window. Window exhaust adapter Extend Exhaust hose Projection Hole "TOP" The exhaust hose should be as short as possible for operational efficiency; however, it must not be twisted or bent. Unacceptable Acceptable Acceptable E-14
-
 1
1 -
2
-
3
-
4
-
5
-
6
-
7
-
8
-
9
-
10
-
 11
11 -
 12
12 -
 13
13 -
 14
14 -
 15
15 -
 16
16 -
 17
17 -
 18
18 -
 19
19 -
 20
20 -
 21
21 -
22
-
23
-
24
-
25
-
26
-
27
-
28
-
29
-
30
-
31
-
32
-
33
-
34
-
35
-
36
-
37
-
38
-
39
-
40
-
41
-
42
-
43
-
44
-
45
-
46
-
47
-
48
-
49
-
50
-
51
-
52
-
53
-
54
-
55
-
56
-
57
-
58
-
59
-
60
 |
 |
