Sharp CV10NH CV-10NH Operation Manual - Page 28
Drainage
 |
UPC - 074000662377
View all Sharp CV10NH manuals
Add to My Manuals
Save this manual to your list of manuals |
Page 28 highlights
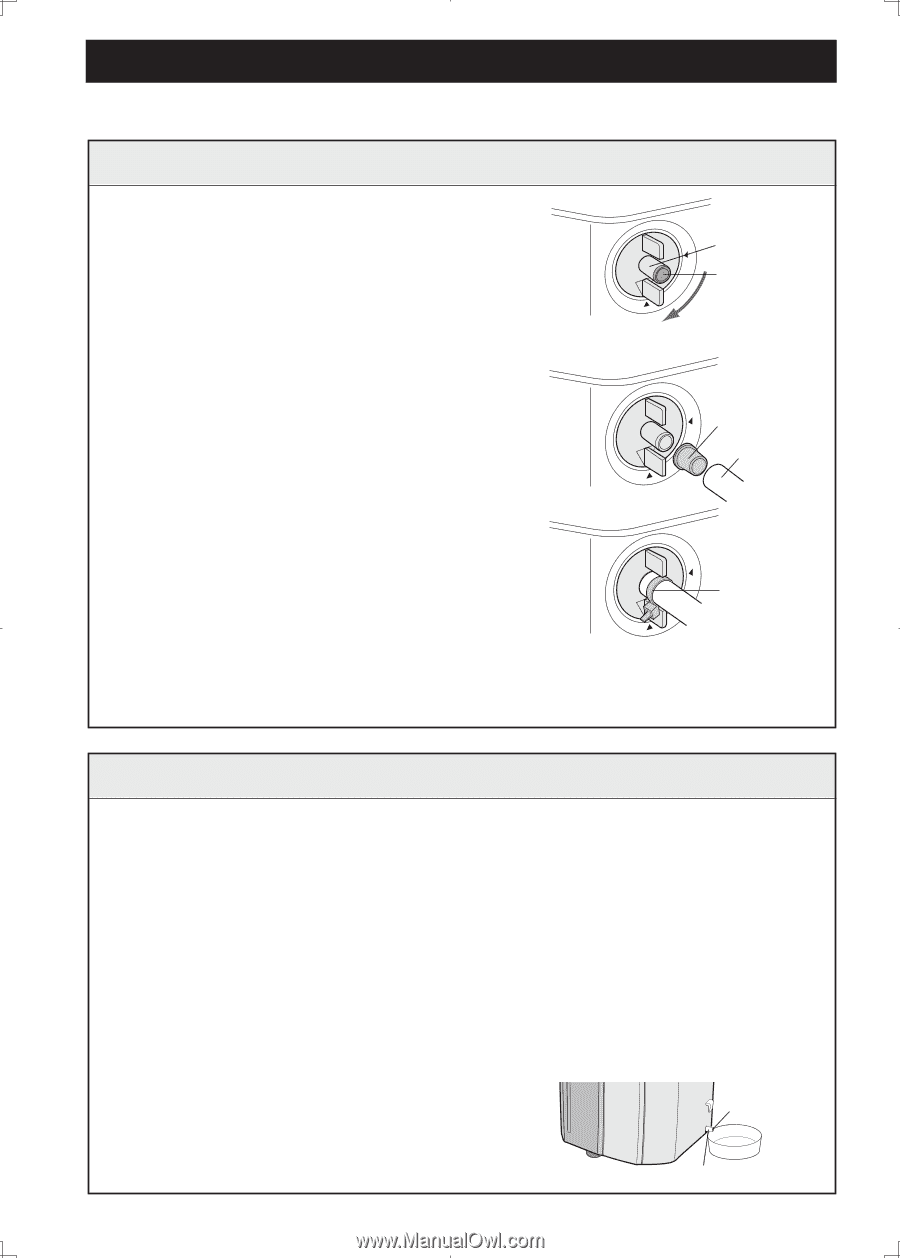
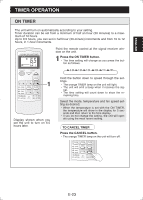
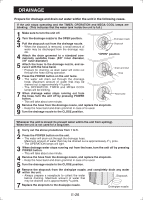
DRAINAGE Prepare for drainage and drain out water within the unit in the following cases. If the unit stops operating and the TIMER, OPERATION and MEGA COOL lamps are blinking. (This indicates that the water tank inside the unit is full.) 1 Make sure to turn the unit off. 2 Turn the drainage nozzle to the OPEN position. Drainage nozzle 3 Pull the stopcock out from the drainage nozzle. • When the stopcock is removed, a small amount of water may be discharged from the drainage nozzle. 4 Attach the drain grommet to a standard commercially available hose. (5/8" inner diameter, 7/8" outer diameter) Stopcock "OPEN" position 5 Attach the hose to the drainage nozzle, and secure it with the hose band. • Prepare for draining, as drain water will come out through the hose during operation. Drain grommet Hose 6 Press the POWER button on the unit twice. • The water will drain out through the drainage hose. Maximum amount of water that may be drained out is approximately 41/5 pints. • The OPERATION, TIMER and MEGA COOL lamps will be blinking. 7 When drainage water stops running out from the hose, turn the unit off by pressing POWER button. Hose band • This will take about one minute. 8 Remove the hose from the drainage nozzle, and replace the stopcock. • Keep the hose band and drain grommet in case of re-used. 9 Turn the drainage nozzle to the CLOSE position. Whenever the unit is moved (to prevent water within the unit from spilling). When the unit is not used for a long time. 1 Carry out the above procedures from 1 to 5. 2 Press the POWER button on the unit. • The water will drain out through the drainage hose. Maximum amount of water that may be drained out is approximately 41/5 pints. • The OPERATION lamps will light. 3 When drainage water stops running out from the hose, turn the unit off by pressing POWER button. • This will take about one minute. 4 Remove the hose from the drainage nozzle, and replace the stopcock. • Keep the hose band and drain grommet in case of re-used. 5 Turn the drainage nozzle to the CLOSE position. 6 Remove the stopcock from the drainpipe nozzle, and completely drain any water within the unit. • Always prepare a receptacle to collect the water before draining. Maximum amount of water that may be drained out is approximately 2/5 pints. Stopcock 7 Replace the stopcock to the drainpipe nozzle. Drainpipe nozzle E-26
-
 1
1 -
2
-
3
-
4
-
5
-
6
-
7
-
8
-
9
-
10
-
11
-
12
-
13
-
14
-
15
-
16
-
17
-
18
-
19
-
20
-
21
-
22
-
 23
23 -
 24
24 -
 25
25 -
 26
26 -
 27
27 -
 28
28 -
 29
29 -
 30
30 -
 31
31 -
 32
32 -
 33
33 -
34
-
35
-
36
-
37
-
38
-
39
-
40
-
41
-
42
-
43
-
44
-
45
-
46
-
47
-
48
-
49
-
50
-
51
-
52
-
53
-
54
-
55
-
56
-
57
-
58
-
59
-
60
 |
 |