Sharp DK-CL6N DK-CL6N Operation Manual - Page 7
Remote control For DK-CL6N only - music system for ipod
 |
UPC - 074000369412
View all Sharp DK-CL6N manuals
Add to My Manuals
Save this manual to your list of manuals |
Page 7 highlights
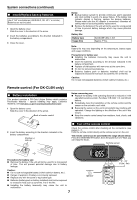
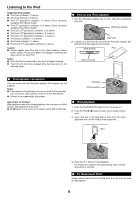
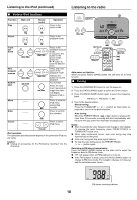
System connections (continued) ■ Install/Replace backup batteries Use 2 "AA" size batteries (UM/SUM-3, R6, HP-7 or similar). Batteries are not included. 1 Open the battery cover. Slide the cover in the direction of the arrow. 2 Insert the batteries according to the direction indicated in the battery compartment. 3 Close the cover. Notes: ● Backup battery system to provide continuous alarm operation and clock setting in event of a power failure. If the battery low indicator display is flashing, replace the backup batteries. Please make sure the AC adaptor is connected, otherwise all setting may be lost during battery replacement. ● Remove the batteries if the unit will not be used for a long period of time to prevent battery leakage which may cause potential damage. Battery life: Battery type Usage time ALKALINE (AA) (1.5V) Approx. P hrs. Note: Battery life may vary depending on the temperature, battery types and usage conditions. Precautions for battery use: ● Installing the batteries incorrectly may cause the unit to malfunction. ● Insert the batteries according to the direction indicated in the battery compartment. ● Replace all old batteries with new ones at the same time. ● Do not mix old and new batteries. ● Batteries (battery pack or batteries installed) shall not be exposed to excessive heat such as sunshine, fire or the like. Caution: Do not use rechargeable batteries (nickeI-cadmium battery, etc.). Remote control (For DK-CL6N only) ■ Battery installation This product contains a CR Coin Lithium Battery which contains Perchlorate Material - special handling may apply. California residents, see www.dtsc.ca.gov/hazardouswaste/perchlorate/ 1 Open the battery cover. Slide the cover in the direction of the arrow. Back of remote control Notes concerning use: ● Replace the battery if the operating distance is reduced or if the operation becomes erratic. Purchase "CR 2032" 3 V, coin lithium battery. ● Periodically clean the transmitter on the remote control and the sensor on the unit with a soft cloth. ● Exposing the sensor on the unit to strong light may interfere with operation. Change the lighting or the direction of the unit if this occurs. ● Keep the remote control away from moisture, heat, shock, and vibrations. 2 Insert the battery according to the direction indicated in the battery compartment. Positive (+) side up ■ Test of the remote control Check the remote control after checking all the connections (see pages 6 - 7). Point the remote control directly at the remote sensor on the unit. The remote control can be used within the range shown below: Press the ON/STAND-BY button. Does the power turn on? Now, you can enjoy the music. Remote sensor Precautions for battery use: ● Remove the battery if the unit will not be used for a long period of time. This will prevent potential damage due to battery leakage. Caution: ● Do not use rechargeable battery (nickel-cadmium battery, etc.). ● Danger of explosion if battery is incorrectly replaced. ● Replace only with the same or equivalent type. ● Batteries (battery pack or battery installed) shall not be exposed to excessive heat such as sunshine, fire or the like. ● Installing the battery incorrectly may cause the unit to malfunction. 7 15˚ 15˚ SLEEP 8" - 20' (0.2m - 6m) iPod BAND RADIO MENU ENTER AUX -TV OUT EQUALIZER -PROG
-
 1
1 -
 2
2 -
 3
3 -
 4
4 -
 5
5 -
 6
6 -
 7
7 -
 8
8 -
 9
9 -
 10
10 -
 11
11 -
 12
12 -
13
-
14
-
15
-
16
 |
 |