Sharp MX-B350P MX-B350P MX-B450P Software Setup Guide - Page 12
Install the driver using an existing port
 |
View all Sharp MX-B350P manuals
Add to My Manuals
Save this manual to your list of manuals |
Page 12 highlights
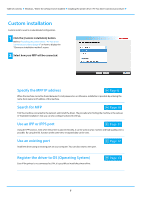
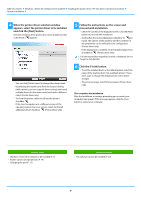
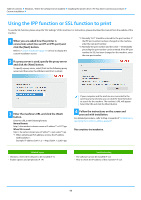
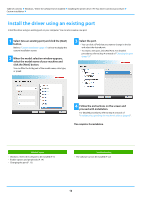
Table of contents Windows / Select the software to be installed Installing the printer driver / PC-Fax driver (common procedure) Custom installation Install the driver using an existing port Install the driver using an existing port on your computer. You can also create a new port. 1 Select [Use an existing port] and click the [Next] button. Refer to "Custom installation (page 7)" on how to display the custom installation screen. 2 When the model selection window appears, select the model name of your machine and click the [Next] button. You can filter the list by part of the model name, color type, or speed. 3 Select the port. • You can click a [Port] that you want to change in the list and select the desired port. • To create a new port, click [Add Port]. For detailed procedures, refer to Step 4 onwards of "Changing the port (page 15)". 4 Follow the instructions on the screen and proceed with installation. For detailed procedures, refer to Step 5 onwards of "Installation by specifying the machine's address (page 8)". This completes the installation. Related topics • Windows / Select the software to be installed (P. 3) • Enable options and peripherals (P. 14) • Changing the port (P. 15) Troubleshooting • The software cannot be installed (P. 22) 12
-
 1
1 -
2
-
3
-
4
-
5
-
6
-
 7
7 -
 8
8 -
 9
9 -
 10
10 -
 11
11 -
 12
12 -
 13
13 -
 14
14 -
 15
15 -
 16
16 -
 17
17 -
18
-
19
-
20
-
21
-
22
-
23
-
24
-
25
-
26
 |
 |
