Singer 3116 Simple Instruction Manual - Page 29
Inserting and changing needles
 |
View all Singer 3116 Simple manuals
Add to My Manuals
Save this manual to your list of manuals |
Page 29 highlights
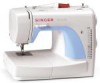
D A B C 1 GB Inserting and changing needles Change the needle regularly, especially if it is showing signs of wear and causing problems. For best sewing results always use SINGER Brand Needles. Insert the needle as illustrated as follows: A. Loosen the needle clamp screw and tighten again after inserting the new needle. (1) B. The flat side of the shaft should be towards the back. C/D. Insert the needle as far up as it will go. Attention: Turn power switch to off ("O") before inserting or removing the needle. B A C Needles must be in perfect condition. (2) Problems can occur with: A. Bent needles B. Blunt needles C. Damaged points 2 22
-
 1
1 -
2
-
3
-
4
-
5
-
6
-
7
-
8
-
9
-
10
-
11
-
12
-
13
-
14
-
15
-
16
-
17
-
18
-
19
-
20
-
21
-
22
-
23
-
 24
24 -
 25
25 -
 26
26 -
 27
27 -
 28
28 -
 29
29 -
 30
30 -
 31
31 -
 32
32 -
 33
33 -
 34
34 -
35
-
36
-
37
-
38
-
39
-
40
-
41
-
42
-
43
-
44
-
45
-
46
-
47
-
48
-
49
-
50
-
51
-
52
-
53
-
54
-
55
-
56
-
57
-
58
-
59
-
60
-
61
-
62
-
63
-
64
-
65
-
66
-
67
-
68
-
69
-
70
-
71
-
72
-
73
-
74
-
75
-
76
-
77
-
78
-
79
-
80
-
81
-
82
-
83
-
84
-
85
-
86
-
87
-
88
-
89
-
90
-
91
-
92
-
93
-
94
 |
 |

Change the needle regularly, especially if it is showing signs
of wear and causing problems. For best sewing results always
use SINGER Brand Needles.
Insert the needle
A. Loosen the needle clamp screw and tighten again after
inserting the new needle. (1)
B. The flat side of the shaft should be towards the back.
C/D.
Insert the needle as far up as it will go.
Turn power switch to off ("O") before inserting or removing
the needle.
Needles must be in perfect condition. (2)
Problems can occur with:
A. Bent needles
B. Blunt needles
C. Damaged points
Attention:
as illustrated as follows:
22
Inserting and changing needles
1
2
A
C
B
A
B
C
D
GB