Singer 3337 SIMPLE Instruction Manual and Troubleshooting Guide - Page 13
Inserting the Bobbin
 |
View all Singer 3337 SIMPLE manuals
Add to My Manuals
Save this manual to your list of manuals |
Page 13 highlights
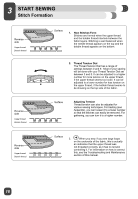
2 GETTING READY TO SEW Inserting the Bobbin ⚠ Turn power switch off before inserting or removing the bobbin. 1 1. When inserting or removing the bobbin, the needle and presser foot must be fully raised. 2. Remove the bobbin cover plate and bobbin. 3. Insert the bobbin in the bobbin case with the thread running in a counterclockwise direction (arrow). A B 4. Pull the thread through the slit (A). 5. With a finger held gently on top of the bobbin, place thread into guides as shown. 6. To cut off excess thread pull it toward you to cut it with the cutter at point (B). Replace the bobbin cover plate. 13
-
 1
1 -
2
-
3
-
4
-
5
-
6
-
7
-
 8
8 -
 9
9 -
 10
10 -
 11
11 -
 12
12 -
 13
13 -
 14
14 -
 15
15 -
 16
16 -
 17
17 -
 18
18 -
19
-
20
-
21
-
22
-
23
-
24
-
25
-
26
-
27
-
28
-
29
-
30
-
31
-
32
-
33
-
34
-
35
-
36
-
37
-
38
-
39
-
40
-
41
-
42
-
43
-
44
-
45
-
46
-
47
-
48
-
49
-
50
-
51
-
52
-
53
-
54
-
55
-
56
-
57
-
58
-
59
-
60
-
61
-
62
-
63
-
64
-
65
-
66
-
67
-
68
-
69
-
70
-
71
-
72
-
73
-
74
-
75
-
76
-
77
-
78
-
79
-
80
-
81
-
82
-
83
-
84
-
85
-
86
-
87
-
88
-
89
-
90
-
91
-
92
-
93
-
94
-
95
-
96
-
97
-
98
-
99
-
100
-
101
-
102
 |
 |

GETTING READY TO SEW
13
2
Inserting the Bobbin
B
A
1
⚠
Turn power switch off before inserting or removing the bobbin.
1.
When inserting or removing the bobbin, the needle and
presser foot must be fully raised.
2. Remove the bobbin cover plate and bobbin.
3.
Insert the bobbin in the bobbin case with the thread
running in a counterclockwise direction (arrow).
4. Pull the thread through the slit (A).
5.
With a finger held gently on top of the bobbin, place
thread into guides as shown.
6.
To cut off excess thread pull it toward you to cut it with
the cutter at point (B). Replace the bobbin cover plate.