Singer 3337 SIMPLE Instruction Manual and Troubleshooting Guide - Page 32
Maintenance
 |
View all Singer 3337 SIMPLE manuals
Add to My Manuals
Save this manual to your list of manuals |
Page 32 highlights
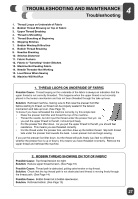
24 TROUBLESHOOTING AND MAINTENANCE Maintenance Cleaning the Feed Teeth and Hook Area ⚠ Before cleaning the machine, disconnect the power supply by removing the plug from the electrical outlet. Turn the hand wheel to raise the needle to its highest position. Raise the presser foot lifter. To ensure the best possible operation of your machine, it is necessary to keep the essential parts clean. For daily machine use, it is recommended that you clean the machine weekly. 1. Remove the bobbin cover and then the presser foot by pressing down on both sides of the presser foot. Removing the presser foot will provide better access to the needle plate and bobbin case area. 2. Turn the handwheel towards you until the needle is at the highest position. (The take-up lever should be visible over the top of the machine). 3. Remove the 2 screws in the needle plate using the L-screwdriver provided with your machine. Remove the needle plate. 4. Remove the bobbin from the bobbin case. 5. Take a hold of the bobbin case with your thumb and index finger at about 7 o'clock. Push it lightly to the right as you lift, the bobbin case will easily slip out of the hook race area. 6. Using the small brush that was provided with your machine remove lint and fluff from the hook race area, as well as the feed teeth area. 7. Your machine has been pre-lubricated at the factory; as a result oiling the bobbin case area is not necessary. 8. To reinsert the bobbin case, make sure the needle is at the highest position. (The take-up lever should be visible over the top of the machine). 9. Take a hold of the bobbin case with your thumb and index finger at 6 o'clock directly over the left screw at the center front of the bobbin case. 10. Guide the forked end of the bobbin case under the feed teeth and then move the bobbin case from right to left, until it is seated correctly in the hook race. 11. To ensure that the bobbin case is in the correct position, turn the handwheel towards you; the hook race should turn freely in a counter-clockwise direction. 12. Make sure the needle is again at the highest position. Reposition the needle plate over the feed dogs and secure in place using the 2 screws that you removed earlier. 13. Attach presser foot, insert bobbin and replace bobbin cover. You are now ready to sew. Sewing Light This appliance is equipped with a durable LED illumination, which is expected to last for the lifetime of the equipment. Please contact a local service agent, should the lamp nevertheless require to be replaced. 32
-
 1
1 -
2
-
3
-
4
-
5
-
6
-
7
-
8
-
9
-
10
-
11
-
12
-
13
-
14
-
15
-
16
-
17
-
18
-
19
-
20
-
21
-
22
-
23
-
24
-
25
-
26
-
 27
27 -
 28
28 -
 29
29 -
 30
30 -
 31
31 -
 32
32 -
 33
33 -
 34
34 -
 35
35 -
 36
36 -
 37
37 -
38
-
39
-
40
-
41
-
42
-
43
-
44
-
45
-
46
-
47
-
48
-
49
-
50
-
51
-
52
-
53
-
54
-
55
-
56
-
57
-
58
-
59
-
60
-
61
-
62
-
63
-
64
-
65
-
66
-
67
-
68
-
69
-
70
-
71
-
72
-
73
-
74
-
75
-
76
-
77
-
78
-
79
-
80
-
81
-
82
-
83
-
84
-
85
-
86
-
87
-
88
-
89
-
90
-
91
-
92
-
93
-
94
-
95
-
96
-
97
-
98
-
99
-
100
-
101
-
102
 |
 |
