Singer 3337 SIMPLE Instruction Manual and Troubleshooting Guide - Page 28
Troubleshooting
 |
View all Singer 3337 SIMPLE manuals
Add to My Manuals
Save this manual to your list of manuals |
Page 28 highlights
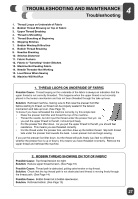
24 TROUBLESHOOTING AND MAINTENANCE Troubleshooting 3. UPPER THREAD BREAKING Possible Cause: Thread path obstructed. Solution: Check if thread is caught on thread spool (rough spots on the spool itself) or behind spool pin or spool cap (if the thread has fallen behind the spool cap and therefore cannot feed freely through the machine path). (See Page 14) Possible Cause: Machine is not threaded correctly. Solution: Remove upper thread completely, raise presser foot lifter, rethread machine making sure thread is in take-up lever (raise take up lever to its highest position by turning hand wheel toward you. (See Page 14) Possible Cause: Upper tension too tight. Solution: Reduce upper thread tension. (See Page 18) 4. THREAD IS SHREDDING Possible Cause: Thread is old or poor quality. Solution: Rethread the top of the machine and bobbin with good quality thread. (See Page 14) Possible Cause: The needle is either worn or old, or it is the wrong style or size for the thread being used. Though it may seem that the machine is shredding the thread, it is usually the needle causing this. If the needle is old or worn out, or if the needle is too small for the thickness of thread, the eye of the needle can cause the thread to shred. Solution: Change to a fresh needle in the correct size for the thickness/weight of thread being used. (See Page 25) 5. THREAD BUNCHING AT BEGINNING Possible Cause: Top & bobbin threads have not been properly placed underneath presser foot before starting to sew. Solution: Ensure that both the top thread and the bobbin thread are under the presser foot and toward the back before starting to sew. (See Page 20) Possible Cause: Sewing was started with no fabric under the presser foot. Solution: Place fabric under foot, making sure that needle comes down into fabric; lightly hold both thread tails for first few stitches. (See Page 20) 6. SKIPPING STITCHES Possible Cause: Needle inserted incorrectly. Solution: Check that flat side of needle top is toward back of machine and needle is up as far as it can go, then tighten needle clamp screw. (See Page 25) Possible Cause: Wrong needle for fabric sewn. Solution: Use correct style & size of needle for fabric. (Go to www.singerco.com to view the Stitch Reference Guide) Possible Cause: Bent, dull or damaged needle. Solution: Discard needle and insert new needle. (See Page 25) 28
-
 1
1 -
2
-
3
-
4
-
5
-
6
-
7
-
8
-
9
-
10
-
11
-
12
-
13
-
14
-
15
-
16
-
17
-
18
-
19
-
20
-
21
-
22
-
 23
23 -
 24
24 -
 25
25 -
 26
26 -
 27
27 -
 28
28 -
 29
29 -
 30
30 -
 31
31 -
 32
32 -
 33
33 -
34
-
35
-
36
-
37
-
38
-
39
-
40
-
41
-
42
-
43
-
44
-
45
-
46
-
47
-
48
-
49
-
50
-
51
-
52
-
53
-
54
-
55
-
56
-
57
-
58
-
59
-
60
-
61
-
62
-
63
-
64
-
65
-
66
-
67
-
68
-
69
-
70
-
71
-
72
-
73
-
74
-
75
-
76
-
77
-
78
-
79
-
80
-
81
-
82
-
83
-
84
-
85
-
86
-
87
-
88
-
89
-
90
-
91
-
92
-
93
-
94
-
95
-
96
-
97
-
98
-
99
-
100
-
101
-
102
 |
 |
