Singer 3337 SIMPLE Instruction Manual and Troubleshooting Guide - Page 20
Sewing a Straight Stitch
 |
View all Singer 3337 SIMPLE manuals
Add to My Manuals
Save this manual to your list of manuals |
Page 20 highlights
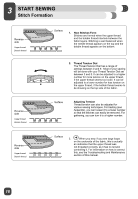
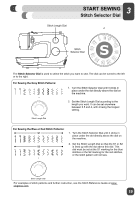
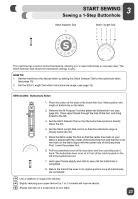
23 START SEWING Sewing a Straight Stitch Stitch Selector Dial Stitch Length Dial A straight stitch is used for sewing seams and topstitching. HOW TO: 1. Set the machine for Straight Stitch by setting the Stitch Selector Dial to straight stitch. (see page 19) 2. The Stitch Length Dial control can be set at the stitch length that you desire. (see page 19) SEW ALONG: 1. Set the Stitch Selector Dial so that the straight stitch symbols are directly below the dot. 2. Set the Stitch Length Dial control so that the number 2 is directly below the dot on the machine. This is an average stitch length setting for regular sewing. 3. Place the fabric under the All-Purpose Foot or the Sew Easy Foot (see page 26) with the right-hand edge of the fabric lined up with the desired seam guide line on the right side of the needle plate. Lower the presser foot, then step on the foot control to begin sewing. Always make sure that the presser foot is lowered before you begin to sew. If you fail to do so, the machine will jam as you begin to sew. Start your seam by sewing 2 to 3 stitches. Press the reverse lever to sew backwards 2 to 3 stitches, which will lock the end of the seam so the stitches don't come undone. Release the reverse lever to sew forward again. Continue sewing the length of the seam. Press the reverse lever at the end of the seam and sew backwards 2 to 3 stitches. Release the reverse lever to sew forward again to finish. Use a slightly shorter stitch length for lightweight fabrics, finer threads and needles. Use a longer stitch length such as 3 or 4 for heavy weight fabrics. It may be helpful to gently hold the thread tails with your left hand for the first few stitches, as this will help guide the fabric under the foot as you begin to sew. 20
-
 1
1 -
2
-
3
-
4
-
5
-
6
-
7
-
8
-
9
-
10
-
11
-
12
-
13
-
14
-
 15
15 -
 16
16 -
 17
17 -
 18
18 -
 19
19 -
 20
20 -
 21
21 -
 22
22 -
 23
23 -
 24
24 -
 25
25 -
26
-
27
-
28
-
29
-
30
-
31
-
32
-
33
-
34
-
35
-
36
-
37
-
38
-
39
-
40
-
41
-
42
-
43
-
44
-
45
-
46
-
47
-
48
-
49
-
50
-
51
-
52
-
53
-
54
-
55
-
56
-
57
-
58
-
59
-
60
-
61
-
62
-
63
-
64
-
65
-
66
-
67
-
68
-
69
-
70
-
71
-
72
-
73
-
74
-
75
-
76
-
77
-
78
-
79
-
80
-
81
-
82
-
83
-
84
-
85
-
86
-
87
-
88
-
89
-
90
-
91
-
92
-
93
-
94
-
95
-
96
-
97
-
98
-
99
-
100
-
101
-
102
 |
 |
