Sony DPF X1000 Operating Instructions - Page 13
DC IN 8.4 V jack, Memory Stick PRO Standard - picture frame
 |
UPC - 027242763333
View all Sony DPF X1000 manuals
Add to My Manuals
Save this manual to your list of manuals |
Page 13 highlights
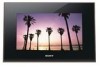
Rear Before operation A EXT INTERFACE connector (.page 67) You can transfer images wirelessly from a BLUETOOTH™ compatible mobile phone or digital camera by connecting a Bluetooth adaptor (optional: DPPA-BT1). You can also connect a digital camera, USB memory, or photo storage compatible with USB mass storage. B USB B connector (.page 69) Connect a USB cable when you want to use the photo frame with a computer. C HDMI OUT (output) connector (.page 63) Connect an HDMI cable when you want to view images on a high definition TV. D Stand (.page 17) E DC IN 8.4 V jack (.page 19) Insert the plug of the supplied AC adaptor to this jack, and connect the AC power cord to the AC adaptor and the wall outlet. F Power Switch (.page 23) G VIEW MODE button (.page 26) H "Memory Stick PRO" (Standard/ Duo) slot (.page 25) I Access lamp J Alarm switch (.page 57) K Standby indicator L 1 (on/standby) button M MENU button Displays the menu. From the menu, you can operate the same functions as those of the buttons on the remote control, such as [Slideshow Settings], [Rotate], [Add to album] and [Date/time settings]. N Direction (B/b/v/V) buttons, Press B/b/v/V to select the menu items. Then press to enter the selection. O BACK button Returns to the previous screen. P Reset switch (.page 76) The date/time setting, alarm settings, and the auto power on/off settings return to their factory default setting. Use a long, thin object, such as a pin, to push the switch. Q CompactFlash card/Microdrive slot (.page 25) R SD memory card/MMC/xD-Picture Card slot (.page 25) Continued 13 GB
-
 1
1 -
2
-
3
-
4
-
5
-
6
-
7
-
 8
8 -
 9
9 -
 10
10 -
 11
11 -
 12
12 -
 13
13 -
 14
14 -
 15
15 -
 16
16 -
 17
17 -
 18
18 -
19
-
20
-
21
-
22
-
23
-
24
-
25
-
26
-
27
-
28
-
29
-
30
-
31
-
32
-
33
-
34
-
35
-
36
-
37
-
38
-
39
-
40
-
41
-
42
-
43
-
44
-
45
-
46
-
47
-
48
-
49
-
50
-
51
-
52
-
53
-
54
-
55
-
56
-
57
-
58
-
59
-
60
-
61
-
62
-
63
-
64
-
65
-
66
-
67
-
68
-
69
-
70
-
71
-
72
-
73
-
74
-
75
-
76
-
77
-
78
-
79
-
80
-
81
-
82
-
83
-
84
-
85
-
86
-
87
-
88
 |
 |
