Sony DSC P50 Operating Instructions - Page 70
Notes on [DATE/TIME], POWER SAVE
 |
UPC - 027242589315
View all Sony DSC P50 manuals
Add to My Manuals
Save this manual to your list of manuals |
Page 70 highlights
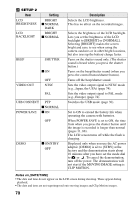
SETUP 2 Item LCD BRIGHTNESS LCD BACKLIGHT Setting BRIGHT x NORMAL DARK BRIGHT x NORMAL BEEP SHUTTER x ON VIDEO OUT OFF NTSC PAL USB CONNECT PTP x NORMAL POWER SAVE x ON OFF DEMO x ON/STBY OFF Description Selects the LCD brightness. This has no effect on the recorded images. Selects the brightness of the LCD backlight. Lets you set the brightness of the LCD backlight to [BRIGHT] or [NORMAL]. Selecting [BRIGHT] makes the screen bright and easy to see when using the camera outdoors or in other bright locations, but also uses up the battery charge faster. Turns on the shutter sound only. (The shutter sound is heard when you press the shutter button.) Turns on the beep/shutter sound (when you press the control button/shutter button). Turns off the beep/shutter sound. Sets the video output signal to NTSC mode (e.g., Japan, the USA) (page 74). Sets the video output signal to PAL mode (e.g., Europe) (page 74). Switches the USB mode (page 30). Set to ON to extend the battery life when operating the camera with batteries. When POWER SAVE is set to ON, the time from when you press the shutter button until the image is recorded is longer than normal (pages 11, 88). The LCD screen turns off while the flash is charging. Displayed only when you use the AC power adaptor. [DEMO] is set to [STBY] at the factory and the demonstration starts about 10 minutes after you have set the mode dial to or . To cancel the demonstration, turn off the power. The demonstration will not start if the MOVING IMAGE setting is CLIP MOTION. Notes on [DATE/TIME] • The date and time do not appear on the LCD screen during shooting. These appear during playback. • The date and time are not superimposed onto moving images and Clip Motion images. 70
-
 1
1 -
2
-
3
-
4
-
5
-
6
-
7
-
8
-
9
-
10
-
11
-
12
-
13
-
14
-
15
-
16
-
17
-
18
-
19
-
20
-
21
-
22
-
23
-
24
-
25
-
26
-
27
-
28
-
29
-
30
-
31
-
32
-
33
-
34
-
35
-
36
-
37
-
38
-
39
-
40
-
41
-
42
-
43
-
44
-
45
-
46
-
47
-
48
-
49
-
50
-
51
-
52
-
53
-
54
-
55
-
56
-
57
-
58
-
59
-
60
-
61
-
62
-
63
-
64
-
 65
65 -
 66
66 -
 67
67 -
 68
68 -
 69
69 -
 70
70 -
 71
71 -
 72
72 -
 73
73 -
 74
74 -
 75
75 -
76
-
77
-
78
-
79
-
80
-
81
-
82
-
83
-
84
-
85
-
86
-
87
-
88
-
89
-
90
-
91
-
92
 |
 |