Sony DSC P50 Operating Instructions - Page 75
Troubleshooting
 |
UPC - 027242589315
View all Sony DSC P50 manuals
Add to My Manuals
Save this manual to your list of manuals |
Page 75 highlights
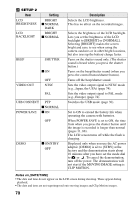
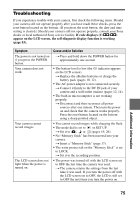
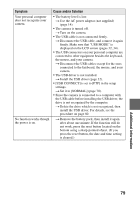
Troubleshooting If you experience trouble with your camera, first check the following items. Should your camera still not operate properly after you have made these checks, press the reset button located on the bottom. (If you press the reset button, the date and time setting is cleared.) Should your camera still not operate properly, consult your Sony dealer or local authorized Sony service facility. If code displays (C:ss:ss) appear on the LCD screen, the self-diagnosis display function is working (page 83). Symptom The power is not turned on if you press the POWER button. Your camera does not work. Your camera cannot record images. The LCD screen does not light when the power is turned on. Cause and/or Solution t Press and hold down the POWER button for approximately one second. • The battery level is low (the E indicator appears on the LCD screen). t Replace the alkaline batteries or charge the battery pack (pages 10, 12). • The AC power adaptor is not connected securely. t Connect it firmly to the DC IN jack of your camera and a wall outlet (mains) (pages 12, 14). • The built-in microcomputer is not working properly. t Disconnect and then reconnect all power sources after one minute. Then turn the power on and check that the camera works properly. Press the reset button located on the bottom using a sharp-pointed object. • You cannot record images while charging the flash. • The mode dial is set to or SET UP. t Set it to , or (pages 19, 26). • No "Memory Stick" has been inserted into your camera. t Insert a "Memory Stick" (page 17). • The write-protect tab on the "Memory Stick" is set to LOCK. t Set it to the recording position. • The power was turned off with the LCD screen set to OFF the last time the camera was used. t The camera retains the settings from the last time it was used. If you turn the power off with the LCD screen set to OFF, the LCD is still set to OFF the next time you turn the power on. Additional information 75
-
 1
1 -
2
-
3
-
4
-
5
-
6
-
7
-
8
-
9
-
10
-
11
-
12
-
13
-
14
-
15
-
16
-
17
-
18
-
19
-
20
-
21
-
22
-
23
-
24
-
25
-
26
-
27
-
28
-
29
-
30
-
31
-
32
-
33
-
34
-
35
-
36
-
37
-
38
-
39
-
40
-
41
-
42
-
43
-
44
-
45
-
46
-
47
-
48
-
49
-
50
-
51
-
52
-
53
-
54
-
55
-
56
-
57
-
58
-
59
-
60
-
61
-
62
-
63
-
64
-
65
-
66
-
67
-
68
-
69
-
 70
70 -
 71
71 -
 72
72 -
 73
73 -
 74
74 -
 75
75 -
 76
76 -
 77
77 -
 78
78 -
 79
79 -
 80
80 -
81
-
82
-
83
-
84
-
85
-
86
-
87
-
88
-
89
-
90
-
91
-
92
 |
 |