Sony DSC V3 Operating Instructions - Page 116
USB mode, Communication with your, computer, When a USB connector is not, provided on your computer
 |
UPC - 027242662155
View all Sony DSC V3 manuals
Add to My Manuals
Save this manual to your list of manuals |
Page 116 highlights
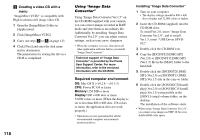
USB mode There are two modes for a USB connection when connecting with a computer, [Normal] and [PTP]* modes. The default setting is the [Normal] mode. This section describes the [Normal] mode as an example. * For a details on the PTP connection, see page 142. Communication with your computer When your computer resumes from the suspend or sleep mode, communication between your camera and your computer may not recover at the same time. When a USB connector is not provided on your computer When neither a USB connector nor a recording medium slot is provided, you can copy images using an additional device. See the Sony Website for details. http://www.sony.net/ Connecting your camera to your computer For details, see page 104. Disconnecting the USB cable, removing the recording medium from your camera or turning off the power during USB connection Drag and drop the drive icon or the icon of the recording medium to the "Trash" icon, then disconnect the USB cable, remove the recording medium, or turn off the camera. • If you are using Mac OS X v10.0, disconnect the USB cable etc., after you have turned your computer off. Copying images 1 Double-click the newly recognized icon on the desktop. The contents of the recording medium inserted in your camera appear. 2 Double-click [DCIM]. 3 Double-click the folder that the images you want to copy are stored. 4 Drag and drop the image files to the hard disk icon. • The image files are copied to your hard disk. For details on the storage location of the images and file names, see page 107. Viewing the images on your computer 1 Double-click the hard disk icon. 2 Double-click the desired image file in the folder containing the copied files. The image file opens. • "Picture Package" cannot be used with Macintosh. 116
-
 1
1 -
2
-
3
-
4
-
5
-
6
-
7
-
8
-
9
-
10
-
11
-
12
-
13
-
14
-
15
-
16
-
17
-
18
-
19
-
20
-
21
-
22
-
23
-
24
-
25
-
26
-
27
-
28
-
29
-
30
-
31
-
32
-
33
-
34
-
35
-
36
-
37
-
38
-
39
-
40
-
41
-
42
-
43
-
44
-
45
-
46
-
47
-
48
-
49
-
50
-
51
-
52
-
53
-
54
-
55
-
56
-
57
-
58
-
59
-
60
-
61
-
62
-
63
-
64
-
65
-
66
-
67
-
68
-
69
-
70
-
71
-
72
-
73
-
74
-
75
-
76
-
77
-
78
-
79
-
80
-
81
-
82
-
83
-
84
-
85
-
86
-
87
-
88
-
89
-
90
-
91
-
92
-
93
-
94
-
95
-
96
-
97
-
98
-
99
-
100
-
101
-
102
-
103
-
104
-
105
-
106
-
107
-
108
-
109
-
110
-
 111
111 -
 112
112 -
 113
113 -
 114
114 -
 115
115 -
 116
116 -
 117
117 -
 118
118 -
 119
119 -
 120
120 -
 121
121 -
122
-
123
-
124
-
125
-
126
-
127
-
128
-
129
-
130
-
131
-
132
-
133
-
134
-
135
-
136
-
137
-
138
-
139
-
140
-
141
-
142
-
143
-
144
-
145
-
146
-
147
-
148
-
149
-
150
-
151
-
152
-
153
-
154
-
155
-
156
 |
 |
