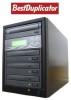
Sony DVD Duplicator User Guide - Page 9
Getting Started - 1 10
 |
UPC - 837654184592
View all Sony DVD Duplicator manuals
Add to My Manuals
Save this manual to your list of manuals |
Page 9 highlights
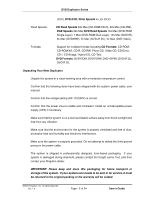
DVD Duplicator Series Chapter 2 Getting Started Turning on the System Plug the AC cord into the system and then into a wall outlet. NOTE: Make sure that the voltage setting is correct (115v or 230v). Switch the ON/OFF rocker-switch located on the back of the system (below the power outlet). The LCD display will light up, indicator lights on each of the DVD disc drives will flash momentarily and the system will go through a short self test routine. About the LCD Panel Display When you first turn the system on, after a short self test routine the information displayed in the LCD panel will indicate the copy function is selected: Press the down arrow button to scroll through the functions that are available in the system. They appear in the following order: 1. Copy 2. Test 3. Test & Copy 4. Verify 5. Compare 6. Prescan 7. Disc Info 8. Select Source 9. Image (When a hard drive is installed in the duplicator) 10. Edit Track 11. Setup Press the up arrow button to scroll through the functions in the opposite order. Pressing the ENT (Enter) button starts the function that you have selected. Press the ESC (Escape) button stops/cancels any function that you have started or selected. ©2005 Kingdom, Inc. All rights reserved Ver: 1.0 Page - 8 of 34 User's Guide
-
 1
1 -
2
-
3
-
 4
4 -
 5
5 -
 6
6 -
 7
7 -
 8
8 -
 9
9 -
 10
10 -
 11
11 -
 12
12 -
 13
13 -
 14
14 -
15
-
16
-
17
-
18
-
19
-
20
-
21
-
22
-
23
-
24
-
25
-
26
-
27
-
28
-
29
-
30
-
31
-
32
-
33
-
34
-
35
 |
 |
