Sony FWD-42PV1 Operating Instructions - Page 27
Dynamic Picture, Color Temp., Phase, Sharpness, Noise Reduct.
 |
View all Sony FWD-42PV1 manuals
Add to My Manuals
Save this manual to your list of manuals |
Page 27 highlights
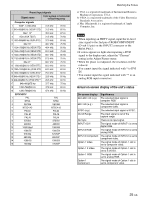
Phase Select "Phase" with M/m and press ENTER. Adjust the phase with M/m/
-
 1
1 -
2
-
3
-
4
-
5
-
6
-
7
-
8
-
9
-
10
-
11
-
12
-
13
-
14
-
15
-
16
-
17
-
18
-
19
-
20
-
21
-
 22
22 -
 23
23 -
 24
24 -
 25
25 -
 26
26 -
 27
27 -
 28
28 -
 29
29 -
 30
30 -
 31
31 -
 32
32 -
33
-
34
-
35
-
36
-
37
-
38
-
39
-
40
-
41
-
42
-
43
-
44
-
45
-
46
-
47
 |
 |

27
(GB)
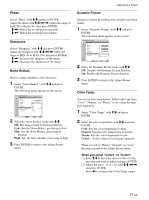
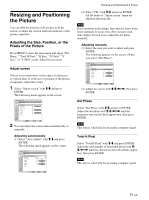
Dynamic Picture
Enhances contrast by making white brighter and black
darker.
1
Select “Dynamic Picture” with
M
/
m
and press
ENTER.
The following menu appears on the screen.
PICTURE/SOUND CONTROL
Adjust Picture
Contrast:
Brightness:
Chroma:
Phase:
Sharpness:
Noise Reduct.:
Dynamic Picture:
Color Temp.:
Set
ENTER
Exit
MENU
Select
70
50
50
0
10
Off
Off
On
2
Select the Dynamic Picture mode with
M
/
m
.
Off:
Disables the Dynamic Picture function.
On:
Enables the Dynamic Picture function.
3
Press ENTER to return to the Adjust Picture
menu.
Color Temp.
You can set color temperature. Either select one from
“Cool,” “Neutral,” or “Warm,” or set values for each
gain separately.
1
Select “Color Temp.” with
M
/
m
and press
ENTER.
2
Select the color temperature with
M
/
m
and press
ENTER.
Cool:
Sets the color temperature to high.
Neutral:
Sets the color temperature to neutral.
Warm:
Sets the color temperature to low.
Color1 – 3:
Sets values for each gain separately.
When you select “Warm,” “Neutral,” or “Cool,”
the menu returns to the Adjust Picture menu.
When you select “Color1” to “Color3”
(1) Press
M
/
m
to move the cursor (yellow) to the
gain that you want to adjust and press ENTER.
(2)
Adjust the gain (–15 to +15) with
M
/
m
/
<
/
,
and press ENTER.
Press
<
to return to the Color Temp. menu.
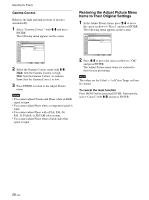
Adjusting the Picture
Phase
Select “Phase” with
M
/
m
and press ENTER.
Adjust the phase with
M
/
m
/
<
/
,
within the range of
Left (50) to Right (50), then press ENTER.
M
/
,
:
Makes the overall picture greenish.
m
/
<
:
Makes the overall picture reddish.
Sharpness
Select “Sharpness” with
M
/
m
and press ENTER.
Adjust the sharpness with
M
/
m
/
<
/
,
within the
range of MIN (0) to MAX (20), then press ENTER.
M
/
,
:
Increases the sharpness of the image.
m
/
<
:
Decreases the sharpness of the image.
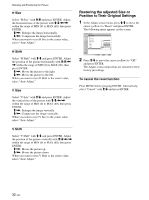
Noise Reduct.
Reduces image graininess and color noise.
1
Select “Noise Reduct.” with
M
/
m
and press
ENTER.
The following menu appears on the screen.
PICTURE/SOUND CONTROL
Adjust Picture
Contrast:
Brightness:
Chroma:
Phase:
Sharpness:
Noise Reduct.:
Dynamic Picture:
Color Temp.:
Set
ENTER
Exit
MENU
Select
70
50
Off
Neutral
Off
Low
Mid
High
2
Select the Noise Reduct. mode with
M
/
m
.
Off:
The image signal is displayed directly.
Low:
Sets the Noise Reduct. processing to low.
Mid:
Sets the Noise Reduct. processing to
medium.
High:
Sets the Noise Reduct. processing to high.
3
Press ENTER to return to the Adjust Picture
menu.