Sony FWD-42PV1 Operating Instructions - Page 39
On/Off Timer Function
 |
View all Sony FWD-42PV1 manuals
Add to My Manuals
Save this manual to your list of manuals |
Page 39 highlights
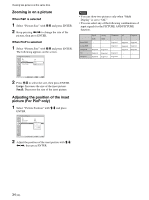
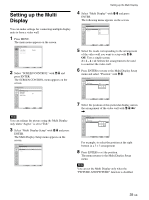
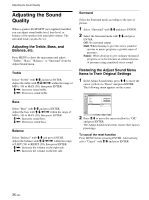
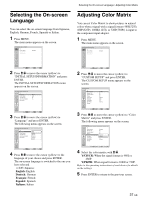
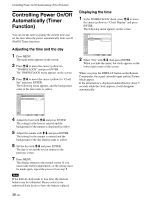
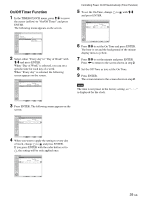
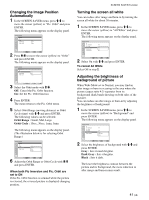
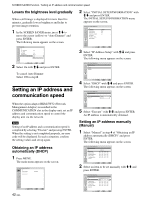
On/Off Timer Function 1 In the TIMER/CLOCK menu, press M/m to move the cursor (yellow) to "On/Off Timer" and press ENTER. The following menu appears on the screen. TIMER/CLOCK Clock Set Clock Display: On/Off Timer Off Every day Day of Week Select Set ENTER Exit MENU 2 Select either "Every day"or "Day of Week" with M/m and press ENTER. When "Day of Week" is selected, you can set a specific time for each day of a week. When "Every day" is selected, the following screen appears on the screen. TIMER/CLOCK On/Off Timer Repeat Every Day [On Time] [Off Time] 0 : 00 0 : 00 Controlling Power On/Off Automatically (Timer Function) 5 To set the On Time, change to with M/m and press ENTER. TIMER/CLOCK On/Off Timer Repeat Every Day [On Time] [Off Time] 000 :: 0000 000 :: 0000 Select Set ENTER Exit MENU 6 Press M/m to set the On Time and press ENTER. The hour is set and the background of the minute display turns to yellow. 7 Press M/m to set the minute and press ENTER. Press < to return to the screen shown in step 2. 8 Set the Off Time as you set the On Time. 9 Press ENTER. The screen returns to the screen shown in step 2. Note The time is not preset in the factory setting, so "-- : --" is displayed for the clock. Select Set ENTER Exit MENU 3 Press ENTER. The following menu appears on the screen. TIMER/CLOCK On/Off Timer Repeat Every Day [On Time] [Off Time] 000 :: 0000 000 :: 0000 Select Set ENTER Exit MENU 4 When you want to apply the setting to every day of week, change to and press ENTER. If you press ENTER with the radio button set to , the setting will be only applied once. TIMER/CLOCK On/Off Timer Repeat Every Day [On Time] [Off Time] 000 :: 0000 000 :: 0000 Select Set ENTER Exit MENU 39 (GB)
-
 1
1 -
2
-
3
-
4
-
5
-
6
-
7
-
8
-
9
-
10
-
11
-
12
-
13
-
14
-
15
-
16
-
17
-
18
-
19
-
20
-
21
-
22
-
23
-
24
-
25
-
26
-
27
-
28
-
29
-
30
-
31
-
32
-
33
-
 34
34 -
 35
35 -
 36
36 -
 37
37 -
 38
38 -
 39
39 -
 40
40 -
 41
41 -
 42
42 -
 43
43 -
 44
44 -
45
-
46
-
47
 |
 |
