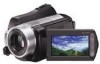
Sony HDR SR10 Operating Instructions - Page 22
Saving images, Items of the OPTION MENU, Using a computer, Connecting your camcorder to, other devices - external mic
 |
UPC - 027242727779
View all Sony HDR SR10 manuals
Add to My Manuals
Save this manual to your list of manuals |
Page 22 highlights
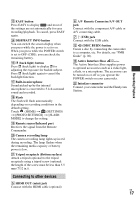
Saving images CLOCK/ LANG GENERAL SET [CLOCK SET]*, [AREA SET], [DST SET], [SUMMERTIME], [ LANGUAGE SET]* [DEMO MODE], [REC LAMP], [CALIBRATION], [A.SHUT OFF], [QUICK ON STBY], [REMOTE CTRL], [DROP SENSOR], [CTRL FOR HDMI] * You can set these items also during Easy Handycam operation. ** The menu name is changed to [SOUND SETTINGS] during Easy Handycam operation. Items of the OPTION MENU Items you can set only on the OPTION MENU will be described below. tab [FOCUS], [SPOT FOCUS], [TELE MACRO], [EXPOSURE], [SPOT METER], [SCENE SELECTION], [WHITE BAL.], [COLOR SLOW SHTR], [SUPER NIGHTSHOT] tab [FADER], [D.EFFECT], [PICT.EFFECT] tab [BLT-IN ZOOM MIC], [MICREF LEVEL], [SELF-TIMER], [TIMING], [RECORD SOUND] - (The tab depends on the situation/No tab) [SLIDE SHOW], [SLIDE SHOW SET], [COPIES], [DATE/TIME], [SIZE] Due to the limited capacity of the media, make sure that you save the image data to some type of external media such as a DVD-R or a computer. You can save the images recorded on the camcorder as described below. Using a computer By using "Picture Motion Browser" on the supplied CD-ROM, you can save the images recorded on your camcorder with HD (high definition) image quality or SD (standard definition) image quality. You can rewrite movies with HD (high definition) image quality from the computer to your camcorder, if necessary. For details, see "PMB Guide" (p. 26). Creating a disc with One Touch (One Touch Disc Burn) You can save images recorded on the hard disk of your camcorder directly to a disc with ease by pressing the (DISC BURN) button. Saving images on a computer (Easy PC Back-up) You can save images recorded on the camcorder on the hard disk of a computer. Creating a disc with selected images You can save images copied to your computer on a disc. You can also edit those images. Connecting your camcorder to other devices For details, see "Handycam Handbook" (PDF). US 22
-
 1
1 -
2
-
3
-
4
-
5
-
6
-
7
-
8
-
9
-
10
-
11
-
12
-
13
-
14
-
15
-
16
-
 17
17 -
 18
18 -
 19
19 -
 20
20 -
 21
21 -
 22
22 -
 23
23 -
 24
24 -
 25
25 -
 26
26 -
 27
27 -
28
-
29
-
30
-
31
-
32
-
33
-
34
-
35
-
36
-
37
-
38
-
39
-
40
-
41
-
42
-
43
-
44
-
45
-
46
-
47
-
48
-
49
-
50
-
51
-
52
-
53
-
54
-
55
-
56
-
57
-
58
-
59
-
60
-
61
-
62
-
63
-
64
-
65
-
66
-
67
-
68
-
69
-
70
-
71
-
72
 |
 |
