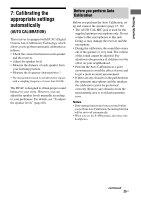
Sony HT-SF470 Operating Instructions - Page 26
Performing Auto Calibration, A.CAL MENU appears, then - speaker level height
 |
UPC - 027242792869
View all Sony HT-SF470 manuals
Add to My Manuals
Save this manual to your list of manuals |
Page 26 highlights
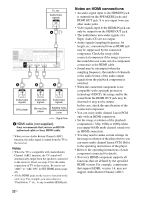
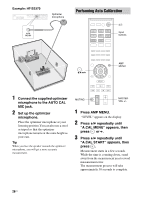
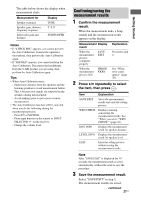
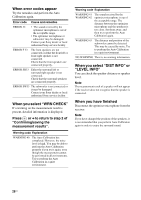
Example: HT-SS370 SPEAKERS FRONT R FRONT L SUR R SUR L SUBWOOFER CENTER L DIGITAL EZW-T100 DC5V R AUTO AUDIO IN AUDIO IN CAL MIC SA-CD/CD TV 0.7A MAX DMPORT HDMI DVD IN COAX IN OPT IN OPT IN VIDEO SAT/CATV TV BD IN SAT/CATV IN ANTENNA AM ARC TV OUT Optimizer microphone Performing Auto Calibration BD DVD TV VIDEO DMPORT TUNER SAT/ CATV SA-CD/ CD ?/1 Input buttons 1 Connect the supplied optimizer microphone to the AUTO CAL MIC jack. 2 Set up the optimizer microphone. Place the optimizer microphone at your listening position.You can also use a stool or tripod so that the optimizer microphone remains at the same height as your ears. Tip When you face the speaker towards the optimizer microphone, you will get a more accurate measurement. , V/v/B/b O MENU m M .X x> MUTING AMP MENU MASTER VOL +/- 1 Press AMP MENU. "LEVEL" appears on the display. 2 Press V/v repeatedly until "A.CAL MENU" appears, then press or b. 3 Press V/v repeatedly until "A.CAL START" appears, then press . Measurement starts in a few seconds. While the time is counting down, stand away from the measurement area to avoid measurement error. The measurement process will take approximately 30 seconds to complete. 26US
-
 1
1 -
2
-
3
-
4
-
5
-
6
-
7
-
8
-
9
-
10
-
11
-
12
-
13
-
14
-
15
-
16
-
17
-
18
-
19
-
20
-
 21
21 -
 22
22 -
 23
23 -
 24
24 -
 25
25 -
 26
26 -
 27
27 -
 28
28 -
 29
29 -
 30
30 -
 31
31 -
32
-
33
-
34
-
35
-
36
-
37
-
38
-
39
-
40
-
41
-
42
-
43
-
44
-
45
-
46
-
47
-
48
-
49
-
50
-
51
-
52
-
53
-
54
-
55
-
56
-
57
-
58
-
59
-
60
-
61
-
62
-
63
-
64
-
65
-
66
-
67
-
68
-
69
-
70
-
71
-
72
-
73
-
74
-
75
-
76
 |
 |
