Sony KLV32S400A Revision History - Page 78
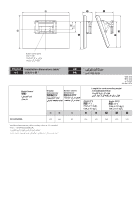
Step 5: Preparing for the, installation of the TV, Remove the screws from the rear of the TV.
 |
UPC - 011110668585
View all Sony KLV32S400A manuals
Add to My Manuals
Save this manual to your list of manuals |
Page 78 highlights
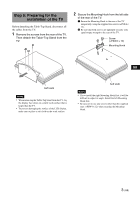
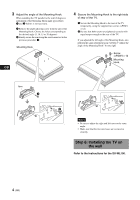
Step 5: Preparing for the installation of the TV Before detaching the Table-Top Stand, disconnect all the cables from the TV. 1 Remove the screws from the rear of the TV. Then detach the Table-Top Stand from the TV. 2 Secure the Mounting Hook from the left side of the rear of the TV. 1 Secure the Mounting Hook to the rear of the TV temporarily, using the supplied two screws (+PSW4 × 12). 2 Be sure that both screws are tightened securely with equal torque strength to the rear of the TV. Screw (+PSW4 × 12) Mounting Hook GB Soft cloth Notes • When removing the Table-Top Stand from the TV, lay the display face down on a stable work surface that is larger than the TV. • To prevent damaging the surface of the LCD display, make sure to place a soft cloth on the work surface. Soft cloth Notes • If you install the right Mounting Hook first, it will be difficult to adjust its angle. Install the left Mounting Hook first. • Be sure not to use any screws other than the supplied ones (+PSW4 × 12) when securing the Mounting Hook. 3 (GB)
-
 1
1 -
2
-
3
-
4
-
5
-
6
-
7
-
8
-
9
-
10
-
11
-
12
-
13
-
14
-
15
-
16
-
17
-
18
-
19
-
20
-
21
-
22
-
23
-
24
-
25
-
26
-
27
-
28
-
29
-
30
-
31
-
32
-
33
-
34
-
35
-
36
-
37
-
38
-
39
-
40
-
41
-
42
-
43
-
44
-
45
-
46
-
47
-
48
-
49
-
50
-
51
-
52
-
53
-
54
-
55
-
56
-
57
-
58
-
59
-
60
-
61
-
62
-
63
-
64
-
65
-
66
-
67
-
68
-
69
-
70
-
71
-
72
-
 73
73 -
 74
74 -
 75
75 -
 76
76 -
 77
77 -
 78
78 -
 79
79 -
 80
80 -
 81
81
 |
 |
