Sony NEX-5 α Handbook - Page 124
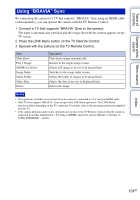
Using BRAVIA Sync, Press the LINK Menu button on the TV Remote Control.
 |
UPC - 027242797505
View all Sony NEX-5 manuals
Add to My Manuals
Save this manual to your list of manuals |
Page 124 highlights
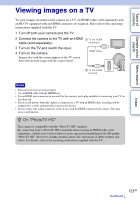
Table of contents Sample photo Menu search search Using "BRAVIA" Sync By connecting the camera to a TV that supports "BRAVIA" Sync using an HDMI cable (sold separately), you can operate the camera with the TV Remote Control. 1 Connect a TV that supports "BRAVIA" Sync to the camera. The input is automatically switched and the image shot with the camera appears on the TV screen. 2 Press the LINK Menu button on the TV Remote Control. 3 Operate with the buttons on the TV Remote Control. Item Slide Show Play 1 Image Still/Movie Select Image Index Select Folder Select Date Delete Operation Plays back images automatically Returns to the single-image screen. Selects still image or movie to be played back. Switches to the image index screen. Selects the folder of images to be played back. Selects the date of movies to be played back. Deletes the image. Notes • The operations available are restricted when the camera is connected to a TV using an HDMI cable. • Only TVs that support "BRAVIA" Sync can provide LINK Menu operations. The LINK Menu operations differ depending on the TV connected. For details, refer to the operating instructions supplied with the TV. • If the camera performs unnecessary operations in response to the TV Remote Control when the camera is connected to another manufacturer's TV using an HDMI connection, operate [Menu] t [Setup] t [CTRL FOR HDMI] t [Off]. Index 124GB
-
 1
1 -
2
-
3
-
4
-
5
-
6
-
7
-
8
-
9
-
10
-
11
-
12
-
13
-
14
-
15
-
16
-
17
-
18
-
19
-
20
-
21
-
22
-
23
-
24
-
25
-
26
-
27
-
28
-
29
-
30
-
31
-
32
-
33
-
34
-
35
-
36
-
37
-
38
-
39
-
40
-
41
-
42
-
43
-
44
-
45
-
46
-
47
-
48
-
49
-
50
-
51
-
52
-
53
-
54
-
55
-
56
-
57
-
58
-
59
-
60
-
61
-
62
-
63
-
64
-
65
-
66
-
67
-
68
-
69
-
70
-
71
-
72
-
73
-
74
-
75
-
76
-
77
-
78
-
79
-
80
-
81
-
82
-
83
-
84
-
85
-
86
-
87
-
88
-
89
-
90
-
91
-
92
-
93
-
94
-
95
-
96
-
97
-
98
-
99
-
100
-
101
-
102
-
103
-
104
-
105
-
106
-
107
-
108
-
109
-
110
-
111
-
112
-
113
-
114
-
115
-
116
-
117
-
118
-
 119
119 -
 120
120 -
 121
121 -
 122
122 -
 123
123 -
 124
124 -
 125
125 -
 126
126 -
 127
127 -
 128
128 -
 129
129 -
130
-
131
-
132
-
133
-
134
-
135
-
136
-
137
-
138
-
139
-
140
-
141
-
142
-
143
-
144
-
145
-
146
-
147
-
148
-
149
-
150
-
151
-
152
-
153
-
154
-
155
-
156
-
157
-
158
-
159
 |
 |