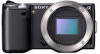
Sony NEX-5 α Handbook - Page 127
Using the software
 |
UPC - 027242797505
View all Sony NEX-5 manuals
Add to My Manuals
Save this manual to your list of manuals |
Page 127 highlights
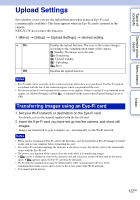
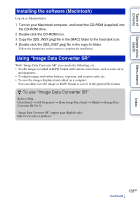
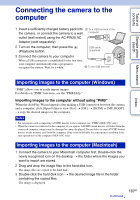
Table of contents Sample photo Menu search search Index Using the software Installing the software (Windows) Log on as Administrator. 1 Turn on your computer, and insert the CD-ROM (supplied) into the CD-ROM drive. The installation menu screen appears. • If it does not appear, double-click [Computer] (For Windows XP: [My Computer]) t (SONYPMB) t [Install.exe]. • If the AutoPlay screen appears, select "Run Install.exe" and follow the instructions that appear on the screen to proceed with the installation. 2 Click [Install]. Make sure that both "Sony Image Data Suite" and "PMB" are checked and follow the instructions on the screen. • Connect the camera to the computer during the procedure following the instructions on the screen (page 130). • When the restarting confirmation message appears, restart the computer following the instructions on the screen. • DirectX may be installed depending on the system environment of your computer. 3 Remove the CD-ROM after the installation is complete. The following software is installed and shortcut icons appear on the desktop. "Image Data Converter SR" "Image Data Lightbox SR" "PMB" "PMB Launcher" "PMB Help" Notes • If "PMB" has already been installed on the computer, and the version number of the previously installed "PMB" is lower than that of the "PMB" on the CD-ROM (supplied), install "PMB" also from the CD-ROM (supplied). • If a version of "PMB" under 5.0.00 has been installed on your computer, you may be unable to use some functions of those "PMB" when installing the "PMB" from the supplied CD-ROM. Also, "PMB Launcher" is installed from the supplied CD-ROM and you can start "PMB" or other software by using the "PMB Launcher." Double-click the "PMB Launcher" short-cut icon on the computer screen to start "PMB Launcher." 127GB Continued r
-
 1
1 -
2
-
3
-
4
-
5
-
6
-
7
-
8
-
9
-
10
-
11
-
12
-
13
-
14
-
15
-
16
-
17
-
18
-
19
-
20
-
21
-
22
-
23
-
24
-
25
-
26
-
27
-
28
-
29
-
30
-
31
-
32
-
33
-
34
-
35
-
36
-
37
-
38
-
39
-
40
-
41
-
42
-
43
-
44
-
45
-
46
-
47
-
48
-
49
-
50
-
51
-
52
-
53
-
54
-
55
-
56
-
57
-
58
-
59
-
60
-
61
-
62
-
63
-
64
-
65
-
66
-
67
-
68
-
69
-
70
-
71
-
72
-
73
-
74
-
75
-
76
-
77
-
78
-
79
-
80
-
81
-
82
-
83
-
84
-
85
-
86
-
87
-
88
-
89
-
90
-
91
-
92
-
93
-
94
-
95
-
96
-
97
-
98
-
99
-
100
-
101
-
102
-
103
-
104
-
105
-
106
-
107
-
108
-
109
-
110
-
111
-
112
-
113
-
114
-
115
-
116
-
117
-
118
-
119
-
120
-
121
-
 122
122 -
 123
123 -
 124
124 -
 125
125 -
 126
126 -
 127
127 -
 128
128 -
 129
129 -
 130
130 -
 131
131 -
 132
132 -
133
-
134
-
135
-
136
-
137
-
138
-
139
-
140
-
141
-
142
-
143
-
144
-
145
-
146
-
147
-
148
-
149
-
150
-
151
-
152
-
153
-
154
-
155
-
156
-
157
-
158
-
159
 |
 |